

There’s something incredibly satisfying about layering crispy, golden-brown katsu over a bed of steaming white rice, then drenching it in the sweet-savory embrace of rich Tonkatsu sauce. This Japanese Katsu Bowl isn’t just a meal—it’s a comforting hug in a bowl that brings together crunchy textures and bold flavors in perfect harmony. Each bite delivers that signature crunch from panko-breaded pork or chicken, followed by the light freshness of shredded cabbage and the zing of lemon. Whether you’re taking your first dive into Japanese home cooking or you’re a seasoned enthusiast, this bowl offers an accessible yet deeply rewarding experience in every forkful.
Beyond its irresistible taste, this dish shines for its simple prep and beginner-friendly techniques. With just 20 minutes of active preparation, 15 minutes of frying, and a brief 5-minute rest, you’ll have a restaurant-quality dinner on the table soon enough. Clocking in at around 600 calories per serving, it’s substantial enough for dinner but light enough for a satisfying lunch. The vibrant contrast of textures—from the crunchy katsu to the fluffy rice and crisp cabbage—makes each mouthful a delightful adventure. So grab your apron, summon your enthusiasm, and get ready to savor the crunchy goodness of Japanese Katsu in a heartwarming bowl!
KEY INGREDIENTS IN JAPANESE KATSU BOWLS WITH TONKATSU SAUCE
Before diving into the cooking process, let’s gather the stars of the show. These key ingredients work in concert to deliver that classic combination of crunch, flavor, and freshness. From the tender meat at the heart of the dish to the bright garnishes that finish it off, here’s what you’ll need:
- Boneless pork chops or chicken breasts
Providing the hearty protein base, these cuts are pounded to an even thickness for uniform cooking and maximum tenderness.
- All-purpose flour
This helps the egg adhere to the meat and creates the first layer of coating, ensuring the panko breadcrumbs stick beautifully.
- Eggs
Beaten to a silky consistency, the eggs act as a binding agent, gluing the panko to the meat for that signature crispy crust.
- Panko breadcrumbs
Japanese-style breadcrumbs give an extra-light, ultra-crispy texture that sets this katsu apart from the ordinary.
- Salt
A foundational seasoning that enhances the natural flavors of the meat and balances the sweetness of the Tonkatsu sauce.
- Black pepper
Adds a gentle warmth and subtle kick, rounding out the seasoning profile for a more complex taste.
- Vegetable oil
A neutral frying medium that achieves the perfect golden-brown color without overpowering the other flavors.
- Cooked white rice
The comforting, pillowy base that soaks up every drop of sauce, creating a harmonious balance of textures.
- Shredded cabbage
Provides a refreshing crunch and helps cut through the richness of the fried katsu with its light, crisp bite.
- Tonkatsu sauce
A tangy-sweet condiment (store-bought or homemade) that ties all the components together with its complex umami notes.
- Chopped green onions
Bright, fresh, and slightly pungent, these are the ideal finishing touch to elevate both flavor and presentation.
- Lemon wedges
Optional but highly recommended for adding a zesty pop that brightens each mouthful.
HOW TO MAKE JAPANESE KATSU BOWLS WITH TONKATSU SAUCE
Now that every ingredient is at the ready, it’s time to transform them into a bowl of pure joy. Follow these steps carefully to achieve that perfect crunch and balanced flavor:
1. Season the meat: Take your pounded pork or chicken and season both sides evenly with salt and black pepper, making sure every edge is lightly coated for balanced flavor throughout.
2. Set up a breading station: Arrange three shallow dishes side by side—one with flour, one with beaten eggs, and one with panko breadcrumbs—to streamline the dredging process and keep each stage tidy.
3. Dredge in flour: Place a piece of meat into the flour dish, turning to coat completely, then shake off any excess. This creates a dry surface for the egg to cling to.
4. Dip in egg: Transfer the floured meat to the egg dish, letting any extra drip off so you don’t end up with a soggy coating.
5. Press in panko: Finally, press the meat into the panko breadcrumbs, ensuring an even, thorough coating. Press gently but firmly to encourage the breadcrumbs to adhere.
6. Heat the oil: Pour about ½ inch of vegetable oil into a large skillet and heat it over medium-high. The oil is ready when a stray breadcrumb sizzles immediately on contact.
7. Fry to golden perfection: Carefully lay the breaded meat into the hot oil. Cook for about 3–4 minutes per side until the exterior turns a deep, crispy golden brown and the interior is fully cooked.
8. Drain and rest: Remove the katsu from the skillet and let it drain on a paper towel–lined plate for a moment. This keeps the coating crisp and absorbs excess oil.
9. Slice into strips: Using a sharp knife, slice the cooled katsu into even strips, perfect for layering over rice.
10. Build the bowls: Divide the cooked white rice among serving bowls, then pile on the shredded cabbage to add a refreshing crunch.
11. Finish and garnish: Arrange the katsu strips atop the cabbage, drizzle generously with Tonkatsu sauce, and sprinkle with chopped green onions. Add lemon wedges on the side if you’d like a citrusy lift.
SERVING SUGGESTIONS FOR JAPANESE KATSU BOWLS WITH TONKATSU SAUCE
Serving your katsu bowls is as fun as preparing them. A thoughtful presentation and a few complementary sides can elevate this dish from comforting home-cooking to a memorable dining experience. Whether you’re hosting friends for dinner or simply treating yourself to a delicious solo meal, these serving ideas will help you showcase your katsu bowls in all their glory. Think about color contrasts, flavor balances, and texture additions to create a well-rounded, visually appealing plate that will have everyone reaching for seconds.
- Serve alongside Japanese pickles (tsukemono) for a tangy, refreshing counterpoint to the rich fried meat and creamy cabbage. Thinly sliced cucumbers or daikon add both color and a lively crunch.
- Pair with a warm bowl of miso soup to round out the meal in classic Japanese style. The umami broth and tender tofu cubes are the perfect foil for the crispy katsu.
- Offer extra Tonkatsu sauce in a small dipping dish so everyone can customize the tangy-sweet intensity to their liking. This also adds an interactive element to the meal.
- Scatter toasted sesame seeds and a pinch of shichimi togarashi (Japanese seven-spice) over the top for a subtle heat and fragrant aroma that will make each bite unforgettable.
HOW TO STORE JAPANESE KATSU BOWLS WITH TONKATSU SAUCE
When it comes to preserving the crunch and flavor of your katsu bowls, proper storage is key. While the katsu itself tastes best fresh, you can still keep the components separate and fresh to enjoy later. Here are a few tried-and-true methods for stashing away your leftovers without sacrificing texture or taste.
- Refrigerate components separately: Store the fried katsu, rice, and cabbage in individual airtight containers. This prevents moisture transfer that can turn crunchy panko into a soggy coating.
- Cool completely before sealing: Allow each component to cool to room temperature before refrigerating. Trapping heat in a sealed container will create condensation, which can make the coating limp.
- Keep sauce on the side: Store the Tonkatsu sauce in a small, sealed jar or container. Adding the sauce right before serving ensures the katsu remains crisp.
- Freeze for longer storage: If you plan to enjoy your katsu bowls beyond a couple of days, wrap individual portions of cooked, cooled katsu tightly in plastic wrap and place them in a freezer bag. When ready to eat, reheat in a convection oven or toaster oven to restore the crisp texture.
CONCLUSION
This Japanese Katsu Bowl recipe is proof that you don’t need elaborate techniques or exotic ingredients to enjoy a restaurant-quality meal at home. By following a few simple steps—seasoning, breading, frying, and careful assembly—you’ll create a satisfying dish that balances crunch, flavor, and freshness in every bite. With just 20 minutes of prep, 15 minutes of cooking, and a short 5-minute rest, you’ll be digging into crispy katsu atop fluffy rice and crisp cabbage, all tied together by that irresistible Tonkatsu sauce. Perfect for lunch or dinner, this beginner-friendly bowl clocks in at around 600 calories and can easily be customized with tofu, extra veggies, or a homemade sauce blend. Feel free to print this article and tuck it into your recipe binder for easy reference. You’ll also find a helpful FAQ below to answer common questions about variations, substitutions, and troubleshooting.
If you try this recipe or have any questions as you cook, I’d love to hear from you! Let me know how your katsu turns out, share any twists you’ve added, or drop your favorite garnishing hacks in the comments. Your feedback and stories make this cooking journey even more fun, whether you’re curious about perfecting the panko crust or want tips on serving presentation. Don’t hesitate to reach out with comments, questions, or suggestions, and happy cooking!
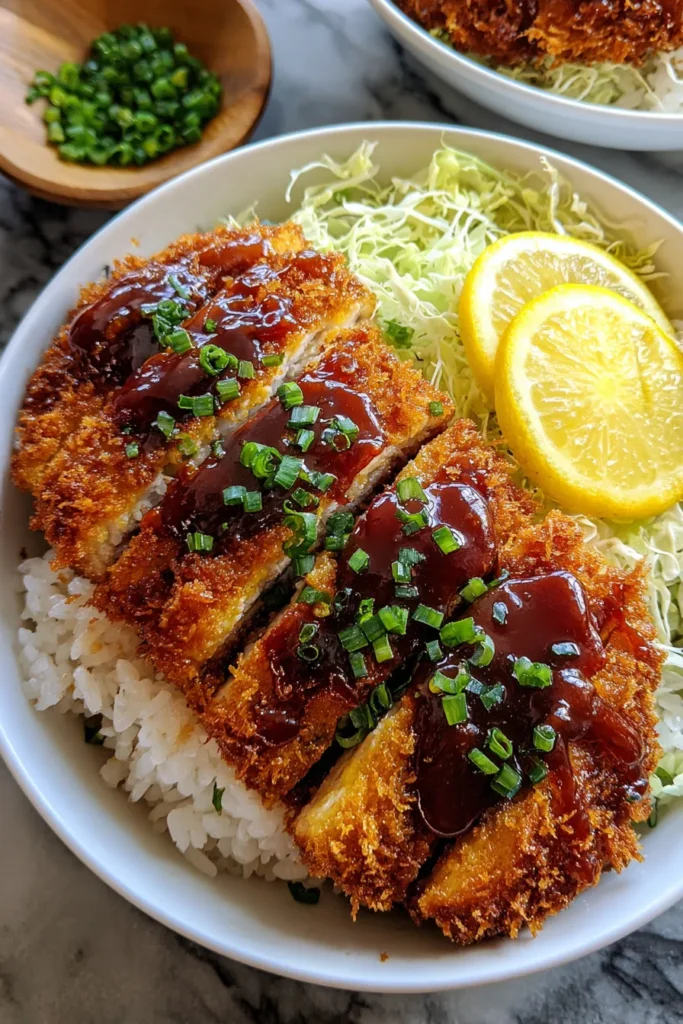

Japanese Katsu Bowls with Tonkatsu Sauce
Description
Experience the delightful crunch of perfectly breaded katsu served over fluffy rice, topped with fresh cabbage and zesty tonkatsu sauce for a satisfying meal.
Ingredients
Instructions
-
Begin by preparing the meat. Season the pork or chicken with salt and black pepper on both sides.
-
Set up a breading station with three separate shallow dishes. Place flour in the first dish, beaten eggs in the second, and panko breadcrumbs in the third.
-
Dredge the meat cuts in flour, ensuring they are coated evenly. Shake off any excess flour.
-
Dip them into the beaten eggs, allowing excess egg to drip off.
-
Finally, press them into the panko breadcrumbs, ensuring they are completely coated. Press gently to help the panko stick well.
-
Heat about 1/2 inch of vegetable oil in a large skillet over medium-high heat. The oil is ready when a breadcrumb dropped in sizzles upon contact.
-
Carefully place the breaded meat into the hot oil, cooking for about 3-4 minutes on each side or until golden brown and fully cooked through. Remove and let drain on a paper towel-lined plate.
-
Slice the cooked meat into strips.
-
To assemble the katsu bowls, divide the cooked rice into serving bowls. Place shredded cabbage on top.
-
Arrange the sliced katsu atop the cabbage and drizzle generously with Tonkatsu sauce.
-
Garnish with chopped green onions and serve with lemon wedges if desired.
Nutrition Facts
Serving Size 4
- Amount Per Serving
- Calories 150kcal
Note
- For a homemade Tonkatsu sauce, mix 1/2 cup ketchup, 2 tablespoons Worcestershire sauce, 1 tablespoon soy sauce, and 1 tablespoon sugar.
- Chicken can be substituted with tofu for a vegetarian version.
- Panko breadcrumbs create a crunchier texture than regular breadcrumbs.
- The pounded thickness of meat ensures even cooking and tenderness.
- Traditional Katsu is served with a simple cabbage slaw, but feel free to add other vegetables like carrots or snap peas for more variety.

