

There’s something irresistibly playful about turning juicy strawberries into tiny edible mummies for Halloween. These Spooky Chocolate-Covered Strawberry Mummies bring together the bright red of fresh fruit and the creamy white of melted chocolate in a delightfully eerie twist. Every bite offers the juicy burst of perfectly ripe strawberries, swathed in a silky blanket of white chocolate that chills on your tongue before melting into sweet, velvety perfection. The subtle sheen from a touch of coconut oil boosts the presentation—and the taste—giving each mummy a polished, professional look that’s sure to impress. Dipping each berry by hand, twisting it gently to coat in thick chocolate, you’ll feel like a dessert artist crafting little edible characters. It’s more than just a recipe; it’s a creative adventure in your own kitchen, perfect for sharing with family, friends, or spirited little ghouls eager for a festive treat. As you line them up on parchment paper, you’ll watch them transform into ghostly figures with mini chocolate chip eyes peeking out from a zig-zag of creamy frosting.
As someone who loves whipping up festive snacks, I can’t wait to unleash the Halloween fun with these charming chocolate-covered strawberry mummies! This beginner-friendly dessert has all the hallmarks of a perfect party treat: minimal prep, quick cook time, and a rest period that gives you just enough time to tame your ghostly playlist or carve that jack-o’-lantern. With only about 15 minutes of hands-on work and a swift 5 minutes of heating and dipping, you’ll give these juicy gems a 30-minute chill session before the magic is complete. In just under an hour, you have a platter of spooky cuteness that clocks in at around 200 calories for every 10 strawberries—ideal for indulging on Halloween night without guilt. This recipe falls squarely into the Beginner difficulty level and makes a delightful Dessert course for any eerie occasion. The combination of juicy berries and creamy white chocolate is satisfying on its own, but the playful mummy lines and chocolate chip eyes add that perfect spooky edge. Whether you’re hosting a haunted house party, surprising trick-or-treaters with something unexpected, or simply craving a festive snack, these mummies will bring smiles—and a few playful scares—to any gathering.
KEY INGREDIENTS IN SPOOKY CHOCOLATE-COVERED STRAWBERRY MUMMIES
Before you get started, let’s assemble the stars of the show. These simple ingredients work in harmony to deliver that signature mummy look and mouthwatering flavor. Here’s what you’ll need and why each item is so important:
- Fresh Strawberries
Ripe, firm strawberries form the juicy core of each mummy. Their natural sweetness and bright red color peek through the white chocolate stripes, adding both flavor contrast and visual appeal.
- White Chocolate Chips
These melt into a smooth, creamy coating that wraps each strawberry in a ghostly white blanket. The sweetness of the chips balances the berry’s tartness and creates the perfect base for the mummy drizzles.
- Coconut Oil or Vegetable Shortening
A little fat helps the chocolate melt more evenly and adds a glossy finish. It also prevents the white chocolate from solidifying too quickly, so you can achieve those neat, ribbon-like stripes.
- Mini Chocolate Chips
Tiny chips become the spooky eyes for each mummy. Their dark color pops against the white coating, giving each treat its playful, character-filled expression.
- Wax or Parchment Paper
Lining your baking sheet with a nonstick surface ensures the mummies set without sticking. It makes cleanup a breeze and keeps those delicate chocolate details intact.
HOW TO MAKE SPOOKY CHOCOLATE-COVERED STRAWBERRY MUMMIES
Ready to get your hands (and kitchen) delightfully messy? Below is a step-by-step guide to transform ordinary strawberries into spooky chocolate mummies:
1. Wash the strawberries thoroughly and pat them dry with paper towels. Ensuring they are completely dry is key, as any moisture will cause the chocolate to seize and become grainy.
2. Prepare a baking sheet by lining it with wax or parchment paper. This nonstick layer will let the mummies set perfectly without tearing the chocolate when you peel them off.
3. In a microwave-safe bowl, combine the white chocolate chips and coconut oil. Microwave in 30-second intervals, stirring between each session, until the chocolate is completely melted, smooth, and shiny.
4. Hold a strawberry by the stem or use a fork and gently dip it into the melted white chocolate, twisting it slightly to achieve an even coating.
5. Allow any excess chocolate to drip back into the bowl before placing the strawberry onto the prepared baking sheet.
6. Repeat the process with the remaining strawberries, lining them up on the paper to set.
7. After all strawberries are coated, spoon the remaining white chocolate into a small piping bag or use a resealable plastic bag with a tiny corner snipped off.
8. Drizzle the white chocolate over each strawberry in a zig-zag pattern to create the mummy wrap effect.
9. Before the chocolate sets completely, press two mini chocolate chips onto each strawberry for eyes, gently pushing them into the warm coating.
10. Let the strawberries sit at room temperature until the chocolate hardens, or place them in the refrigerator to speed up the setting process.
11. Once set, gently peel the strawberries off the parchment and serve immediately.
SERVING SUGGESTIONS FOR SPOOKY CHOCOLATE-COVERED STRAWBERRY MUMMIES
When these eerie little treats are ready, the fun doesn’t stop at the kitchen counter. Presentation is part of the magic, and a few clever touches can make your mummy strawberries even more memorable. Here are some playful ideas to inspire your Halloween spread:
- Plate on a Spooky Platter
Arrange the mummies on a dark or Halloween-themed platter. The contrast will make the white chocolate pops, and you can scatter a few edible candy bones or plastic spiders around the edge for extra creep factor.
- Garnish with Edible Glitter
Lightly dust the finished mummies with edible shimmer or fine sugar crystals. The sparkle catches candlelight and adds a mystical aura, turning each strawberry into a shining ghost.
- Pair with Warm Beverages
Offer a pot of hot apple cider or pumpkin spice tea alongside your platter. The fruity warmth complements the chilled berries, delivering a cozy contrast that guests will love.
- Arrange on Themed Picks
Insert Halloween-themed skewers or decorative toothpicks into the stems. These handy picks make it easy for guests to grab a mummy without smudging the chocolate and add a festive pop of color to your display.
HOW TO STORE SPOOKY CHOCOLATE-COVERED STRAWBERRY MUMMIES
Proper storage keeps your strawberry mummies looking fresh and prevents the chocolate from sweating or the berries from becoming mushy. Follow these tips to maintain flavor and texture:
For best results, store the mummies in a cool, dry part of your refrigerator. Placing them in an airtight container prevents odors from mingling and shields them from humidity.
- Refrigerate in an Airtight Container
Gently layer the strawberries in a single layer inside a container that seals tightly. This prevents air and moisture from causing condensation on the chocolate.
- Separate Layers with Parchment
If you need to stack multiple layers, insert pieces of parchment or wax paper between them. This ensures the mummies don’t stick together or rub off their delicate chocolate designs.
- Consume Within 24 Hours
Fresh strawberries release moisture over time, which can soften chocolate. For optimal texture and flavor, enjoy these mummies within one day of assembly.
- Avoid Excess Moisture
Don’t wash the strawberries again after coating. Any added water will make the chocolate dull or sticky. Keep them dry until you’re ready to serve.
CONCLUSION
All in all, these Spooky Chocolate-Covered Strawberry Mummies are proof that simple ingredients and a bit of creativity can produce a show-stopping Halloween treat. From the juicy burst of each ripe strawberry to the silky crunch of the white chocolate wrap, every element works in harmony to delight both the eyes and the taste buds. With minimal prep time, straightforward steps, and easy storage tips, this recipe is ideal for beginners and seasoned home chefs alike. Feel free to print this article and save it for later use—whether you’re planning a Halloween party, crafting classroom snacks, or simply want to delight trick-or-treaters with something unexpected. You’ll find all the details in one spot, including a handy FAQ below for troubleshooting and extra tips.
Now that you’ve read through how to make these little mummies, I’d love to hear from you! If you try this recipe, please leave a comment to share your spooky creations or any fun twists you dreamed up. Have questions about melting the chocolate just right? Need advice on making extra-shiny drizzles? Drop your feedback or ask away—I’ll be here to help every step of the way. Happy haunting and happy baking!
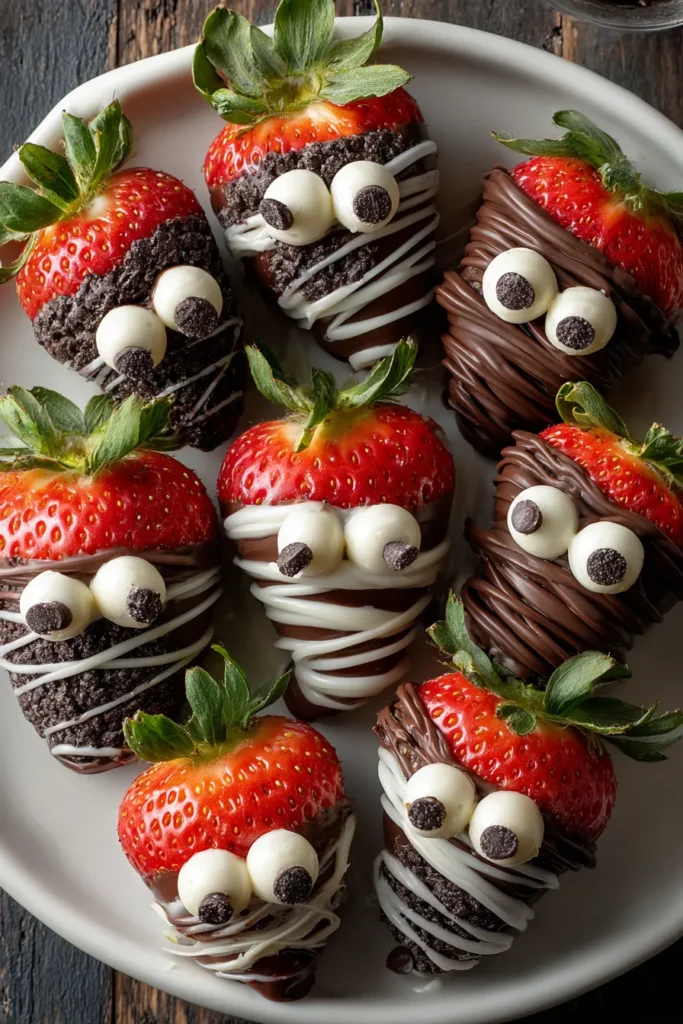

Spooky Chocolate-Covered Strawberry Mummies
Description
These spooky mummies are a delightful treat featuring juicy strawberries draped in creamy white chocolate, complete with spooky chocolate chip eyes. Perfect for Halloween festivities!
Ingredients
Instructions
-
Start by washing the strawberries thoroughly and patting them dry with paper towels. Ensure they are completely dry, as any moisture will cause the chocolate to seize.
-
Prepare a baking sheet by lining it with wax or parchment paper.
-
In a microwave-safe bowl, combine the white chocolate chips and coconut oil. Microwave in 30-second intervals, stirring in between, until the chocolate is fully melted and smoothed.
-
Hold a strawberry by the stem or use a fork and gently dip it into the melted white chocolate, twisting it slightly to get an even coating.
-
Allow any excess chocolate to drip back into the bowl before placing the strawberry onto the prepared baking sheet.
-
Repeat the process with the remaining strawberries.
-
After all strawberries are coated, spoon the remaining white chocolate into a small piping bag or a resealable plastic bag with a small hole cut in the corner.
-
Drizzle the white chocolate over each strawberry in a zig-zag pattern to create the mummy effect.
-
Before the chocolate sets completely, place two mini chocolate chips on each strawberry for eyes.
-
Let the strawberries sit at room temperature until the chocolate has hardened, or place them in the refrigerator to speed up the setting process.
-
Once set, gently peel the strawberries off the parchment and serve.
Nutrition Facts
Serving Size 8
- Amount Per Serving
- Calories 25kcal
Note
- Ensure strawberries are thoroughly dried, as moisture prevents chocolate from adhering properly.
- Variation in dipping intensity achieves creative mummy effects.
- Strawberries last 24 hours in the fridge, but best served fresh.
- Coconut oil adds shine to the chocolate and aids in melting, but can be replaced with vegetable shortening if preferred.

