

There’s something magical about fall desserts that wrap you up in a cozy blanket of warmth and comfort, and these Apple Crisp Mini Cheesecakes are the ultimate autumn indulgence. Each bite brings together the silky smoothness of cheesecake, the sweet pop of cinnamon-spiced apples, and a satisfyingly crunchy crumble that shatters beautifully with every forkful. You might think mini desserts are all fluff, but trust me, these little beauties pack a flavor punch that rivals any full-size treat. The buttery graham cracker crust sets the stage with its subtle sweetness and gentle crunch, while the creamy filling, gently sweetened with vanilla and sugar, holds the perfect tangy balance. When you top it all off with tender diced apples tossed in brown sugar and a sprinkle of cinnamon, you get a harmonious melody of textures and aromas that’ll make everyone lean in for that first nibble.
Beyond their irresistible taste, these mini cheesecakes are remarkably approachable for bakers of any level. With just about twenty minutes of hands-on prep, you’ll press crusts, whisk batters, and layer fruit in muffin cups, then let your oven work its magic for roughly half an hour. After a quick cool-down and a brief chill in the fridge, you’ll have a dozen petal-perfect pastries ready to impress at holiday gatherings, potlucks, or even a simple movie night at home. Whether you’re a seasoned baker looking for a show-stopping finale or a beginner eager to master a crowd-pleaser, this recipe guides you through each step with clarity and charm. So grab your apron, rally your inner dessert enthusiast, and let’s dive into the world of Apple Crisp Mini Cheesecakes!
KEY INGREDIENTS IN APPLE CRISP MINI CHEESECAKES
Before we get our hands dirty, let’s meet the team of ingredients that come together to make this dessert shine. Each component plays a special part—from laying the buttery foundation to layering in creamy richness, sweet-tart fruit, and that iconic crumble topping.
- Graham cracker crumbs: Provide a crisp, slightly sweet base that mimics the classic cheesecake crust. Their texture holds up under the filling while delivering a hint of honeyed flavor.
- Granulated sugar: Sweetens both the crust and the cheesecake batter without overwhelming the delicate tang of the cream cheese. It also helps the crust bind together when mixed with melted butter.
- Unsalted butter: Melted into the graham crumbs to create a firm, buttery crust that sets beautifully. Using unsalted butter lets you control overall saltiness.
- Cream cheese: The heart of your cheesecake filling. Its rich, velvety texture transforms the base into a luscious, creamy layer that contrasts wonderfully with the crisp topping.
- Vanilla extract: A little splash enhances all the flavors, bringing out the sweetness of the apples and the richness of the cream cheese.
- Eggs: Act as binders, giving structure to the cheesecake so it sets properly without cracking or weeping.
- Peeled and diced apples: Offer juicy sweetness and natural tartness that balances the rich cheesecake. Tart varieties like Granny Smith work especially well here.
- Ground cinnamon: Sprinkled with the apples and in the topping for that warm, spicy note that makes this dessert feel unmistakably autumnal.
- Light brown sugar: Adds a deeper, caramel-like sweetness both to the apple layer and to the crumble topping, enhancing complexity.
- All-purpose flour: The backbone of the crisp topping. When combined with sugar and butter, it creates those irresistible golden crumbs.
HOW TO MAKE APPLE CRISP MINI CHEESECAKES
With all your ingredients prepped and measured, you’re ready to transform simple pantry staples into twelve picture-perfect mini cheesecakes. Follow these steps in order, paying attention to each technique so your desserts come out flawless every time.
1. Preheat your oven to 325°F (165°C) and line a standard 12-cup muffin tin with paper liners to prevent sticking and make clean-up a breeze.
2. In a small bowl, combine the graham cracker crumbs and granulated sugar. Stir in the melted unsalted butter until the mixture holds together when pressed.
3. Divide the crumb mixture evenly among the muffin cups, then press down firmly with the back of a spoon or a small glass to form a compact crust layer in each cup.
4. In a medium bowl, beat the softened cream cheese until completely smooth. Add granulated sugar and vanilla extract, then continue beating until the mixture is silky and lump-free.
5. Add the eggs one at a time, beating just until each egg is incorporated—overmixing can introduce air pockets that lead to cracks.
6. Spoon the cheesecake batter over the crusts, filling each cup about two-thirds full to leave room for apples and topping.
7. In another bowl, toss the diced apples with ground cinnamon and light brown sugar until each piece is evenly coated in sweet spice.
8. Spoon the apple mixture on top of the cheesecake layer, distributing it so every mini cheesecake gets a generous fruit covering.
9. For the crisp topping: In a small bowl, mix together all-purpose flour, light brown sugar, and ground cinnamon. Cut in the cold, diced unsalted butter with a pastry cutter or fork until the mixture resembles coarse crumbs.
10. Sprinkle the crumb mixture evenly over the apple layer in each muffin cup, making sure to cover all the fruit.
11. Bake for 20–25 minutes, or until the cheesecakes are set around the edges and the topping turns a beautiful golden brown.
12. Let them cool in the pan for 10 minutes, then carefully transfer the liners to a wire rack to finish cooling completely.
13. Refrigerate the mini cheesecakes for at least 2 hours (or overnight) to achieve the best creamy texture before serving.
SERVING SUGGESTIONS FOR APPLE CRISP MINI CHEESECAKES
Once your mini cheesecakes have chilled to perfection, it’s time to think about presentation. These petite treats are fantastic on their own, but adding a few thoughtful garnishes and accompaniments can elevate them to showpiece status. Whether you’re sending them out as dessert at a holiday table or surprising a friend with homemade goodies, these ideas will help you serve them in style—complete with flavors and textures that complement the apples and creamy cheese.
- Drizzle with warm caramel sauce just before serving to add extra sweetness and a glossy finish. Simply heat store-bought caramel or whip up a quick homemade version, then use a spoon to zigzag lines across the tops.
- Top each cheesecake with a dollop of fresh whipped cream lightly sweetened and flavored with a hint of vanilla. The airy cream creates a lovely contrast against the dense filling and crunchy topping.
- Serve alongside a small scoop of vanilla bean ice cream or a spoonful of spiced gelato for a decadent pairing. The cold creaminess melds perfectly with the apples and cheesecake.
- Arrange on a decorative platter with a sprinkle of extra cinnamon or a few sprigs of fresh mint for color and aroma. Adding thin apple slices or candied pecans around the platter can turn your serving board into a true work of art.
HOW TO STORE APPLE CRISP MINI CHEESECAKES
These mini cheesecakes are just as versatile when it comes to storage as they are to serving. Whether you’re making them a day ahead for a party or saving leftovers for later, proper storage will preserve their flavor, prevent sogginess, and keep that crumble topping crisp. Here are a few reliable methods to keep your treats tasting their best.
- Refrigeration in an airtight container: After the cheesecakes have fully chilled, place them in a single layer inside a sealed container. This keeps them fresh for up to 5 days without drying out or absorbing other fridge odors.
- Layered separation: If you need to stack the mini cheesecakes, place a sheet of parchment or wax paper between layers to protect the topping and maintain the crumble’s texture.
- Freezing for longer storage: Arrange cooled mini cheesecakes on a baking sheet and freeze until firm, then transfer to a freezer-safe bag or container. They’ll keep for up to 1 month—just thaw in the refrigerator overnight before serving.
- Make-ahead assembly: For ultimate convenience, prepare the crust, filling, and fruit topping a day in advance, then refrigerate before adding and baking the crisp topping. This cuts down on day-of prep without sacrificing any flavor.
CONCLUSION
What a delightful journey we’ve taken, from gathering pantry staples to savoring the final bite of a perfectly balanced Apple Crisp Mini Cheesecake. We’ve explored each key ingredient—like the buttery graham crust and tangy cream cheese filling—understood how crisp-tender apple pieces bring natural sweetness, and mastered the art of creating that irresistible streusel topping. The step-by-step instructions guide you through preheating, pressing, beating, tossing, and baking, ensuring that every mini cheesecake sets up beautifully without a hitch. From prep time (just 20 minutes) to bake time (25 minutes) and the mandatory chill session (2 hours), this recipe is approachable even for beginner bakers, yet impressive enough to earn you bragging rights at any get-together. Remember, each petite dessert clocks in at around 220 calories, making portion control a breeze without sacrificing that sweet satisfaction.
Feel free to print this article and tuck it into your favorite recipe binder or keep it bookmarked for future reference—you’ll want to revisit this fall favorite season after season. Below, you’ll find a handy FAQ section to troubleshoot any questions, from preventing cracks to choosing the best apple varieties. If you give these mini cheesecakes a try, drop a comment or question! I’d love to hear how they turned out for you, learn about any creative twists you added, or help troubleshoot if you hit a snag along the way. Your feedback makes this recipe even sweeter, so let me know your thoughts and happy baking!
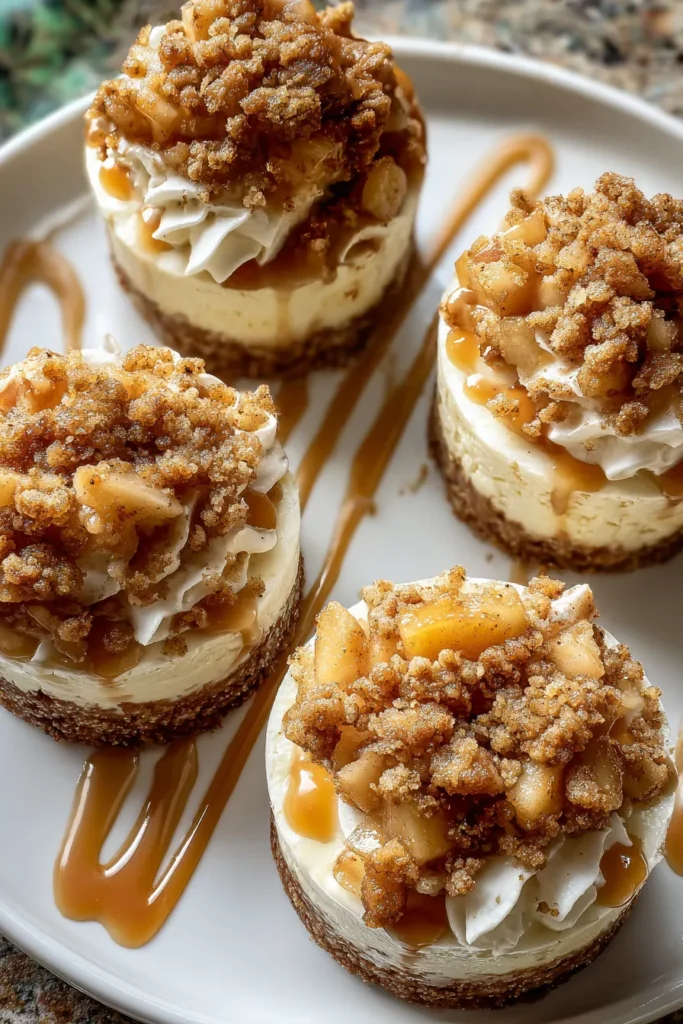

Apple Crisp Mini Cheesecakes
Description
These Apple Crisp Mini Cheesecakes combine creamy cheesecake with sweet apples and a deliciously crunchy topping. Each bite is a delightful balance of flavors and textures that will impress your guests.
Ingredients
Instructions
-
Preheat your oven to 325°F (165°C) and line a standard muffin tin with 12 paper liners.
-
In a small bowl, combine graham cracker crumbs and 2 tablespoons sugar. Stir in the melted butter until well combined.
-
Divide the crumb mixture evenly among the muffin cups, pressing down firmly to form a crust layer in each.
-
In a medium bowl, beat the cream cheese until smooth. Add 1/2 cup granulated sugar and vanilla extract, and continue beating until well combined.
-
Add the eggs one at a time, beating after each addition just until combined.
-
Spoon the cheesecake batter over the crust layer in the muffin cups, filling about 2/3 full.
-
In another bowl, toss the diced apples with 1/2 teaspoon cinnamon and 1/4 cup brown sugar until evenly coated.
-
Spoon the apple mixture evenly over the cheesecake layer in the muffin cups.
-
For the crisp topping: In a small bowl, mix together the flour, 1/3 cup brown sugar, and 1/2 teaspoon cinnamon. Cut in the diced cold butter using a pastry cutter or fork until the mixture resembles coarse crumbs.
-
Sprinkle the crumb mixture over the apple layer in each muffin cup, distributing evenly.
-
Bake in the preheated oven for about 20-25 minutes or until the cheesecakes are set and the topping is golden brown.
-
Let them cool in the pan for 10 minutes, then move to a wire rack to cool completely.
-
Refrigerate the mini cheesecakes for at least 2 hours before serving for the best texture.
Nutrition Facts
Serving Size 12
- Amount Per Serving
- Calories 18kcal
Note
- Use tart apples like Granny Smith for a balance of flavor.
- These mini cheesecakes can be stored in an airtight container in the fridge for up to 5 days.
- You can drizzle with caramel sauce as an optional garnish before serving.

