

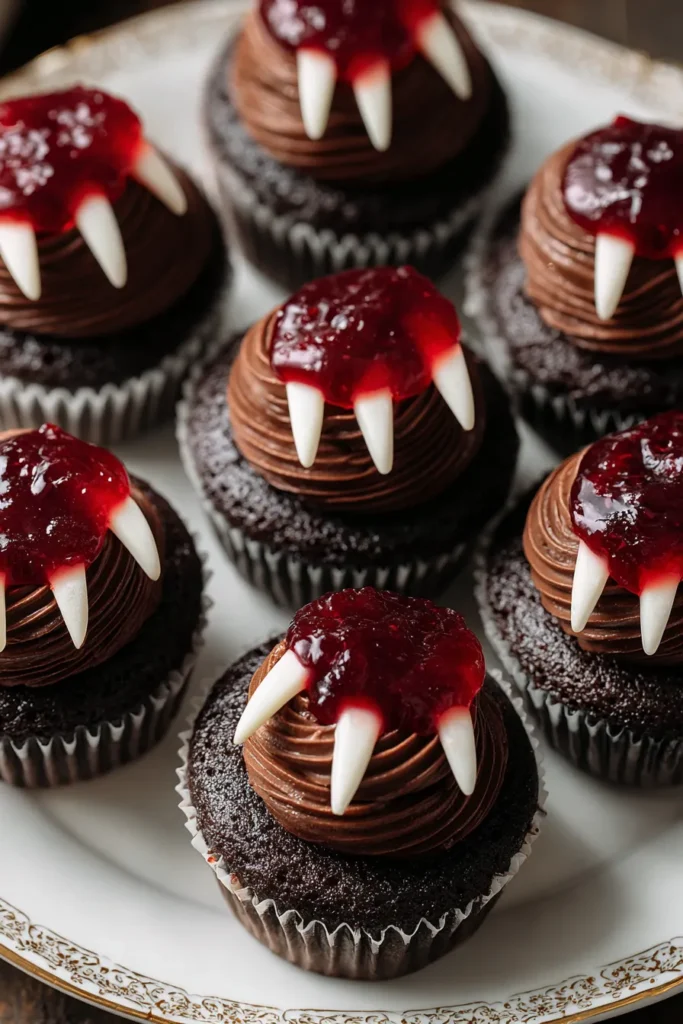
This Halloween season, I dove headfirst into crafting the most delightfully eerie dessert: Halloween Vampire Bite Cupcakes. From the moment I stirred the rich, cocoa-laden batter to the final flourish of plastic fangs and blood-red gel, my kitchen turned into a whimsical laboratory of spooky desserts and festive baking. These chocolate cupcakes aren’t just your everyday party treats—they’re an experience that thrills every chocolate lover’s senses. With a surprise raspberry filling that gushes out like a mini “blood bath” with each bite, these cupcakes are bound to be the star of your Halloween party. Whether you’re hosting ghoulish guests or sneaking a midnight snack, these intermediate-level cupcakes (250 calories each) offer a perfect balance of challenge and reward, with 20 minutes of prep, 20 minutes of bake time, and a brief 10-minute rest before decorating.
The magic truly happens when the cupcakes cool and you hollow out each little chocolate mound. Dying the jam with red gel food coloring gives that vibrant, spooky hue, and topping everything with pillowy whipped cream makes the contrast pop. I’ll never forget my nephew’s wide-eyed gasp when he bit into one—his face went from curious to delightedly terrified in seconds! Sprinkling on a dash of red glitter sugar (if you’re feeling extra adventurous) adds a haunting sparkle that ties the whole look together. These are more than just treats; they’re conversation starters. By the end, your guests will be clamoring for the recipe, and you’ll have created memories (and Instagram-worthy photos) that linger far beyond Halloween night.
KEY INGREDIENTS IN HALLOWEEN VAMPIRE BITE CUPCAKES
Before you summon the spirits of Halloween baking, let’s gather our fiendishly fabulous ingredients. Each component plays a crucial role, from the structure of the cupcake to the surprise “bleed” of fruity filling, ensuring every bite is rich, indulgent, and theatrically spooky.
- All-purpose flour
Provides the essential structure and body of the cupcake, creating a tender crumb that holds all the magical fillings and frostings.
- Granulated sugar
Sweetens the batter while contributing to a moist, soft texture that balances the deep chocolate flavor.
- Unsweetened cocoa powder
Delivers intense, chocolatey depth and a dark hue perfect for spooky desserts like vampire bites.
- Baking powder
Acts as the primary leavening agent, helping the cupcakes to rise tall and fluffy in the oven.
- Baking soda
Enhances lift and also interacts with the acidic buttermilk to tenderize the crumb.
- Salt
Balances sweetness and enhances the overall flavor, making the chocolate notes shine.
- Buttermilk
Adds a subtle tang and moisture, while reacting with baking soda for a lighter texture.
- Vegetable oil
Keeps the cupcakes tender and moist, ensuring they stay delicious even after chilling.
- Egg
Binds the ingredients together and provides structure, giving the cupcakes stability and a fine crumb.
- Vanilla extract
Infuses a warm, aromatic undertone that complements the rich chocolate base.
- Hot water
Blooms the cocoa powder, intensifying the chocolate flavor while creating a velvety, pourable batter.
- Red gel food coloring
Transforms the jam into a vivid “blood” red, heightening the vampire-bite illusion.
- Raspberry or strawberry jam
Acts as the surprise filling, oozing out when bitten into and adding a fruity contrast to the chocolate.
- Heavy cream
Whipped into peaks, it becomes the luscious topping that holds the decorative plastic fangs in place.
- Powdered sugar
Stabilizes the whipped cream and adds sweetness, ensuring firm, lasting peaks.
- Plastic fangs
Bring the final spooky flourish, creating the illusion of a chilling vampire bite.
HOW TO MAKE HALLOWEEN VAMPIRE BITE CUPCAKES
Ready to get your hands delightfully messy? This step-by-step guide will walk you through every detail, so you’ll produce cupcakes that are not only show-stopping but irresistibly tasty. Follow along for a seamless baking and decorating experience, perfect for any haunted gathering.
1. Preheat the oven to 350°F (175°C) and line a 12-cup muffin pan with festive cupcake liners. This ensures even baking and makes cleanup a breeze.
2. In a large bowl, whisk together the all-purpose flour, granulated sugar, unsweetened cocoa powder, baking powder, baking soda, and salt. Whisking well guarantees an evenly combined dry base.
3. Add the buttermilk, vegetable oil, egg, and vanilla extract to the dry mix. Mix until well combined, scraping down the sides for a smooth batter.
4. Gradually pour in the hot water while stirring. Continue mixing until the batter is completely smooth. Don’t worry about the thin consistency—it bakes up into a moist cupcake.
5. Fill each liner about two-thirds full with the chocolatey batter, allowing room for rise without overflowing.
6. Bake for 18–20 minutes, or until a toothpick inserted into the center comes out clean. The tops should spring back lightly when touched.
7. Let the cupcakes cool in the pan for 5 minutes. Then transfer them to a wire rack to cool completely before decorating.
8. Once cooled, use a small knife to cut a neat hole in the center of each cupcake, creating a pocket for the surprise filling.
9. Mix red gel food coloring into the raspberry or strawberry jam until you achieve a deep, blood-red hue. Spoon the colored jam into each hole and set aside the cupcake cutouts.
10. In a chilled bowl, whip the heavy cream with the powdered sugar until stiff peaks form, ensuring the whipped cream holds its shape.
11. Pipe or spread the whipped cream over each cupcake, fully covering the filled centers and sealing in the fruity “blood.”
12. Insert a pair of plastic fangs into the whipped cream at an angle to mimic a chilling vampire bite.
13. For an extra gore effect, drizzle additional colored jam around the fangs—just enough to look like fresh bite marks.
SERVING SUGGESTIONS FOR HALLOWEEN VAMPIRE BITE CUPCAKES
When it’s time to unveil your spooky creations, presentation makes all the difference. These serving ideas will elevate your Halloween cupcake display, making it as memorable as the taste itself. Whether you’re hosting a costume party or gathering around a dimly lit table, these tips will ensure your theme is cohesive, creepy, and utterly delicious.
- Themed Platter Display
Arrange the cupcakes on a dark, ornate serving tray or a blood-red platter to enhance the dramatic contrast of the whipped cream and jam. Surround the base with faux cobwebs or dried rose petals for a gothic touch.
- Ambient Lighting
Place flickering LED candles or small pumpkin lanterns around the serving table. The soft, dance-like light will cast eerie shadows on the cupcakes, making the “bleeding” effect more vivid.
- Mini Coffin Boxes
For individual servings, present each cupcake in a mini coffin-shaped box or paper sleeve. This charming detail adds a fun, interactive element as guests uncover their treats.
- Complementary Sips
Pair the cupcakes with a dark berry mocktail or a spiced hot cocoa. The fruity or cinnamon notes will harmonize beautifully with the chocolate and jam, leaving guests craving more.
HOW TO STORE HALLOWEEN VAMPIRE BITE CUPCAKES
Proper storage is essential to preserve the rich chocolate flavor, tender crumb, and fluffy whipped cream topping. Whether you’re prepping a day ahead or saving leftovers, these methods will keep your vampire bites as fresh and eye-catching as when they first came out of the oven.
- Refrigerate in an Airtight Container
Place the cupcakes in a single layer within a sealed container. This prevents the whipped cream from drying out and keeps the jam fresh. Consume within 2–3 days for optimal taste.
- Freeze Unfrosted Cups
If you want to get ahead of the haunting hustle, freeze the plain, cooled cupcakes (no jam or frosting) in a freezer-safe bag or container. Thaw at room temperature, then fill, frost, and decorate just before serving.
- Use a Cupcake Carrier with a Dome Lid
A dedicated carrier shields the cupcakes from fridge odors and accidental smudging. The dome also prevents the fangs and whipped topping from collapsing.
- Room-Temperature Short-Term
If serving within 4–6 hours, store the cupcakes at room temperature in a cool, dry spot away from direct sunlight. Cover loosely with plastic wrap to protect from dust while allowing slight airflow.
CONCLUSION
Congratulations—you’ve just mastered the art of creating spook-tacular Halloween Vampire Bite Cupcakes that strike the perfect balance between eerie aesthetics and mouthwatering flavor. From the foundational chocolate batter to the dramatic raspberry “blood” surprise, each step is designed to thrill your guests and satisfy their sweet cravings. This recipe serves as an enchanting addition to any Halloween spread, whether you’re an intermediate baker or simply love exploring festive baking projects. Don’t forget: you can easily print this article to keep the step-by-step guide at your fingertips or save it for future haunted occasions. The combination of cocoa richness, tangy jam, and airy whipped cream guarantees a crowd-pleaser every time, making these cupcakes the ultimate dessert course.
If you decide to tackle this recipe, please share your thoughts! Did the cupcakes vanish as quickly as a vampire at dawn? Are there any tricks or tweaks you’ve discovered along the way? Feel free to leave comments, questions, or feedback below—whether you need tips on achieving the perfect whipped-cream peaks or want advice on adding extra spooky flair. And if you’re curious about more chilling details, check out the FAQ section below for answers to common queries. Your baking journey doesn’t have to end here; I can’t wait to hear how these festive vampire bite cupcakes become a highlight of your Halloween festivities!

Halloween Vampire Bite Cupcakes
Description
These rich and chocolaty cupcakes ooze with a surprise raspberry filling and are topped with whipped cream and playful plastic fangs, making every bite eerily delightful.
Ingredients
Instructions
-
Preheat the oven to 350°F (175°C). Line a 12-cup muffin pan with cupcake liners.
-
In a large mixing bowl, whisk together the flour, sugar, cocoa powder, baking powder, baking soda, and salt.
-
Add the buttermilk, vegetable oil, egg, and vanilla extract to the dry ingredients and mix until well combined.
-
Gradually add the hot water and mix until the batter is smooth. The batter will be thin.
-
Fill the cupcake liners about 2/3 full with the batter.
-
Bake for 18-20 minutes or until a toothpick inserted into the center of a cupcake comes out clean.
-
Allow the cupcakes to cool in the pan for 5 minutes, then transfer them to a wire rack to cool completely.
-
Once cooled, use a small knife to cut a small hole in the center of each cupcake.
-
Mix a few drops of red gel food coloring with the raspberry or strawberry jam and fill each hole with a spoonful of the colored jam. Set aside the tops to cover the holes once filled.
-
In a mixing bowl, whip the heavy cream with powdered sugar until stiff peaks form.
-
Pipe or spread the whipped cream on top of each cupcake.
-
Place a pair of plastic fangs into the whipped cream at an angle to look like vampire bites.
-
Drizzle a little more of the red gel-colored jam for a blood effect around the fangs if desired.
Nutrition Facts
Serving Size 12
- Amount Per Serving
- Calories 21kcal
Note
- These cupcakes are not only spooky but deliciously rich and chocolaty.
- You can use store-bought cupcakes as a shortcut and focus on decorating.
- Try mixing in some red glitter sugar for an extra spooky sparkle.
- The jam filling serves as a surprise "bleeding" effect when bitten into.

