

There’s something truly magical about blending crunchy candy chunks, velvety peanut butter, and silky chocolate into bite-sized confections that feel like little celebrations in your mouth. Decadent Crispy Chocolate-Dipped Butterfinger Balls manage this alchemy effortlessly: the crisp shards of candy bar mingle with the creamy chew of peanut butter and powdered sugar, then get a luxurious milk chocolate coat that cracks and melts at every bite. Whether you’re planning a festive dessert table for friends or a cozy weekend treat, this no-bake gem is a breeze to prepare and only needs about 15 minutes of hands-on work before it chills. The simplicity belies a treat that tastes far more intricate, with crunchy peanut butter pearls hugged by a gloss of milk chocolate, each piece carrying around 320 calories of pure bliss. As a home cook who treasures effortless yet impressive desserts, I love how this beginner-friendly recipe transforms just six ingredients into a crowd-stopping dessert that’s ready in under an hour.
One of my favorite memories with this recipe involves my nephew, who’s notorious for refusing vegetables but can’t resist anything with chocolate. He insisted on wearing his tiny apron, crushed Butterfinger bits ended up everywhere, and we giggled as our fingers turned golden with peanut butter. Those sticky hands flipping balls lined up in neat rows taught me that cooking together doesn’t just create treats—it creates moments. And the best part? Seeing the delight on everyone’s faces when they took that first bite, their eyes widening at the unexpected crunch playing hide-and-seek inside smooth frames of peanut butter and powdered sugar. Since then, I’ve made these Butterfinger balls for holiday cookie exchanges, late-night study sessions, and even impromptu neighborhood potlucks. They always feel like a sweet victory lap, a quick fix for any chocolate craving. As we move through the recipe in the sections below, you’ll see just how straightforward this process is—and maybe even be inspired to host your own candy-party adventure.
KEY INGREDIENTS IN DECADENT CRISPY CHOCOLATE-DIPPED BUTTERFINGER BALLS
Every great recipe starts with ingredients that bring unique magic to the table. In these Butterfinger balls, each element plays a crucial role: the candy brings a satisfying crunch, peanut butter adds creamy richness, powdered sugar binds everything together, and melt-in-your-mouth chocolate creates a glossy finish. Let’s meet our star players:
- Crushed Butterfinger candy bars
Offers toasted, crispy clusters of flaky candy center that deliver the signature crackle in every bite. These shards provide the texture contrast that makes each ball so addictively crunchy.
- Creamy peanut butter
Acts as the rich, velvety binder that envelops the candy pieces, infusing each ball with a nutty warmth while keeping the mixture pliable for shaping.
- Powdered sugar
Delivers a smooth sweetness and helps thicken the mixture into a dough-like consistency, ensuring your balls hold their shape without any baking required.
- Vanilla extract
Just a splash brings fragrant depth and a mellow, aromatic sweetness that rounds out the overall flavor profile.
- Milk chocolate chips
Melt into a luscious coating around each ball, creating a creamy shell that snaps deliciously when you sink your teeth in.
- Coconut oil
Thins out the chocolate for a shiny, even finish and prevents the coating from setting too stiffly, guaranteeing a silky mouthfeel.
HOW TO MAKE DECADENT CRISPY CHOCOLATE-DIPPED BUTTERFINGER BALLS
Now that we’ve assembled our ingredients, let’s walk through the simple, no-bake process that turns them into indulgent Butterfinger balls. Each step is crafted to ensure maximum flavor and texture, from forming your candy-peanut butter centers to dipping them in luscious melted chocolate.
1. Begin by gathering all your ingredients and utensils. You will need a mixing bowl, a baking sheet lined with parchment paper, and a microwave-safe bowl for melting chocolate. Laying everything out first keeps your workspace organized and the process seamless.
2. In the mixing bowl, combine the crushed Butterfinger candy bars, creamy peanut butter, powdered sugar, and vanilla extract. Use a sturdy spatula or your hands to mix thoroughly until the ingredients form a thick, uniform dough that’s easy to mold.
3. Once the mixture is combined, use your hands to form small balls, about 1 inch in diameter. Roll the mixture in your palms for smooth edges, then place each one onto the prepared baking sheet, spacing them evenly to prevent sticking.
4. After shaping the balls, place the baking sheet in the freezer for about 30 minutes. This step is crucial: firm centers handle the dipping process better and absorb less melted chocolate.
5. While the Butterfinger balls chill, prepare the chocolate coating. In your microwave-safe bowl, combine the milk chocolate chips and coconut oil. Microwave in 30-second intervals, stirring between each batch, until the chocolate is fully melted and smooth.
6. When the balls are firm, remove the sheet from the freezer. Dip each ball into the melted chocolate, using a fork to ensure full coverage. Lift out and gently tap the fork against the bowl edge to let any excess chocolate drip off.
7. Return the chocolate-dipped Butterfinger balls to the parchment-lined baking sheet. If you want some extra flair, sprinkle crushed Butterfinger pieces or a pinch of sea salt on top before the coating sets.
8. Allow the chocolate to harden at room temperature, or speed up the process by placing the sheet back in the refrigerator. Once the shell is fully set, serve your delights at room temperature or store them in an airtight container in the fridge until you’re ready to enjoy.
SERVING SUGGESTIONS FOR DECADENT CRISPY CHOCOLATE-DIPPED BUTTERFINGER BALLS
Now that your Butterfinger balls are beautifully coated and fully set, let’s talk about showcasing them in style. These little munchkins are the ultimate crowd-pleaser, so whether you’re dressing up a dessert platter at a birthday bash, creating a sweet centerpiece for a baby shower, or offering late-night study snacks, they always steal the spotlight. With just a few simple touches—like color-coordinated serving dishes, festive toothpicks, or artful layering on tiered stands—you can transform these treats into an irresistible focal point. Picture layering them on a vintage cake stand draped with lace doilies to evoke nostalgic charm, or arranging them on rustic wooden boards sprinkled with sea salt and cocoa powder for a modern twist. Hosting a movie night? Pile them into glass jars alongside popcorn and candy for a fun snack table. For a sophisticated adult gathering, serve them on slate trays accompanied by dark chocolate truffles and a decanter of port wine, inviting guests to explore contrasting textures and flavors. Even setting up a self-serve Butterfinger ball bar with dipping sauces and toppings lets guests customize their own bites, sparking conversation and delight.
- Colorful Dessert Platters
Arrange the balls on vibrant trays with fresh berries and mint sprigs to add pops of color. The contrast enhances their golden-peanut-butter hue and makes each platter Instagram-worthy.
- Tiered Display Stand
Stack your Butterfinger balls on a multi-level cake stand for elegant height and visual interest. Layer the tiers with doilies or edible petals for a refined finish.
- Interactive Topping Bar
Set out small bowls of extra crushed Butterfinger, chopped nuts, sprinkles, and flaky sea salt. Guests can personalize each bite, creating a playful station that doubles as decoration.
- Gourmet Pairings
Serve alongside espresso shots, sweet dessert wine, or rich hot chocolate. The warm beverages accentuate the chocolate shell’s snap and highlight the peanut butter’s creamy warmth.
HOW TO STORE DECADENT CRISPY CHOCOLATE-DIPPED BUTTERFINGER BALLS
These Butterfinger balls taste at their best when enjoyed fresh, but life happens, and sometimes you need to prepare ahead or stash leftovers. Storing them properly preserves texture—the crunch of candy and snap of chocolate—and keeps that creamy peanut butter center from weeping or becoming too hard. Whether you’re chilling them for tomorrow’s office snack or freezing extra batches for future cravings, following a few storage tips will maintain their flavor and look. Storing at the right temperature and with the correct airflow is essential: too warm, and chocolate softens into a melty mess; too cold or humid, and you risk condensation that dulls the glossy sheen. To ensure every ball stays perfect, use airtight containers lined with parchment paper, adding layers of separation to prevent sticking. For a quick grab-and-go stash, keep a batch in the fridge on the middle shelf away from strong odors—chocolate easily absorbs scents. Planning ahead? Freeze individual servings wrapped tightly, then thaw on the counter for an indulgent countdown. For moisture control, a small food-safe silica packet or a pouch of dry rice in a breathable bag can soak up excess humidity and keep the shell crisp.
- Airtight Refrigerator Storage
Layer balls in a sealed container lined with parchment, then store on the middle fridge shelf for up to one week. This keeps the peanut butter center creamy and the chocolate shell firm.
- Room Temperature Holding
In a cool, dry pantry or cupboard, place the balls in a well-sealed tin for up to two days. Avoid direct sunlight or heat sources that can soften the coating.
- Freezer Preservation
Flash-freeze the balls on a sheet pan for one hour, then transfer to a freezer-safe bag or container. Store for up to one month and thaw at room temperature for 10–15 minutes before serving.
- Layered Protection
Whenever you stack multiple layers in a container, insert thin sheets of parchment or wax paper between each level. This prevents sticking and preserves the crisp edges of your chocolate shells.
CONCLUSION
From the first crackle of Butterfinger chunks to the smooth embrace of melted milk chocolate, these Decadent Crispy Chocolate-Dipped Butterfinger Balls encapsulate everything we love about simple, no-bake desserts: speed, flavor, and that satisfying crunch that keeps us reaching for seconds. With just six ingredients and a beginner-friendly technique, you can whip up a batch in under an hour—spending about 15 minutes mixing, 30 minutes chilling, and the rest enjoying them at your next gathering or cozy night in. Whether you’re an experienced home cook looking for a quick sweet fix or a kitchen novice in search of an impressive yet fuss-free recipe, this guide is designed to walk you through every step, from ingredient prep to chocolate-dipping mastery. Feel free to print this article and tuck it into your recipe binder or bookmark it online so you can revisit it whenever that chocolate craving hits. We’ve covered ingredient essentials, detailed step-by-step instructions, creative serving suggestions, and foolproof storage tips—everything you need to make, present, and preserve these delightful treats. The next time you need a dessert for a party, kids’ playdate, or simply a self-indulgent moment, remember these Butterfinger balls. In the sections below, you’ll find a handy FAQ to troubleshoot any questions that might pop up—everything from allergy swaps to chocolate-coating consistency.
Thank you for joining me on this chocolate-peanut-butter adventure! If you give this recipe a spin, let me know how it goes in the comments: did you add a twist of sea salt, experiment with white chocolate, or customize toppings for a theme party? Your feedback—thoughts on texture, flavors, or any clever variations you discover—makes the kitchen conversation so much richer. And if you hit any snags, whether it’s a chocolate seizing up or balls sticking together, I’m here to help. Please scroll down to the FAQ for quick answers to common queries, but feel free to leave a personalized comment below if you crave extra guidance. Questions, feedback, or adorable photos of your finished Butterfinger balls? Share them—I can’t wait to hear from you and celebrate every crunchy, chocolatey success!
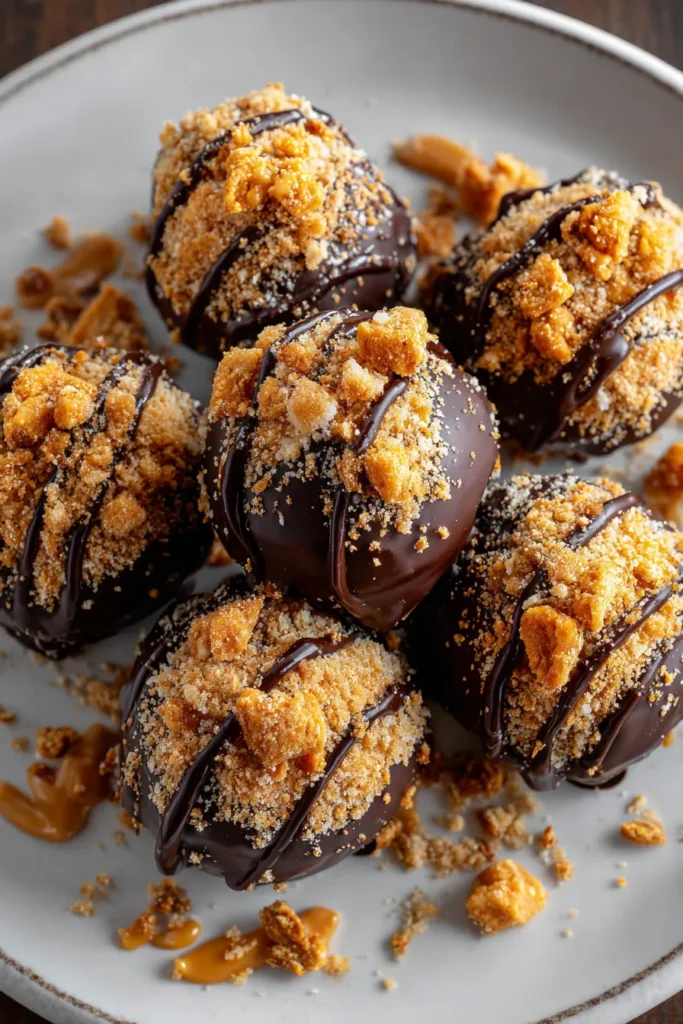

Decadent Crispy Chocolate-Dipped Butterfinger Balls
Description
These irresistible Butterfinger balls combine the crunch of candy with smooth peanut butter, all wrapped in rich chocolate. They're little bites of bliss!
Ingredients
Instructions
-
Begin by gathering all your ingredients and utensils. You will need a mixing bowl, a baking sheet lined with parchment paper, and a microwave-safe bowl for melting chocolate.
-
In a mixing bowl, combine the crushed Butterfinger candy bars, creamy peanut butter, powdered sugar, and vanilla extract. Mix everything together until well combined. The mixture should be thick and easy to mold with your hands.
-
Once the mixture is combined, use your hands to form small balls, about 1 inch in diameter. Place the formed balls onto the lined baking sheet, keeping them spaced evenly apart.
-
Once all of the Butterfinger balls are shaped, place the baking sheet in the freezer for about 30 minutes. This will help them firm up and make chocolate dipping easier.
-
While the Butterfinger balls are chilling, prepare the chocolate coating. In a microwave-safe bowl, combine the milk chocolate chips and coconut oil. Microwave in 30-second intervals, stirring in between, until the chocolate is fully melted and smooth.
-
Once the Butterfinger balls are firm, remove them from the freezer. Dip each ball into the melted chocolate, ensuring they are fully coated. Use a fork to lift them out and let any excess chocolate drip off.
-
Place the chocolate-dipped Butterfinger balls back onto the parchment-lined baking sheet. If desired, you can sprinkle some crushed Butterfinger or sea salt on top for added flavor and decoration before the chocolate sets.
-
Allow the chocolate to harden at room temperature, or you can place them back in the refrigerator to speed up the process. Once set, serve them at room temperature, or store them in an airtight container in the refrigerator until ready to enjoy.
Nutrition Facts
Serving Size 12
- Amount Per Serving
- Calories 27kcal
Note
- These Butterfinger balls are a great treat for parties or holiday gatherings.
- Feel free to experiment with different types of chocolate, such as dark or white chocolate, for coating.
- You can also try adding a pinch of salt to the chocolate mixture for a sweet and salty flavor contrast.
- These treats can be made ahead of time and stored in the fridge for up to a week, making them perfect for meal prep!
- Make sure to check for allergies if you're sharing these with others, as they contain peanut butter.

