

Crisp cucumber and hearty chickpeas get cozy inside soft whole wheat pita pockets, all drizzled with a creamy yogurt-tahini dressing and brightened up by fresh parsley. This light yet satisfying lunch is a perfect balance of crunchy veggies, tender protein, and tangy flavors that’ll have you reaching for seconds—no heavy cooking required. Whether you’re meal-prepping for the week or need a quick, nourishing bite, these stuffed pitas are your new go-to. Let’s dive in and get you stuffing!
Key Ingredients
Here’s everything you need to bring these stuffed pita pockets to life. Each ingredient plays a simple yet essential role in creating that perfect blend of taste, texture, and nutrition.
- 4 whole wheat pita breads: Soft, fibrous pockets that hold the filling together while adding a nutty base.
- 1 cup canned chickpeas, drained and rinsed: Protein-packed legumes that bring a hearty, creamy texture.
- 1 large cucumber, diced: Crisp, hydrating crunch that keeps every bite refreshingly light.
- 1 medium tomato, diced: Juicy sweetness to contrast the tangy yogurt-tahini dressing.
- ¼ red onion, finely chopped: Sharp, aromatic bite that balances the milder flavors.
- ½ cup plain Greek yogurt: Creamy base for the dressing, adding tang and richness.
- 2 tablespoons tahini: Nutty depth that enriches the yogurt dressing with sesame flavor.
- 1 tablespoon lemon juice: Bright acidity that lifts and unifies all the flavors.
- 2 tablespoons fresh parsley, chopped: Herbaceous freshness that gives a burst of green flavor.
- Salt and pepper to taste: Essential seasoning to enhance all ingredients.
- Optional: Feta cheese, crumbled (for garnish): Salty creaminess for an extra layer of richness.
How To Make Fresh Cucumber and Chickpea Stuffed Pita Pockets
Ready to assemble these vibrant pitas? You’ll move through a few simple prep stations—mixing your filling, whisking up the dressing, folding everything together, and stuffing those pita pockets. In under half an hour, you’ll have a rainbow of flavors and textures waiting to be devoured.
1. In a large mixing bowl, combine the drained chickpeas, diced cucumber, diced tomato, and finely chopped red onion. Use a spoon to gently toss so nothing breaks down too much.
2. In a separate bowl, whisk together the Greek yogurt, tahini, lemon juice, salt, and pepper. Taste and adjust seasoning—a little more lemon or salt can really brighten the mixture.
3. Pour the yogurt-tahini dressing over the chickpea-vegetable mix, then gently fold with a spatula until every piece is evenly coated.
4. Stir in the fresh parsley, evenly distributing those green flecks for a pop of color and herbaceous flavor.
5. Use a sharp knife to cut each pita bread in half, creating two open pockets from each round.
6. Carefully spoon the chickpea filling into each pita pocket, making sure you get a balanced portion of veggies and chickpeas.
7. If you like, sprinkle crumbled feta cheese on top of the filling to add a creamy, salty finish.
8. Serve your stuffed pitas right away for the best texture, or refrigerate them for 30 minutes to let the flavors meld and intensify.
Serving Suggestions
These stuffed pita pockets are delicious on their own, but here are some fun ways to elevate your meal presentation:
- Paired with a crisp side salad: A simple green salad tossed in lemon vinaigrette complements the creamy pitas beautifully.
- Alongside pickled vegetables: Quick-pickle some carrots or radishes for a tangy, crunchy contrast.
- Garnished with extra herbs: Sprinkle more parsley or a few mint leaves on the platter for a fresh, inviting look.
- Plated with dipping sauces: Offer small bowls of extra yogurt-tahini or hot chili sauce for guests to customize their pockets.
Tips For Perfect Fresh Cucumber and Chickpea Stuffed Pita Pockets
These pita pockets are a breeze to make, and with a few friendly pointers, you can take them to the next level. From ingredient swaps to timing tricks, here’s how to ensure every bite is just right.
- This dish is not only refreshing but also packed with protein and fiber, making it a well-rounded meal.
- You can add other vegetables like bell peppers or avocado for even more flavor and texture.
- These pita pockets can be made ahead of time for a quick lunch or healthy snack—just keep components separate until serving.
- For a zesty twist, try adding crushed garlic or a sprinkle of paprika to the filling for extra depth.
How To Store It
Whether you’re prepping for tomorrow’s lunch or saving leftovers, proper storage keeps your pita pockets tasting fresh:
- Store the filling and pita breads separately in airtight containers in the refrigerator for up to 2–3 days.
- Keep chopped cucumbers and tomatoes lightly salted in a separate container to prevent sogginess.
- When you’re ready to eat, assemble the pockets so the bread stays soft and doesn’t get damp.
- For grab-and-go convenience, wrap assembled pitas in parchment paper and secure with a sticker or twine.
Frequently Asked Questions
Here are some quick answers to common questions about these stuffed pita pockets:
- How long does it take to prepare this recipe?
It takes about 20–25 minutes to prepare the Fresh Cucumber and Chickpea Stuffed Pita Pockets. This includes draining and rinsing the chickpeas, dicing the cucumber, tomato, and red onion, whisking together the yogurt-tahini dressing, assembling the filling, and stuffing the pita pockets.
- Can I use dried chickpeas instead of canned?
Yes, you can use dried chickpeas, but you will need to soak them overnight and then cook them until tender before using. Make sure to drain and cool them completely before combining with the vegetables and dressing to prevent the filling from becoming watery.
- How can I make this recipe vegan?
To make the recipe vegan, replace the plain Greek yogurt with a dairy-free yogurt alternative, such as coconut or almond yogurt. If you want to omit dairy entirely, you can also skip the feta garnish or use a plant-based crumbled cheese instead.
- What’s the best way to store leftovers?
Store any leftover filling and pita separately in airtight containers in the refrigerator for up to 2–3 days. Assemble the pita pockets just before serving to keep the bread from becoming soggy. You can also wrap filled pitas in parchment paper for a grab-and-go lunch.
- Can I prepare components ahead of time?
Absolutely. You can chop the vegetables and prepare the dressing a day in advance. Keep the components chilled in separate containers. When you’re ready to serve, simply mix everything together, stir in the parsley, and fill the pita pockets.
- What are some flavor variations or add-ins?
You can enhance the flavor by adding minced garlic or a pinch of paprika to the dressing for extra zing. Sliced bell peppers, diced avocado, or shredded carrots also make great additions. For extra heat, a dash of cayenne or chopped jalapeño works well.
- How can I serve these pita pockets for a party?
For a party, cut the stuffed pitas into halves or thirds and arrange them on a platter. Garnish with extra parsley and crumbled feta on top. Provide small bowls of additional yogurt-tahini sauce and lemon wedges so guests can customize their servings.
What Makes This Special
This recipe works like a charm because it’s effortlessly balanced: the creamy, tangy dressing ties together crunchy veggies and tender chickpeas, all snug inside a warm whole wheat pita. It’s a fun, hands-on lunch that feels fancy but comes together in minutes—perfect for weeknight meals or weekend gatherings. Feel free to print this out and tuck it into your favorite recipe binder. Got questions, tweaks, or just want to share how it turned out? Drop a comment below—I’d love to hear your feedback or lend a hand if you need any help!
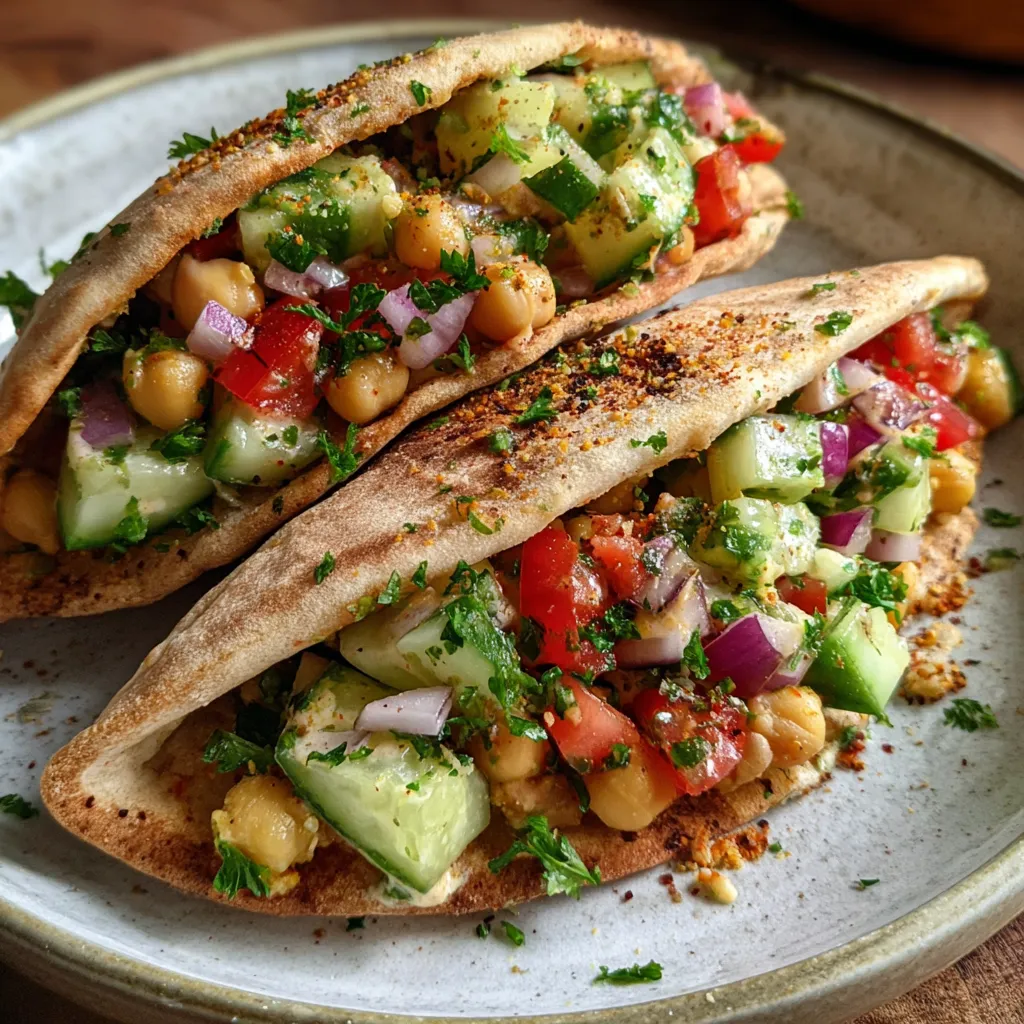

Fresh Cucumber and Chickpea Stuffed Pita Pockets
Description
Bite into soft whole wheat pita pockets overflowing with crunchy cucumber, juicy tomato, and tender chickpeas coating each mouthful in tangy yogurt-tahini goodness, highlighted by aromatic parsley and optional crumbly feta.
Ingredients
Instructions
-
Begin by preparing the filling. In a mixing bowl, combine the drained chickpeas, diced cucumber, diced tomato, and chopped red onion.
-
In a separate bowl, create the dressing by whisking together the Greek yogurt, tahini, lemon juice, salt, and pepper. Adjust the seasoning according to your taste preference.
-
Pour the yogurt-tahini mixture over the chickpea and vegetable mixture. Gently fold the ingredients together until everything is well-coated and mixed.
-
Stir in the chopped parsley for a fresh flavor burst.
-
Cut each pita bread in half to create pockets.
-
Carefully spoon the chickpea filling into each pita pocket, ensuring an even distribution.
-
If desired, sprinkle crumbled feta cheese on top of the filling for added richness.
-
Serve immediately or refrigerate for 30 minutes to allow the flavors to meld. Enjoy!
Nutrition Facts
Serving Size 4
- Amount Per Serving
- Calories 48kcal
Note
- This dish is not only refreshing but also packed with protein and fiber.
- You can add other vegetables like bell peppers or avocado for even more flavor and texture.
- These pita pockets can be made ahead of time for a quick lunch or healthy snack.
- For a zesty twist, try adding crushed garlic or a sprinkle of paprika to the filling.

