Nutrition Facts
Serving Size 24
- Amount Per Serving
- Calories 8kcal

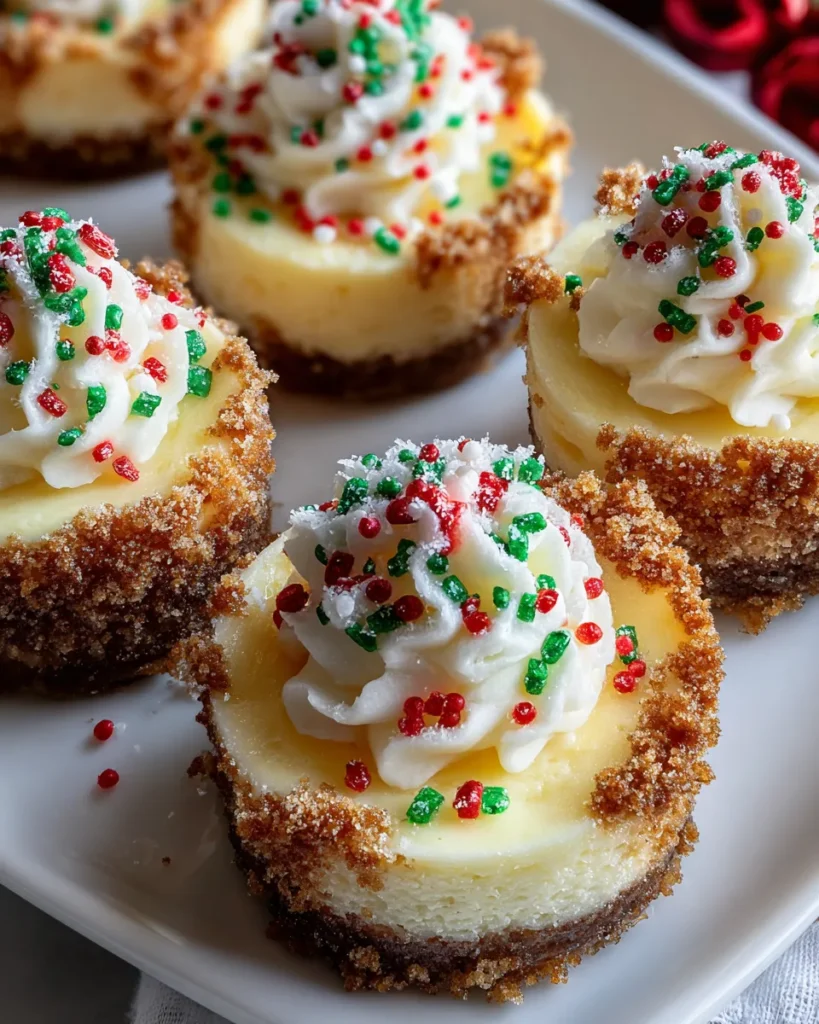
Holiday baking should be fun, not stressful, and that is exactly why I adore these bite-sized treats. There is something incredibly satisfying about a dessert that delivers all the creamy richness of a classic cheesecake without the worry of water baths or cracked tops. These little gems feature a buttery graham crust and a smooth peppermint cream topping that brings immediate festive cheer to any party platter. Whether you are an experienced baker or just looking for a simple sweet to share with neighbors, this recipe is guaranteed to spread joy and disappear quickly from the dessert table.
Creating these festive delights requires just a handful of pantry staples and dairy favorites that you likely already have during the holiday season. The magic lies in the balance between the crunchy, buttery base and the tangy, sweet filling. Everything comes together to create that perfect bite of Christmas cheer, so let’s gather what we need to get started on these crowd-pleasing sweets.
Making these mini cheesecakes is a surprisingly straightforward process that yields impressive results without the hassle of a full-sized cake. The method is broken down into three simple stages: creating the crust, mixing the batter, and whipping up the festive topping. What I love most about this recipe is how forgiving it is; because they are small, they bake evenly and cool down quickly. You will want to handle the batter gently to avoid incorporating too much air, which ensures a dense and creamy texture. Just remember that patience is key when letting them cool, as this sets the structure perfectly for that final dollop of peppermint goodness.
1. Preheat your oven to 325°F (165°C) and line a muffin tin with cupcake liners or grease it well to prevent sticking.
2. In a medium bowl, combine the graham cracker crumbs, ⅓ cup granulated sugar, and melted butter, then mix until fully combined and the texture resembles wet sand.
3. Press about 1 tablespoon of the crumb mixture into the bottom of each muffin cup to form a crust, using a small cup or your fingers to pack it down tightly.
4. In a large bowl, beat the softened cream cheese with an electric mixer on medium speed until it is completely smooth and creamy, which usually takes about 2-3 minutes.
5. Gradually add ½ cup granulated sugar and vanilla extract, continuing to beat the mixture until everything is well combined.
6. Add the eggs, one at a time, beating well after each addition to ensure they are fully incorporated into the batter.
7. Mix in the sour cream until the mixture is smooth and fluffy, ensuring there are no lumps remaining.
8. Divide the cream cheese mixture evenly among the muffin cups, filling each one about ¾ full to allow room for slight rising.
9. Bake in the preheated oven for 18-20 minutes or until the edges are set and the centers are slightly jiggly but not wet.
10. Remove the cheesecakes from the oven and let them cool in the pan for 10 minutes before carefully transferring them to a wire rack to cool completely.
11. Once cooled, refrigerate the cheesecakes for at least 2 hours or until they are firmly set.
12. Before serving, whip the powdered sugar and peppermint extract into the sour cream until smooth, then top each cheesecake with a dollop of this mixture and decorate with red and green sprinkles.
Presenting these mini cheesecakes is almost as fun as eating them because they are naturally adorable and perfect for entertaining. Since they are individual portions, they work beautifully on a dessert buffet where guests can just grab and go without needing a knife or plate. I love how the vibrant sprinkles pop against the white topping, making them an instant centerpiece. You can get creative with how you plate them to elevate the holiday spirit, turning a simple treat into a festive experience.
I want to make sure your baking experience is as smooth as possible, so I have gathered some helpful insights to ensure success. Baking cheesecake can sometimes feel intimidating, but with mini versions, you have a lot more control. The most important thing to remember is temperature; ingredients blend better when they are not cold, and the cakes set better when chilled properly. Don't rush the cooling process, as that is when the magic happens with the texture. These little notes below are my personal cheat sheet for making sure every batch comes out tasting delicious and looking professional.
Proper storage is essential to keeping these cheesecakes fresh and maintaining that perfect creamy texture we all love. Because they contain dairy, they absolutely need to be kept cool, but you also want to protect them from absorbing other odors in your fridge. I find that these treats actually taste even better after they have had time to settle, allowing the peppermint and vanilla flavors to meld together. Whether you are prepping for a party or saving a few for a late-night snack, here is how to keep them tasting their best.
I know that even with a simple recipe, questions can pop up while you are standing in the kitchen. To help you out, I have answered the most common queries I get about these festive treats so you can bake with total confidence.
You should bake the cheesecakes for 18-20 minutes at 325°F (165°C); they are ready when the edges are set and the centers are slightly jiggly but not wet.
Yes, these mini cheesecakes can be made a day ahead of time for convenience, or you can freeze them for longer storage.
After mixing the graham cracker crumbs, sugar, and melted butter until they resemble wet sand, press about 1 tablespoon of the mixture into the bottom of each muffin cup, packing it down tightly with a small cup or your fingers.
You must let the cheesecakes cool in the pan for 10 minutes, transfer them to a wire rack to cool completely, and then refrigerate them for at least 2 hours or until set before adding the topping.
Yes, you can freeze leftovers for up to 2 months; when you are ready to eat them, simply thaw them in the refrigerator before serving.
Before serving, you should whip powdered sugar and peppermint extract into sour cream until smooth, place a dollop on each cheesecake, and decorate with red and green sprinkles.
Why does this recipe work so well? Because it lets you eat cheesecake with your hands, and honestly, that is the kind of holiday freedom we all deserve. The combination of that crunchy crust and the peppermint kiss on top makes every calorie worth it. It is foolproof, festive, and saves you from the drama of slicing a giant cake. Go ahead and hit that print button or save this page because you are going to want these every year. If you whip these up, drop a comment below and tell me how they turned out or if you managed to save any for your guests!
Smooth cheesecake filling sits atop a crunchy graham cracker crust in these individual treats. A dollop of sweet peppermint cream and festive sprinkles add the perfect holiday finish.
Serving Size 24

Hey there! I’m Noah Blake, and welcome to RecipesDive.com — a blog for anyone who’s ready to dive headfirst into real cooking without the intimidation.