

Chicken Caesar Salad Pizza brings together the best of two worlds: the comforting crisp of a homemade pizza crust and the refreshing crunch of a classic Caesar salad. This beginner-friendly dinner recipe layers creamy dressing, savory chicken, and bubbling mozzarella on a golden base, then finishes with bright romaine for that signature salad twist. It’s exactly the kind of easy dinner you’ll want to share with friends—or keep all to yourself!
Key Ingredients
Before you get started, let’s break down what you’ll need to create this delicious fusion:
- 1 pound pizza dough: The sturdy yet tender foundation that holds all our Caesar-inspired toppings.
- 2 tablespoons olive oil: Creates a moisture barrier on the crust and adds a fruity richness.
- 1 clove garlic, minced: Infuses the chicken mixture with aromatic depth and savory warmth.
- 1 cup cooked chicken breast, shredded: Lean protein that soaks up garlic, lemon, and pepper flavors.
- 1 teaspoon lemon juice: Adds a bright, zesty lift to cut through creamy dressing.
- 1/2 teaspoon black pepper: Provides a gentle heat to balance the rich cheeses.
- 1/2 cup Caesar dressing: The creamy, tangy sauce that turns this into a salad pizza.
- 1 cup shredded mozzarella cheese: Melts into gooey, bubbly goodness atop the dressing.
- 1/4 cup grated Parmesan cheese: Offers a salty, nutty kick that’s classic to Caesar flavors.
- 1 cup chopped romaine lettuce: Delivers fresh crunch and botanical brightness on the finished pizza.
How To Make Chicken Caesar Salad Pizza
Bringing Chicken Caesar Salad Pizza to life is all about layering flavors and textures in the right order. First, you’ll par-bake the crust to ensure it’s crisp, then build your chicken mixture and cheese blend before finishing under high heat. Finally, top with fresh romaine to preserve its crunch. Let’s dive into the step-by-step process that turns these components into a showstopper dinner.
1. Preheat oven to 475°F (245°C).
Heat your oven thoroughly—this ensures a hot environment for a golden, crispy crust.
2. Roll out pizza dough on a lightly floured surface to a 12-inch circle.
Work with even, gentle pressure to maintain an even thickness.
3. Transfer dough to a baking sheet or pizza stone and brush with olive oil.
The oil seals the dough’s surface and prevents sogginess under the toppings.
4. Bake crust for 8 minutes until it begins to set but is not fully browned.
This par-bake gives you structure for building layers.
5. In a bowl, combine shredded chicken, minced garlic, lemon juice, and black pepper.
Toss gently so the chicken is evenly coated with bright, savory notes.
6. Spread Caesar dressing evenly over the partially baked crust.
Use a spatula to reach right up to the edges, leaving a small border for the crust.
7. Top with the chicken mixture, then sprinkle mozzarella and Parmesan cheeses.
Distribute toppings in an even layer for consistent melting and flavor.
8. Return pizza to the oven and bake for an additional 5–7 minutes until the cheese is melted and bubbly.
Keep an eye on the edges to achieve your preferred level of golden-brown.
9. Remove pizza from the oven and evenly distribute chopped romaine lettuce over the top.
The residual heat slightly softens the lettuce without wilting it.
10. Slice and serve immediately.
Use a sharp pizza cutter for clean slices and enjoy right away—this pizza is best fresh!
Serving Suggestions
Once your Chicken Caesar Salad Pizza is fresh from the oven, consider these ideas to elevate your meal:
- Pair each slice with a chilled Sauvignon Blanc or a crisp rosé, whose acidity complements the creamy dressing.
- Serve alongside a light mixed green salad drizzled with lemon vinaigrette to echo the pizza’s bright flavors.
- Sprinkle extra crouton pieces on top for an added crunch that mimics traditional Caesar salad texture.
- Offer small bowls of extra Caesar dressing for dipping each slice into that tangy, garlic-forward goodness.
Tips For Perfect Chicken Caesar Salad Pizza
Mastering this pizza is all about balance—crispy crust, melty cheese, and that fresh lettuce finish. Whether you’re a seasoned home cook or just starting out, these insights from my kitchen will help you nail every bite:
- For a crispier crust use a pizza stone or steel.
- Use freshly grated Parmesan for the best flavor.
- Add crouton pieces on top for extra crunch.
- Store leftover pizza in the refrigerator for up to 2 days.
How To Store It
After enjoying a slice (or three), you might want to save the rest for another meal. Here’s how to keep your Chicken Caesar Salad Pizza tasting fresh:
- Refrigerate leftover slices in an airtight container for up to 2 days to preserve moisture and prevent the crust from drying out.
- Freeze individual slices by wrapping each in plastic wrap and placing them in a freezer-safe bag—use within one month for best taste.
- Use an airtight container layered with parchment paper between slices to avoid cheese sticking.
- Reheat in a 350°F oven on a baking sheet for 5–7 minutes to restore crispness; add fresh romaine after warming to keep it crunchy.
Frequently Asked Questions
Here are some quick tips to help you feel confident in the kitchen:
- How can I achieve a crispier crust for my Chicken Caesar Salad Pizza?
To get a crispier crust, use a preheated pizza stone or steel in the oven and stretch the dough thinly to about 12 inches. Bake the oiled crust on the hot surface for the initial 8 minutes, then finish on the stone. You can also bake at 500°F for a slightly shorter time if your oven allows, which produces more oven spring and a crunchier base.
- What can I do to prevent the crust from becoming soggy under the Caesar dressing?
First, brush the dough lightly with olive oil before the initial bake to create a moisture barrier. After par-baking, allow the crust to cool for a minute before spreading the dressing. You can also reserve a small amount of dressing to drizzle after baking instead of applying it all before the final bake.
- Can I prepare any components of this pizza ahead of time?
Yes. You can cook, shred, and season the chicken up to two days in advance and store it in an airtight container in the refrigerator. The dough can be kept chilled and brought to room temperature about 30 minutes before rolling. Grate your cheeses and mince garlic ahead, too, so assembly goes quickly.
- What substitutions or additions can I make to customize this recipe?
You can swap the cooked chicken for grilled shrimp or turkey for a different protein. For extra crunch, sprinkle homemade or store-bought crouton pieces over the lettuce just before serving. If you prefer a lighter pizza, use half mozzarella and half part-skim ricotta. You can also drizzle extra lemon juice or add capers for a tangy twist.
- How should I store and reheat leftover Chicken Caesar Salad Pizza?
Store leftover slices in an airtight container or wrap them individually in plastic wrap and keep in the refrigerator for up to two days. To reheat, place slices on a baking sheet in a 350°F oven for 5–7 minutes until the cheese is melted and the crust is crispy. Add fresh romaine just before serving to maintain its crunch.
- Is it possible to make this recipe gluten-free or low-carb?
Yes. Use a store-bought or homemade gluten-free pizza dough blend in place of regular dough. For a low-carb option, substitute the crust with a cauliflower crust or a thin almond flour–based crust. Bake according to the crust instructions, then proceed with the same toppings and baking times.
What Makes This Special
What really sets Chicken Caesar Salad Pizza apart is the playful mash-up of hot, cheesy pizza with the cool zing of a salad—so every bite is a surprise. The crispy crust, creamy dressing, tender chicken, and fresh romaine create a harmony of textures and flavors that’s as fun to make as it is to eat. Feel free to print this article, keep it in your favorite recipe binder, and share your kitchen triumphs or questions below—I’d love to hear how your pizza turns out!
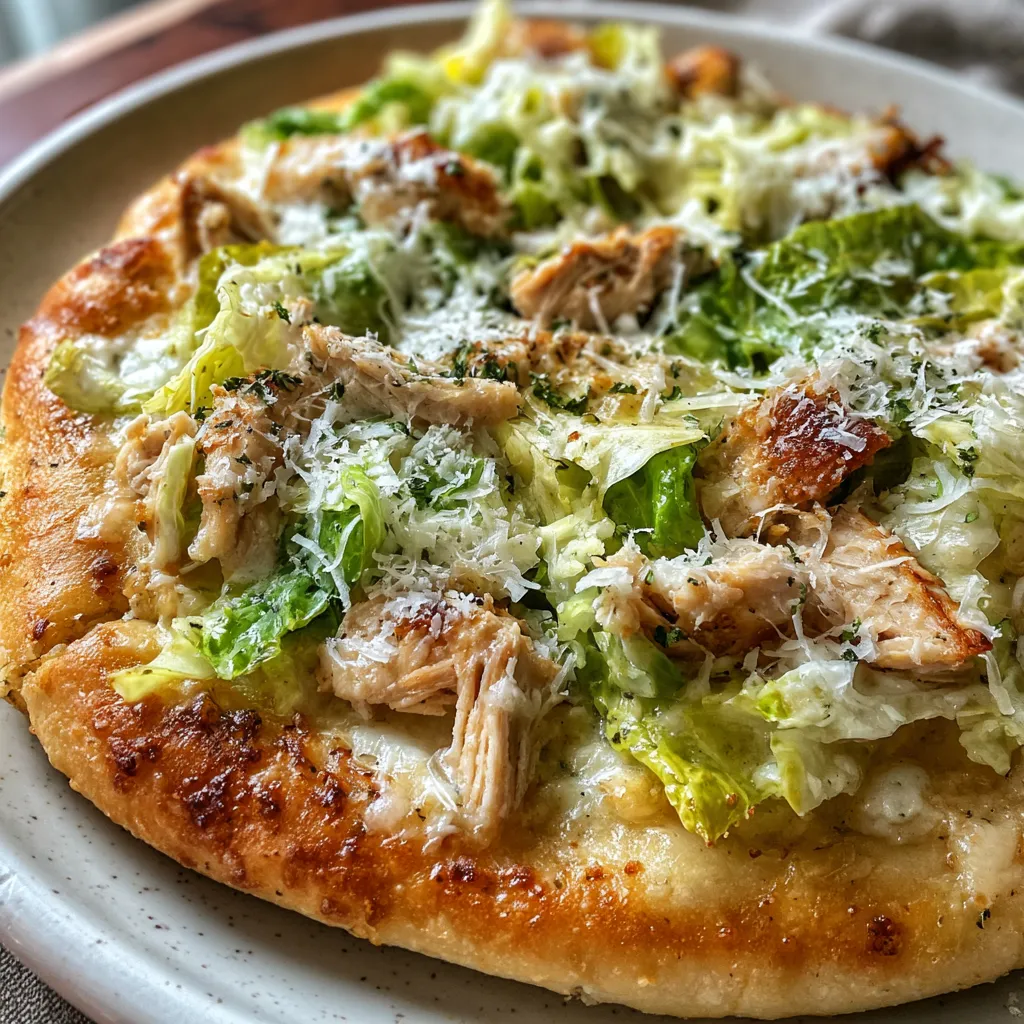

Chicken Caesar Salad Pizza
Description
Experience the sizzle of warm mozzarella and savory chicken atop a golden crust, finished with crisp romaine and zesty Caesar dressing for a refreshing twist on pizza night.
Ingredients
Instructions
-
Preheat oven to 475°F (245°C).
-
Roll out pizza dough on a lightly floured surface to a 12-inch circle.
-
Transfer dough to a baking sheet or pizza stone and brush with olive oil.
-
Bake crust for 8 minutes until it begins to set but is not fully browned.
-
In a bowl, combine shredded chicken, minced garlic, lemon juice, and black pepper.
-
Spread Caesar dressing evenly over the partially baked crust.
-
Top with the chicken mixture, then sprinkle mozzarella and Parmesan cheeses.
-
Return pizza to the oven and bake for an additional 5–7 minutes until the cheese is melted and bubbly.
-
Remove pizza from the oven and evenly distribute chopped romaine lettuce over the top.
-
Slice and serve immediately.
Nutrition Facts
Serving Size 4
- Amount Per Serving
- Calories 178kcal
Note
- For a crispier crust use a pizza stone or steel.
- Use freshly grated Parmesan for the best flavor.
- Add crouton pieces on top for extra crunch.
- Store leftover pizza in the refrigerator for up to 2 days.

