

There’s something magical about taking a simple loaf pan and transforming it into a canvas of swirled chocolate and vanilla. With every slice of this Classic Chocolate Swirl Marble Cake, you get a perfect balance between creamy, tender vanilla crumb and rich, velvety chocolate ribbons. The moment you slice through that golden crust, you’ll reveal a marbled pattern that’s as beautiful as it is delicious. It’s the kind of cake that makes you want to gather around the table, lean in close, and admire those lovely streaks before diving right in. With a moist crumb from the sour cream and a gentle lift from baking powder and soda, each bite is a harmony of flavor and texture that practically melts on your tongue.
When I first tried this recipe, I was a complete beginner in the kitchen—no fancy gadgets, just a trusty mixing bowl and my grandma’s worn wooden spoon. I remember nervously whisking the dry ingredients, hoping I wasn’t about to bake a brick, only to be amazed when that beautiful swirl rose into a light, fluffy cake. If you’re new to baking, don’t worry—this recipe is beginner-friendly and forgiving. The scent that drifts from your oven will have family members sneaking glances into the kitchen, asking when they can taste it. Even seasoned bakers will appreciate how effortlessly the chocolate and vanilla batters come together to create that signature marble effect. So roll up your sleeves, preheat that oven to 350°F, and let’s get swirling!
KEY INGREDIENTS IN CLASSIC CHOCOLATE SWIRL MARBLE CAKE
Before diving into the fun of swirling batters, it’s important to gather quality ingredients that play distinct roles in crafting this cake. Each component works together to build structure, add moisture, and deliver those classic flavor notes we all love. From the foundation of flour to the final swirl of cocoa, here’s what you need and why it matters:
- all-purpose flour
Provides the structural backbone of the cake. Its moderate protein content creates the right balance between tenderness and stability.
- baking powder
Acts as a leavening agent, helping the cake rise and develop a light, airy crumb when it bakes.
- baking soda
Enhances lift and browning by reacting with the sour cream’s acidity. It also helps balance the sweet flavors.
- salt
Brightens the overall taste and strengthens the gluten structure, ensuring your cake holds together beautifully.
- unsalted butter
Contributes rich flavor and creamy moisture. When creamed with sugar, it traps air that helps the cake become fluffy.
- granulated sugar
Sweetens the batter and helps create a tender crumb. It also aids in browning, giving the crust a lovely golden hue.
- eggs
Bind ingredients together, add moisture, and contribute to the cake’s structure and richness.
- vanilla extract
Infuses the vanilla portion of the cake with warm, aromatic notes that enhance the overall flavor profile.
- sour cream
Introduces creaminess and tang, keeping the cake moist and tender while balancing the sweetness.
- unsweetened cocoa powder
Delivers deep chocolate flavor in the swirled portion. It also enriches the cake’s color and intensity.
- milk
Thins the chocolate batter to a pourable consistency, ensuring smooth, even swirls in every slice.
HOW TO MAKE CLASSIC CHOCOLATE SWIRL MARBLE CAKE
Baking this marble masterpiece is all about layering flavors and creating that signature swirl. Follow these detailed steps for a stunning and delicious loaf:
1. Preheat your oven to 350°F (175°C). Grease and flour a 9×5-inch loaf pan or line it with parchment paper so your cake slides out easily once it’s baked.
2. In a medium bowl, whisk together the flour, baking powder, baking soda, and salt until evenly combined. This ensures consistent rising and prevents any pockets of leavener from forming.
3. In a large bowl, cream the softened butter and granulated sugar with an electric mixer on medium speed. Continue until the mixture is light and fluffy, about 3–5 minutes, incorporating plenty of air for a tender crumb.
4. Crack in the eggs one at a time, beating well after each addition to keep the batter smooth. Stir in the vanilla extract, letting its sweet fragrance permeate the mixture.
5. Gradually add the dry flour mixture to the wet ingredients, alternating with the sour cream. Mix just until combined, being careful not to overmix, which can lead to a dense cake.
6. In a separate small bowl, whisk the unsweetened cocoa powder with milk until you have a smooth chocolate batter free of lumps.
7. Divide the cake batter in half. Stir the chocolate mixture into one half until it’s fully incorporated, creating a rich, dark batter.
8. Alternately drop spoonfuls of vanilla and chocolate batter into the prepared loaf pan, layering them to build a beautiful pattern.
9. Use a knife or skewer to gently swirl through the batter in the pan, creating that classic marbled effect without overblending.
10. Bake for 50–60 minutes, or until a toothpick inserted into the center comes out clean. The top should be golden and springy to the touch.
11. Allow the cake to cool in the pan for about 10 minutes, then carefully turn it out onto a wire rack to finish cooling completely.
12. Once fully cooled, slice and serve each piece to reveal the stunning chocolate and vanilla swirls inside.
SERVING SUGGESTIONS FOR CLASSIC CHOCOLATE SWIRL MARBLE CAKE
After waiting for your cake to cool, you’ll want to showcase its marbled design in the best possible way. Serving this cake can be as simple or as elegant as you like, and it pairs beautifully with various accompaniments. Whether you’re hosting a casual afternoon tea or impressing guests at a dinner party, these suggestions will help you present each slice in style and highlight the cake’s delightful flavors:
- Serve slices with a dollop of fresh whipped cream and a sprinkling of mini chocolate chips on top for an extra touch of decadence and texture.
- Offer a side of homemade berry compote, such as raspberry or strawberry, to introduce a bright, fruity contrast that cuts through the richness of the cake.
- Present the slices on a rustic wooden board, lightly dusted with powdered sugar, and garnish with fresh mint leaves for a café-style look.
- Pair each serving with a steaming mug of coffee or espresso, letting the coffee’s bold bitterness complement the cake’s sweet, swirled layers.
HOW TO STORE CLASSIC CHOCOLATE SWIRL MARBLE CAKE
Keeping your marble cake fresh is easier than you might think. Proper storage preserves its moist crumb and rich flavors, ensuring each slice tastes just as good as when it first came out of the oven. Below are some tried-and-true methods to maintain freshness, whether you plan to enjoy the cake over a few days or save it for a special occasion:
- Room Temperature, Airtight Container
Store cooled cake slices in an airtight container or cake dome at room temperature for up to three days. This prevents the cake from drying out while keeping the texture perfectly soft.
- Refrigeration
If you prefer a firmer texture or have a warmer kitchen, wrap individual slices in plastic wrap and store in an airtight container in the fridge for up to five days. Let the cake come to room temperature before serving for the best flavor.
- Freezing Whole or in Slices
For longer storage, wrap the whole loaf or individual slices tightly in plastic wrap and then in aluminum foil to prevent freezer burn. Freeze for up to three months. Thaw overnight in the refrigerator or at room temperature before slicing and serving.
- Reviving Stale Cake
If your cake has begun to dry, pop a slice into the microwave for 10–15 seconds, or warm it in a 300°F oven for 5–7 minutes. This will refresh the moisture and bring back its soft, tender crumb.
CONCLUSION
What a journey we’ve taken together, from gathering pantry staples to unveiling a loaf bursting with chocolate and vanilla swirls. This Classic Chocolate Swirl Marble Cake is more than just a dessert—it’s a testament to how simple ingredients can come together to create something truly special. With its beginner-friendly steps, you’ve learned how to balance dryness and moisture, incorporate rich cocoa into half the batter, and achieve that eye-catching marbled design. Along the way, we explored key ingredients, step-by-step instructions, and pro tips for serving and storage. Whether you’re celebrating a milestone or simply craving a comforting slice with your afternoon tea, this cake delivers both beauty and flavor in equal measure.
Feel free to print this article and save it for later use—you might want to revisit these instructions when planning a weekend bake or sharing treats with friends and family. Below, you’ll find a FAQ section to answer common questions and help you troubleshoot any baking hiccups. I’d love to hear your thoughts, stories, or any variations you tried with this recipe. If you have questions about the swirling technique, need clarity on an ingredient swap, or simply want to share your cake photos, please leave a comment or reach out. Happy baking, and may every slice of your marble cake bring smiles and sweet memories!
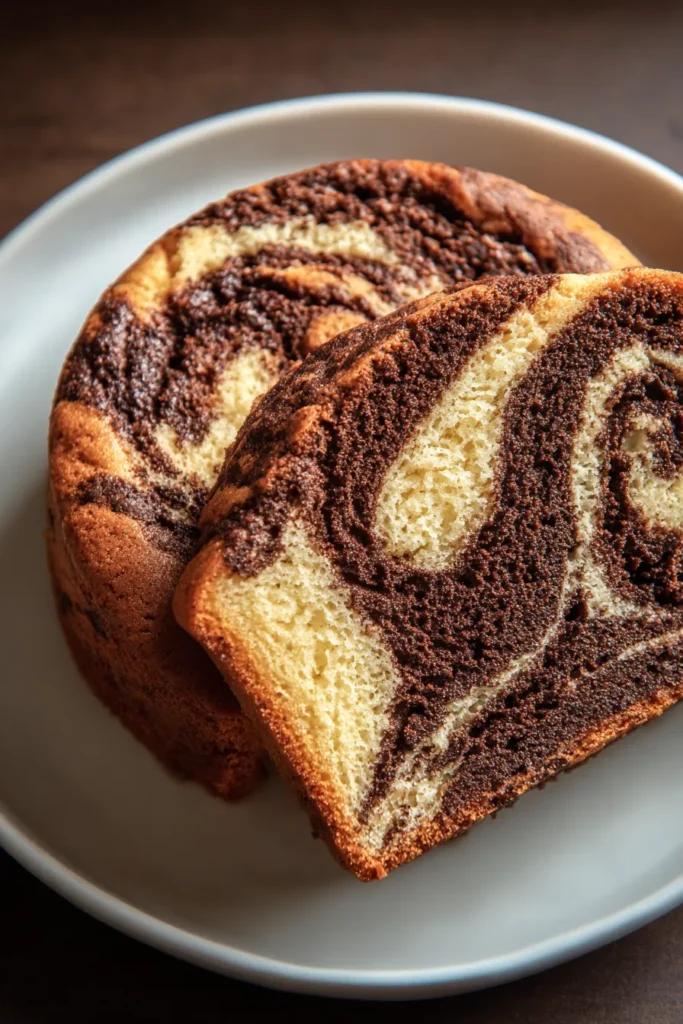

Classic Chocolate Swirl Marble Cake
Description
This Classic Chocolate Swirl Marble Cake features a luscious combination of creamy vanilla and rich chocolate flavors, creating a beautiful marbled design that’s simply irresistible.
Ingredients
Instructions
-
Preheat your oven to 350°F (175°C). Grease and flour a 9x5-inch loaf pan or line with parchment paper.
-
In a medium bowl, whisk together the flour, baking powder, baking soda, and salt. Set aside.
-
In a large bowl, cream the butter and sugar until the mixture is light and fluffy, about 3-5 minutes.
-
Add the eggs one at a time, beating well after each addition. Stir in the vanilla extract.
-
Gradually add the flour mixture to the wet ingredients, alternating with the sour cream. Mix until just combined.
-
In a separate small bowl, mix the cocoa powder with milk until smooth to create a chocolate batter.
-
Divide the cake batter in half. Add the chocolate mixture to one of the halves, gently combining until it's fully mixed.
-
Alternately drop spoonfuls of vanilla and chocolate batter into the prepared loaf pan.
-
Use a knife or skewer to gently swirl through the batter in the pan to create a marbled effect.
-
Bake for 50-60 minutes, or until a toothpick inserted into the center comes out clean.
-
Allow the cake to cool in the pan for about 10 minutes, then turn it out onto a wire rack to finish cooling.
-
Slice and serve the cake once completely cooled.
Nutrition Facts
Serving Size 10
- Amount Per Serving
- Calories 32kcal
Note
- Marble cakes are known for their beautiful appearance and flavors; slice the cake in front of your guests for added effect.
- You can add a handful of chocolate chips to the chocolate batter for an extra chocolatey experience.
- This cake stores well in an airtight container at room temperature for up to three days.

