

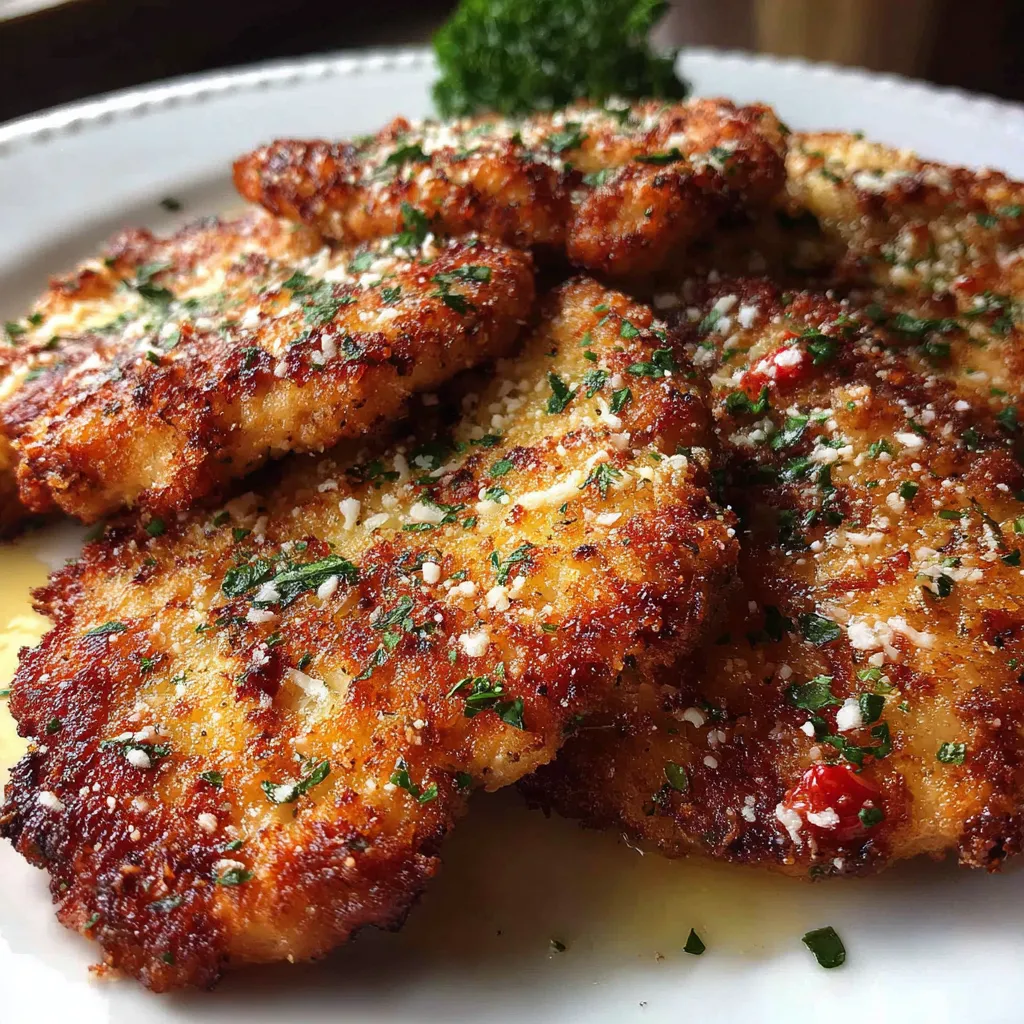
Crusted Chicken Romano turns ordinary chicken breasts into crispy, golden cutlets thanks to a zesty Romano-and-Parmesan breadcrumb coating just begging for a squeeze of lemon. Each bite crackles with a savory crust that gives way to tender, juicy meat—brightened by oregano and garlic notes in every mouthful. Whether you’re racing home for a quick weeknight dinner or craving Italian-inspired comfort, this easy, beginner-friendly recipe will become your new go-to. Let’s dive into the steps and tips to nail that perfect crust!
Key Ingredients
Before you get cooking, gather these flavorful components that make the magic happen:
- 4 pieces chicken breast (boneless skinless): lean protein base that pounded thin cooks evenly
- 1/2 cup all-purpose flour: creates a dry layer for the egg wash to adhere and crisp up
- 2 large eggs: binder that helps the breadcrumb mixture stick to each cutlet
- 2 tablespoons water: thins the egg wash for an even, smooth coating
- 1 cup Italian-style breadcrumbs: flavorful base that forms the golden crust
- 1/2 cup grated Romano cheese: adds sharp, tangy flavor to every crunchy bite
- 1/2 cup grated Parmesan cheese: lends a nutty, salty depth to the coating
- 1 teaspoon dried oregano: herbaceous note that infuses Mediterranean flair
- 1/2 teaspoon garlic powder: delivers a subtle garlic punch without extra prep
- 1/2 teaspoon salt: enhances all the savory flavors in the crust
- 1/4 teaspoon black pepper: gentle heat that complements the cheeses
- 2 tablespoons olive oil: medium for pan-frying that adds richness and flavor
- 2 tablespoons butter: gives the crust a golden, buttery finish that’s irresistible
How To Make Crusted Chicken Romano
Creating these cheesy, crunchy cutlets is a breeze once your ingredients are prepped. You’ll pound the chicken for even thickness, season it, then set up a classic three-step dredging station with flour, egg wash, and the breadcrumb-cheese mix. A quick pan-fry in olive oil and butter seals in juiciness, yielding a golden-brown crust studded with Romano and Parmesan. Follow these detailed steps to achieve restaurant-worthy cutlets right at home.
1. Place chicken breasts between two sheets of plastic wrap and pound to 1/2 inch thickness using a meat mallet or rolling pin for uniform cooking.
2. Season both sides of the chicken with salt, pepper, oregano, and garlic powder, ensuring every piece is evenly coated.
3. Set up a dredging station: put flour in one bowl, whisk eggs with water in a second, and mix breadcrumbs with Romano and Parmesan cheese in a third.
4. Dredge each chicken piece in flour, shaking off the excess, then dip it into the egg wash, and press firmly into the breadcrumb-cheese mixture to coat evenly.
5. Heat olive oil and butter in a large skillet over medium heat until the butter is melted and sizzling, creating the perfect searing surface.
6. Add chicken to the skillet and cook for 4 to 5 minutes per side, or until golden brown and the internal temperature reaches 165°F.
7. Transfer cooked chicken to a paper-towel-lined plate to drain any excess oil before serving, keeping the crust crisp.
Serving Suggestions
Once your Crusted Chicken Romano is ready, here are a few ways to elevate your meal and create a well-rounded plate:
- Serve with lemon wedges: the bright citrus balances the rich, cheesy crust and refreshes the palate.
- Pair with a crisp mixed green salad dressed in a light vinaigrette for a burst of freshness and color.
- Add roasted asparagus or broccoli tossed with olive oil and garlic to complement the chicken’s savory profile.
- Toss garlic-infused pasta in butter, sprinkle extra Parmesan on top, and enjoy an indulgent yet simple Italian-inspired side.
Tips For Perfect Crusted Chicken Romano
Nailing that extra-crispy, flavorful coating is easier than you think. Follow these friendly tips to boost texture and taste:
- For an extra crispy crust, use panko breadcrumbs in place of Italian-style breadcrumbs.
- Serve with lemon wedges for a bright, fresh finish that cuts through the richness.
- Chicken can be coated ahead of time and refrigerated for up to 2 hours before cooking to save prep time.
- Leftovers store well in the refrigerator for up to 3 days, making this recipe a great make-ahead option.
How To Store It
Keeping your Crusted Chicken Romano tasting fresh and crispy takes just a bit of know-how. Whether you’re storing leftovers or prepping ahead, follow these methods to maintain that golden crunch and juicy interior:
- Refrigerate: place cooked cutlets in an airtight container and store in the fridge for up to 3 days.
- Reheat in oven: arrange pieces on a baking sheet and warm at 350°F for 10–12 minutes to re-crisp the crust.
- Freeze: wrap individual cutlets in plastic wrap and seal in a freezer bag for up to 1 month; thaw overnight before reheating.
- Avoid microwaving: using an oven or skillet preserves the crisp exterior without turning it soggy.
Frequently Asked Questions
Here are some quick answers to the questions we hear most about Crusted Chicken Romano:
- Q: How long does it take to prepare and cook Crusted Chicken Romano?
A: It takes about 10 minutes to prep the chicken—pounding, seasoning, and setting up the dredging station—and about 8 to 10 minutes to cook the chicken in the skillet, so you’ll need around 20 minutes total before resting and serving.
- Q: What is the best way to ensure the chicken cooks evenly through to 165°F without burning the crust?
A: Pound the chicken to 1/2 inch thickness for uniform cooking, maintain medium heat so the butter and oil sizzle gently rather than brown too quickly, and flip the chicken after 4–5 minutes per side. Use an instant-read thermometer inserted into the thickest part of the breast; remove at 165°F.
- Q: Can I swap ingredients to accommodate dietary restrictions?
A: Yes. For a gluten-free version, replace the all-purpose flour and Italian-style breadcrumbs with certified gluten-free flour and gluten-free panko. For a lower-sodium option, use reduced-sodium cheese and omit added salt, relying on the Romano and Parmesan for flavor.
- Q: How far in advance can I prepare the chicken coating, and how should I store it?
A: You can dredge and coat the chicken up to 2 hours ahead of cooking. Place the coated breasts on a baking sheet lined with parchment, cover lightly with plastic wrap, and refrigerate until ready to cook. Bring chicken to room temperature for about 10 minutes before frying.
- Q: What are some recommended side dishes and garnishes to serve with Crusted Chicken Romano?
A: Serve the chicken with lemon wedges for brightness, a simple mixed green salad dressed in vinaigrette, roasted vegetables like asparagus or broccoli, or a side of garlic-infused pasta for a full Italian-inspired meal.
- Q: How should I store and reheat leftovers to preserve the crust’s crispiness?
A: Store leftover chicken in an airtight container in the refrigerator for up to 3 days. To reheat, place pieces on a baking sheet in a 350°F oven for 10–12 minutes until warmed through and crisp. Avoid microwaving, which can make the crust soggy.
- Q: What tips help achieve an extra-crispy coating?
A: Use panko breadcrumbs in place of Italian-style crumbs for more air pockets, press the breadcrumb and cheese mixture firmly onto the chicken, and make sure the oil and butter are hot but not smoking before adding the chicken so it sizzles immediately on contact.
What Makes This Special
Crusted Chicken Romano stands out with its unbeatable combination of zesty Romano and Parmesan nestled in a golden, buttery crust that crackles under your fork. It’s the simplicity, speed, and flavor punch—courtesy of oregano, garlic, and a fresh squeeze of lemon—that turns everyday chicken into a weeknight superstar. Print this article, save it for later, and let the kitchen chatter begin! I can’t wait to hear your feedback or answer any questions as you whip up this crispy delight.

Crusted Chicken Romano
Description
Each bite crackles with a golden crust studded with Romano and Parmesan, revealing tender, juicy chicken beneath. The buttery pan-fry smell mingles with oregano and garlic notes, brightened by a squeeze of lemon.
Ingredients
Instructions
-
Place chicken breasts between two sheets of plastic wrap and pound to 1/2 inch thickness.
-
Season both sides of the chicken with salt, pepper, oregano, and garlic powder.
-
Set up a dredging station with flour in one bowl, eggs whisked with water in a second bowl, and breadcrumbs mixed with Romano and Parmesan cheese in a third bowl.
-
Dredge each chicken piece in flour, shaking off excess, then dip in egg wash, and press into the breadcrumb and cheese mixture to coat evenly.
-
Heat olive oil and butter in a large skillet over medium heat until butter is melted and sizzling.
-
Add chicken to the skillet and cook for 4 to 5 minutes per side, or until golden brown and cooked through to an internal temperature of 165°F.
-
Transfer cooked chicken to a paper towel lined plate to drain any excess oil before serving.
Nutrition Facts
Serving Size 4
- Amount Per Serving
- Calories 175kcal
Note
- For an extra crispy crust, use panko breadcrumbs in place of Italian-style breadcrumbs.
- Serve with lemon wedges for a bright, fresh finish.
- Chicken can be coated ahead of time and refrigerated for up to 2 hours before cooking.
- Leftovers store well in the refrigerator for up to 3 days.

