

If you’re on the hunt for a snack that brings together all the best parts of a cheeseburger in a fun, handheld format, these Garlic Butter Cheeseburger Rollups are exactly what your kitchen needs. Juicy ground beef seasoned just right meets finely chopped onions and cloves of garlic, creating a savory filling that’s impossible to resist. As you roll each tortilla, sprinkling in a blanket of shredded cheddar, you can almost hear the cheese melt and bubble. Then, just when you think it can’t get any better, a generous coat of garlic-infused butter transforms the outside into a golden, crispy shell that crackles under your fork. This delightful twist on a classic cheeseburger marries comfort food nostalgia with playful convenience.
Over the years, I’ve tested countless snack ideas for game nights, family dinners, and impromptu gatherings, but these rollups always take center stage. There’s something so satisfying about dipping each warm bite into your favorite sauce or savoring it solo, letting the buttery garlic undertones shine. With only about 15 minutes of prep and another 20 minutes in the oven, you’ll have hot, melty rollups ready to share. Whether you’re juggling a busy weeknight, entertaining a crowd, or simply craving a cozy dinner, this recipe hits all the right notes. Easy enough for beginners yet impressive enough for seasoned home cooks, these Garlic Butter Cheeseburger Rollups are about to become a go-to in your recipe arsenal.
KEY INGREDIENTS IN GARLIC BUTTER CHEESEBURGER ROLLUPS
Before you dive into assembling these savory treats, let’s talk about the star players that make this recipe shine. Each ingredient contributes its own personality, ensuring every bite is packed with layers of flavor.
- Ground beef
The heart of the filling, ground beef provides rich, meaty flavor and satisfying protein. Choosing a quality cut ensures your rollups stay juicy and tender.
- Salt
A simple seasoning essential for bringing out the natural flavors of the beef and onions. It balances and enhances every component.
- Black pepper
Freshly cracked for a gentle kick and depth of flavor. It accentuates the savory profile without overpowering.
- Onion
Finely chopped to add sweet, aromatic notes. As it softens, it blends seamlessly into the beef, creating a flavor base.
- Garlic
Minced cloves deliver pungent warmth and depth. Garlic pairs perfectly with the butter for that irresistible finish.
- Worcestershire sauce
An umami-rich boost that layers in complexity and tangy undertones, giving the filling its signature burger taste.
- Cheddar cheese
Shredded for optimal melting, cheddar brings creaminess and tang, stretching in cheesy strings with every bite.
- Flour tortillas
Large, pliable wrappers that cradle the filling. They bake into tender, golden tubes perfect for handheld eating.
- Unsalted butter
Melted and combined with garlic powder, this butter bath crisps up the tortillas and infuses each rollup with rich, buttery goodness.
- Garlic powder
A convenient way to intensify the garlic flavor on the exterior without adding moisture, ensuring a beautifully crisp finish.
- Fresh parsley
A optional garnish that adds a pop of color and bright, herbaceous contrast to the rich, savory rollups.
HOW TO MAKE GARLIC BUTTER CHEESEBURGER ROLLUPS
Let’s transform those quality ingredients into a crowd-pleasing snack. Follow each step carefully to achieve perfectly seasoned, melty rollups with a golden, garlicky crust.
1. Preheat your oven to 375°F (190°C). This ensures an even bake and crispy exteriors.
2. Heat a skillet over medium-high heat and add the ground beef. Cook, stirring occasionally, until the meat is no longer pink, then drain any excess fat to keep the filling from becoming greasy.
3. Add the chopped onion, minced garlic, salt, and black pepper to the skillet. Continue cooking for 3–4 minutes, or until the onion is soft and translucent, stirring to blend flavors.
4. Stir in the Worcestershire sauce, then remove the skillet from heat. Let the mixture cool slightly to prevent the tortillas from becoming soggy during assembly.
5. Lay a tortilla on a flat surface. Sprinkle a thin layer of cheddar cheese, then top with 2–3 tablespoons of the beef mixture in the center.
6. Roll the tortilla tightly, tucking the sides as you go, to form a neat rollup. Repeat with the remaining tortillas and beef.
7. Arrange the rollups seam side down in a greased baking dish to prevent unraveling.
8. In a small bowl, whisk together the melted butter and garlic powder. Brush this garlic butter mixture generously over the tops of the rollups.
9. Bake in the preheated oven for 15–20 minutes, or until the tops are golden brown and crispy.
10. Remove from the oven and let the rollups cool slightly. Garnish with chopped fresh parsley, if desired.
11. Serve warm, and enjoy each delicious, gooey bite of your Garlic Butter Cheeseburger Rollups!
SERVING SUGGESTIONS FOR GARLIC BUTTER CHEESEBURGER ROLLUPS
When it comes to serving these rollups, the possibilities are endless. Whether you’re hosting a lively game day, planning a relaxed dinner, or packing them for a picnic, presentation and pairing can elevate the experience. Think about contrasting textures and flavors—cool, crisp sides complement the warm, cheesy rollups beautifully. Dips and garnishes add color, intrigue, and extra layers of taste that keep everyone coming back for more. Below are a few of my favorite ways to bring these appetizers to life:
- Serve with zesty dipping sauces: Whip up a simple chipotle mayo by mixing mayonnaise with a teaspoon of chipotle in adobo sauce, or offer a classic ketchup-mustard blend for familiar comfort.
- Pair alongside a crisp green salad: Toss mixed greens, cherry tomatoes, and thinly sliced red onion with a light vinaigrette to offset the richness of the rollups.
- Arrange on a party platter: Add colorful garnishes like sliced bell peppers, olives, and carrot sticks. Place the rollups in the center, surrounded by ramekins of barbecue sauce and ranch dressing.
- Offer a spicy kick: Drizzle sriracha or serve jalapeño slices on the side for guests who crave extra heat and bold flavors.
HOW TO STORE GARLIC BUTTER CHEESEBURGER ROLLUPS
After enjoying these rollups fresh from the oven, you might end up with delicious leftovers. Proper storage ensures you can relive that buttery, cheesy goodness up to several days later without losing flavor or texture. Keep them sealed away from air and moisture for best results, and follow these methods to store and reheat with ease:
- Refrigeration: Place cooled rollups in an airtight container or wrap tightly in plastic wrap. Store in the fridge for up to 3 days. Reheat in a 350°F (175°C) oven for 10–12 minutes to restore crispiness.
- Freezing: For longer storage, freeze rollups on a baking sheet until solid, then transfer to a freezer bag. They keep well for up to one month. Reheat from frozen in a preheated oven at 375°F (190°C) for 20–25 minutes.
- Layer separation: If stacking in containers, insert sheets of parchment paper between layers to prevent sticking and maintain shape.
- Microwave revival: For a quick fix, heat individual portions on a microwave-safe plate for 30–45 seconds, then crisp up under the broiler for 1–2 minutes if desired.
CONCLUSION
Bringing these Garlic Butter Cheeseburger Rollups from the oven to your plate is a journey through savory comfort and playful creativity. You’ve combined juicy ground beef, aromatic onions and garlic, a splash of Worcestershire, and ooey-gooey cheddar, all wrapped in soft tortillas and finished with a garlic-kissed butter crust. Whether you’re a beginner in the kitchen or a seasoned home cook, this recipe walks you through each step with confidence. You can easily swap in lean ground turkey or chicken, experiment with pepper jack or mozzarella, or load up your rollups with pickles and jalapeños for an extra zing. With a total time investment of just 40 minutes—including prep, cooking, and a brief cool-down—these rollups are a breeze to whip up on busy weeknights, lazy weekends, or festive gatherings. Feel free to print this article and save it for later; you’ll find an FAQ section below to answer any lingering questions as you perfect your technique.
I’d love to hear how these rollups turn out in your kitchen. Did you try adding a new cheese or dipping sauce? How did your family or friends react when they sank their teeth into that crispy, melty goodness? If you have questions about ingredient swaps, storage tips, or any part of the cooking process, just let me know. Your feedback and stories are what make this recipe community so special, and I’m here to help you achieve snack-time greatness!
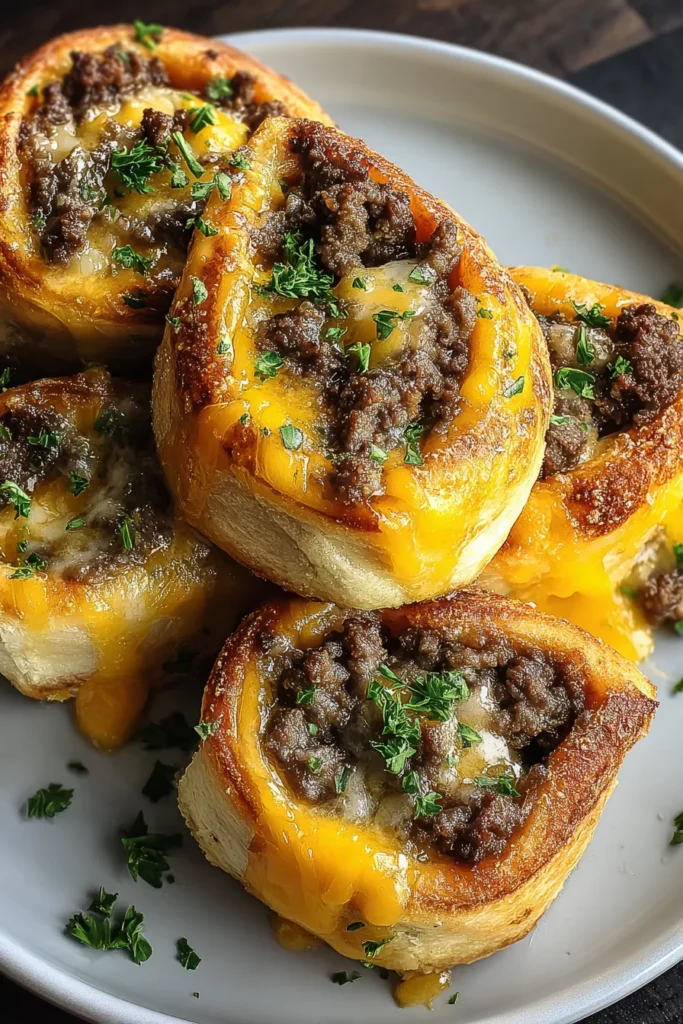

Garlic Butter Cheeseburger Rollups
Description
Packed with juicy beef, melty cheese, and a buttery garlic finish, these rollups are a delightful twist on classic cheeseburgers, perfect for sharing!
Ingredients
Instructions
-
Preheat your oven to 375°F (190°C).
-
In a skillet over medium-high heat, cook the ground beef until it is no longer pink. Drain any excess fat.
-
Add the chopped onion, minced garlic, salt, and black pepper to the beef. Cook for another 3-4 minutes, until the onion is soft and translucent.
-
Stir in the Worcestershire sauce and remove from heat. Let the mixture cool slightly.
-
Place a tortilla on a flat surface. Sprinkle a little cheese and then add about 2-3 tablespoons of the beef mixture onto the center.
-
Roll up the tortilla tightly, tucking in the sides as you go, to create a rollup. Repeat with remaining tortillas and beef mixture.
-
Arrange the rollups seam side down in a greased baking dish.
-
In a small bowl, mix the melted butter with garlic powder. Brush the garlic butter generously over the tops of the rollups.
-
Bake the rollups in the preheated oven for 15-20 minutes or until the tops are golden brown and crispy.
-
Remove from oven, and let cool slightly. Garnish with chopped fresh parsley if desired.
-
Serve warm, and enjoy your delicious Garlic Butter Cheeseburger Rollups!
Nutrition Facts
Serving Size 4
- Amount Per Serving
- Calories 100kcal
Note
- These rollups can also be made with lean ground turkey or chicken for a lighter option.
- You can add your favorite burger toppings, like pickles or jalapenos, inside the rollups for extra flavor.
- Try using different cheeses such as mozzarella or pepper jack for a flavor variation.
- Leftovers can be stored in an airtight container in the refrigerator for up to 3 days and reheated in the oven or microwave.
- These rollups are perfect for game days, parties, or a fun family dinner!

