

If you’re ready to add a dash of spookiness and sweet fun to your dessert lineup, these Oreo Spider Cookies are your next kitchen adventure! With crunchy chocolate sandwich cookies transformed into eight-legged critters, you’ll delight friends and family with treats that look almost too whimsical to eat. As you twist apart those classic sandwich cookies, you’ll feel the familiar snap of cookie meeting cream, and then you get to decide: will you hold on to tradition and use creamy peanut butter, or channel your inner chocolatier with molten chocolate? Either way, each step is easy, entertaining, and downright delightful. It’s the kind of recipe that brings out the kid in everyone—no fancy piping tips or tempering required—just a spoon, a bit of sticky goodness, and plenty of candy eyes.
Once you’ve mastered the assembly line of cookies and licorice legs, you’ll find this recipe becomes a go-to for last-minute gatherings or impromptu kitchen parties. Maybe you remember making paper spiders in grade school or sneaking an extra Oreo after dinner; this playful twist on a favorite snack taps into that nostalgia while letting you get hands-on with a beloved Halloween classic. In just fifteen minutes of prep and a few dabs of peanut butter (or chocolate), you’ll be arranging a bouncy brigade of eight-legged delights to share. I love hearing stories from readers who let kids design their own color combinations or who swap in flavored liqueur melts for an adult-only version. So grab your apron, and let’s whip up a swarm of these Oreo Spider Cookies that are as fun to make as they are to devour!
KEY INGREDIENTS IN OREO SPIDER COOKIES
Before diving into the fun of assembly, it helps to know exactly what makes these little critters come to life. Each ingredient plays its own starring role—whether it’s providing structure, stickiness, or that cheeky pop of color. Here’s what you’ll need to have on hand:
- Oreo cookies
These classic chocolate sandwich cookies form the body of your spider. Their sturdy exterior and creamy filling create a perfect base for sticking on legs and eyes.
- Creamy peanut butter (or melted chocolate)
Acting as the edible “glue,” peanut butter or melted chocolate secures the licorice legs and candy eyes in place. Peanut butter adds a salty contrast, while chocolate keeps it extra indulgent.
- Small candy eyes
An adorable finishing touch that brings each spider to life. These pre-made candy decorations are perfectly sized for Oreo bodies and instantly turn desserts into playful creations.
- Licorice lace or thin string candy
Cut into segments to become the spiders’ legs. Choose a color that fits your theme—classic black licorice for spooky vibes, or red licorice for a fun twist.
HOW TO MAKE OREO SPIDER COOKIES
Let’s walk through the steps that transform simple sandwich cookies into a hauntingly cute Halloween treat. Each step combines ease and creativity, ensuring success whether you’re a beginner baker or a seasoned home cook.
1. Gather all the ingredients and set them out on your countertop for easy access. Measure out your peanut butter (or melted chocolate), unbox the cookies, open the candy eyes, and have your licorice lace ready. A tidy workspace means a smooth assembly line!
2. Carefully twist each Oreo cookie apart, taking care not to break the cookies. Hold the bottom half steady and gently wiggle the top until it pops off, revealing that creamy center—this is your canvas!
3. Using a small spoon, spread a small amount of peanut butter (or melted chocolate) on the cream side of the Oreo. Aim for an even layer about ⅛ inch thick so there’s enough stick without overwhelming the crisp cookie.
4. Cut the licorice lace into small pieces, about 1.5 inches each, to make the spider legs. A sharp knife or clean kitchen scissors work best; keep them uniform so your spiders look consistent.
5. Place 4 pieces of licorice on each side of the Oreo cream to form the legs, sticking them into the cream and peanut butter (or melted chocolate) to secure them in place. Angle them outward to create that classic spider silhouette.
6. Replace the top of the Oreo cookie and gently press down to secure. The pressure should be just enough to hold everything together without squishing the legs.
7. Using a little dab of peanut butter or melted chocolate, attach two candy eyes on top of each Oreo spider to create the eyes. Position them close together for maximum cuteness, and hold for a second to let them set.
8. Let the cookies set for a few minutes before serving, allowing the peanut butter or chocolate to firm up slightly. This quick rest time ensures your spiders won’t lose their legs during transport or display.
SERVING SUGGESTIONS FOR OREO SPIDER COOKIES
Whether you’re hosting a haunted house party, school event, or cozy movie night, presentation makes all the difference. These Oreo Spider Cookies are versatile enough to complement any festive spread, but taking a moment to think about serving can elevate them from adorable to unforgettable. Offering fun display ideas or creative pairings invites guests to engage—and maybe even snap a quick photo for posterity. You can set them loose on a platter, tuck them into mini cupcake liners, or even skewer them for a stand-up spider forest. The key is to balance playfulness with practicality, ensuring these eight-legged treats remain intact and ready to devour.
- Arrange on a spooky platter lined with black lace or parchment paper, spacing each spider evenly. Add plastic spiders or faux cobwebs around the edges for extra drama.
- Serve alongside dipping sauces in miniature bowls—think extra melted chocolate, peanut butter drizzle, or even raspberry jam for a tangy twist. Guests can customize each bite.
- Create a dessert bar with themed labels and colorful candy mixes. Place your Oreo spiders in clear jars or glass bowls, letting their cheerful legs peek out and inviting guests to grab handfuls.
- Package as party favors by slipping two or three spiders into cellophane bags tied with Halloween ribbon. Add a small tag with a spooky pun to make each gift memorable.
HOW TO STORE OREO SPIDER COOKIES
Keeping your Oreo Spider Cookies fresh and fun means understanding how each component behaves over time. The crispness of the cookie paired with sticky peanut butter or chocolate can shift textures if left out too long or stored incorrectly. Aim to preserve that satisfying snap and keep candy eyes firmly in place while preventing the licorice legs from drying out or becoming overly chewy. Proper storage also helps maintain the visual appeal—no one wants a droopy-legged spider at their party! With a few simple tips, you can store your creations up to several days before serving.
- Store at room temperature in an airtight container lined with parchment paper. Place cookies in a single layer or separate stacked layers with wax paper to prevent sticking and crushing.
- For longer freshness, keep them in the refrigerator. Seal in a plastic container with a tight lid; just know the cookies may soften slightly in the cool environment but will remain tasty for up to one week.
- To set up ahead of time, freeze your assembled spiders on a baking sheet until firm. Transfer to a freezer-safe bag or container with parchment between layers. Thaw in the refrigerator for an hour before serving.
- Avoid direct sunlight or high humidity, which can cause the peanut butter to sweat or the licorice to become too soft. Choose a cool, dry spot in your kitchen for any short-term display.
CONCLUSION
We’ve journeyed from simple sandwich cookies to a playful horde of Oreo Spider Cookies—an easy, beginner-friendly dessert that packs big personality for Halloween gatherings and everyday celebrations alike. You now have everything you need: the full ingredient lineup, step-by-step techniques, savvy serving ideas, and storage tips to keep your spiders looking fresh. Print this article and save it in your recipe binder or digital folder so you can revisit these instructions whenever you’re feeling creative. Don’t forget, you can find a FAQ below that covers common questions on substitutions, allergy considerations, and troubleshooting sticky messes.
If you give this recipe a whirl, I’d love to hear how your spooky critters turned out! Share your comments, questions, or any fun twists you invented along the way. Whether you’re tackling it with the kids, preparing for a haunted bash, or simply craving a whimsical dessert, your feedback and stories help our cooking community grow. Let me know if you tried a new licorice flavor, experimented with colorful candy eyes, or even introduced an adult-only version with liqueur-infused chocolate. Happy baking, and may your Halloween treats be as bewitching as they are delicious!
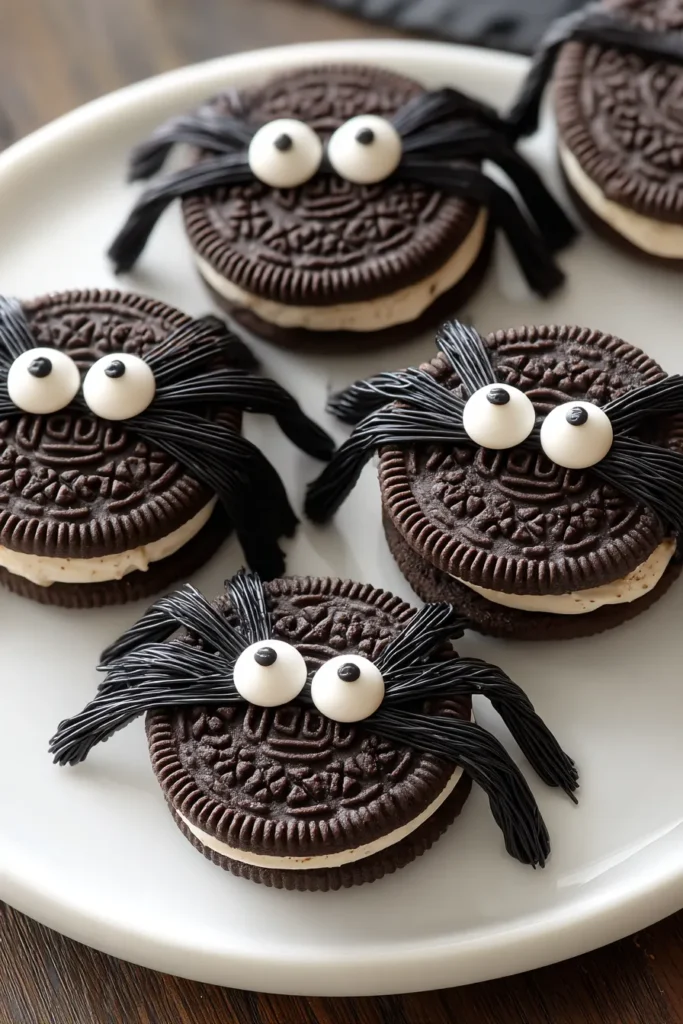

Oreo Spider Cookies
Description
These whimsical Oreo Spider Cookies are a perfect blend of crunchy and creamy, decorated with candy eyes and licorice legs to spook up your treats!
Ingredients
Instructions
-
Gather all the ingredients and set them out on your countertop for easy access.
-
Carefully twist each Oreo cookie apart, taking care not to break the cookies.
-
Using a small spoon, spread a small amount of peanut butter (or melted chocolate) on the cream side of the Oreo.
-
Cut the licorice lace into small pieces, about 1.5 inches each, to make the spider legs.
-
Place 4 pieces of licorice on each side of the Oreo cream to form the legs, sticking them into the cream and peanut butter (or melted chocolate) to secure them in place.
-
Replace the top of the Oreo cookie and gently press down to secure.
-
Using a little dab of peanut butter or melted chocolate, attach two candy eyes on top of each Oreo spider to create the eyes.
-
Let the cookies set for a few minutes before serving, allowing the peanut butter or chocolate to firm up slightly.
Nutrition Facts
Serving Size 12
- Amount Per Serving
- Calories 10kcal
Note
- These cookies make a fun and easy Halloween treat or party snack.
- If you're not a fan of peanut butter, melted chocolate works just as well for sticking the parts together.
- Experiment with different candy colors and licorice flavors to customize your Oreo spiders.
- These cookies are a great project for kids, making them an ideal family activity.

