

There’s something truly heartwarming about gathering around the dinner table to share a meal that bursts with vibrant colors, delightful textures, and a harmony of sweet and tangy flavors. Oven-Baked Sweet and Sour Chicken checks all those boxes and more, delivering tender cubes of chicken enveloped in a luscious sauce that dances on your taste buds. From the first bite, you’ll notice how the gentle crisp from the cornstarch coating meets the juicy interior, offering a playful contrast that’s both comforting and exciting. As someone who loves experimenting in the kitchen, I can attest that this recipe strikes the perfect balance between cooking at home and feeling like you’ve indulged in a restaurant-quality dish.
What makes this recipe a game-changer for busy weeknights is its effortless assembly and minimal fuss. You’ll start by lightly pan-frying the coated chicken pieces to golden perfection, then let the oven work its magic while you catch up on chores or relax with a good book. Meanwhile, the sauce—made from pantry staples like sugar, vinegar, and a touch of ketchup—simmers and melds with bright bell peppers and juicy pineapple chunks. By the time it’s ready, your kitchen will be filled with enticing aromas and you’ll be rewarded with a dish that’s as pleasing to look at as it is to savor. Whether you’re cooking for hungry kids or entertaining friends, this family-friendly meal promises rave reviews every time.
KEY INGREDIENTS IN OVEN-BAKED SWEET AND SOUR CHICKEN
Before we dive into the step-by-step process, let’s take a moment to meet the star players of this dish. Each ingredient has an important role, contributing to the overall texture, flavor, and visual appeal. Having them all prepped and ready will make the cooking process a breeze and ensure every component shines.
- Boneless, skinless chicken breast: Offers a lean source of protein that becomes tender and juicy when coated and baked. Its neutral flavor perfectly soaks up the sweet and sour sauce.
- Cornstarch: Creates an ultra-crisp exterior when the chicken is pan-fried, ensuring a delightful crunch that holds up even after baking.
- Eggs: Act as the binding agent that helps the cornstarch adhere uniformly to each chicken piece, promoting a consistent golden crust.
- Vegetable oil: Provides the necessary medium for shallow frying, helping to achieve a beautiful golden brown without overpowering flavors.
- Granulated sugar: Lends the essential sweetness to balance the tanginess of the vinegar and ketchup, creating that signature flavor fusion.
- Ketchup: Adds body, color, and a hint of tomato tang, enriching the sauce with depth and a subtle umami kick.
- White vinegar: Brings the zesty acidity needed to cut through the richness, resulting in a perfectly balanced sauce.
- Soy sauce: Offers a salty, savory backbone that enhances the overall flavor profile with a touch of umami.
- Garlic powder: Infuses a warm, aromatic undertone that complements both the sweetness and the acidity.
- Water: Helps adjust the sauce’s consistency, ensuring it glazes the chicken evenly during baking.
- Salt: Enhances and rounds out all the flavors, preventing the sauce from tasting flat or one-dimensional.
- Red bell pepper: Introduces a vibrant pop of color and a mild sweetness, plus a satisfying crunch.
- Green bell pepper: Balances the red pepper’s sweetness with a slightly grassy note while adding freshness.
- Pineapple chunks: Bring juicy bursts of tropical sweetness that pair beautifully with the tangy sauce.
- Toasted sesame seeds (optional): Provide a nutty finish and a hint of visual flair if you’re in the mood for added texture.
- Sliced green onions (for garnish): Offer a fresh, oniony zing and a bright green contrast to the deep hues of the chicken and sauce.
HOW TO MAKE OVEN-BAKED SWEET AND SOUR CHICKEN
Now that our ingredients are lined up and ready to go, let’s talk about how to transform them into a mouthwatering dinner the whole family will adore. This process combines pan-frying for crispiness with oven-baking for hands-off convenience, resulting in perfectly glazed chicken and vibrant veggies.
1. Preheat your oven to 325°F (163°C). While the oven warms up, lightly grease a large baking dish to prevent sticking and place it aside so it’s at the ready as soon as your chicken is browned.
2. In a medium bowl, coat the chicken pieces evenly with cornstarch, ensuring each cube is well-covered—this step is key for that signature crunch.
3. Beat the eggs in a separate bowl, then dip each cornstarch-coated chicken piece into the beaten eggs, allowing any excess to drip off before frying.
4. Heat the vegetable oil in a large skillet over medium-high heat. Once shimmering, add the chicken in batches and fry until golden brown on all sides, about 4 minutes per side. Work carefully so the skillet isn’t overcrowded.
5. Transfer the fried chicken pieces to the prepared baking dish, arranging them in a single layer to ensure even baking.
6. In a small bowl, whisk together the sugar, ketchup, white vinegar, soy sauce, garlic powder, water, and salt until the sugar is fully dissolved and the sauce is smooth.
7. Pour the sweet and sour sauce over the chicken, gently tossing or stirring to make sure every piece is generously coated.
8. Scatter the chopped red and green bell peppers along with the pineapple chunks evenly throughout the baking dish, distributing color and flavor.
9. Place the dish in the preheated oven and bake for 1 hour. Every 15 minutes, open the oven and stir gently to baste the chicken and vegetables, ensuring that the sauce glazes everything beautifully.
10. Once the chicken is cooked through and the sauce has thickened to a glossy coating, remove the dish from the oven and let it rest for a few minutes. This helps the flavors settle.
11. For an extra layer of texture and visual appeal, sprinkle toasted sesame seeds over the top and garnish with sliced green onions just before serving.
SERVING SUGGESTIONS FOR OVEN-BAKED SWEET AND SOUR CHICKEN
Serving this vibrant dish is almost as fun as making it. Whether you’re plating a family-style feast or creating individual portions, the way you present it can elevate the experience and turn a simple weeknight dinner into a memorable meal. Here are four ideas to inspire your table setting, ensuring that each bite is accompanied by the perfect accompaniment or garnish.
- Serve over a bed of steamed jasmine rice: The fluffy grains soak up every drop of sauce, creating a harmonious blend of texture and flavor.
- Pair with fried rice or garlic fried cauliflower rice: Add extra veggies or a low-carb twist to complement the sweetness and tanginess of the chicken.
- Present it family-style on a large platter, layering chicken and veggies for a colorful centerpiece; let everyone help themselves for a casual, communal vibe.
- Garnish with a sprinkle of toasted sesame seeds and fresh sliced green onions right before serving to introduce a pop of color and a hint of oniony freshness.
HOW TO STORE OVEN-BAKED SWEET AND SOUR CHICKEN
Once you’ve enjoyed the delightful aromas and flavors of this dish, it’s worth knowing how to store any leftovers so you can savor them later without losing that sweet and tangy magic. Proper storage not only preserves freshness but also ensures safe reheating, keeping textures and tastes as close to freshly baked as possible.
- Refrigeration in an airtight container: Allow the chicken to cool to room temperature, then transfer it (along with any sauce) into a sealed, airtight container. Stored this way, it will stay fresh for up to 3–4 days.
- Freezing for longer-term enjoyment: Portion out cooled chicken and veggies into freezer-safe containers or heavy-duty freezer bags, removing as much air as possible before sealing. Label with the date, and freeze for up to 2 months.
- Defrosting correctly: When ready to enjoy frozen portions, move the container from the freezer to the refrigerator and thaw overnight. This gradual thaw helps maintain texture and prevents the chicken from drying out.
- Reheating evenly: For best results, reheat in a preheated oven at 325°F (163°C) until the chicken is warmed through and the sauce is bubbling. You can also use a microwave on medium power in short intervals, stirring between heats to distribute warmth evenly.
CONCLUSION
I hope this Oven-Baked Sweet and Sour Chicken recipe inspires you to bring bold flavors and bright colors into your kitchen. From its tender, golden-brown chicken cubes to the glossy, tangy-sweet sauce studded with pineapple and vibrant bell peppers, every element works together for a crowd-pleasing meal. This dish not only offers a delicious weeknight dinner but also lends itself to easy meal prep and wonderful leftovers. Don’t forget—you can print this article or save it for future reference, jot down tweaks you make, and revisit your notes whenever you crave that irresistible balance of sweet, sour, and savory goodness. Keep the ingredients list handy, follow the easy steps, and you’ll have a dish that feels both homey and indulgent.
Below, you’ll find a FAQ section that addresses common questions about ingredient swaps, cooking times, and serving variations, so you can tailor the dish to your tastes. If you give this recipe a try, please drop a comment or question—I’d love to hear how it turned out or help troubleshoot any steps. Happy cooking, and here’s to countless delicious meals shared with friends and family!
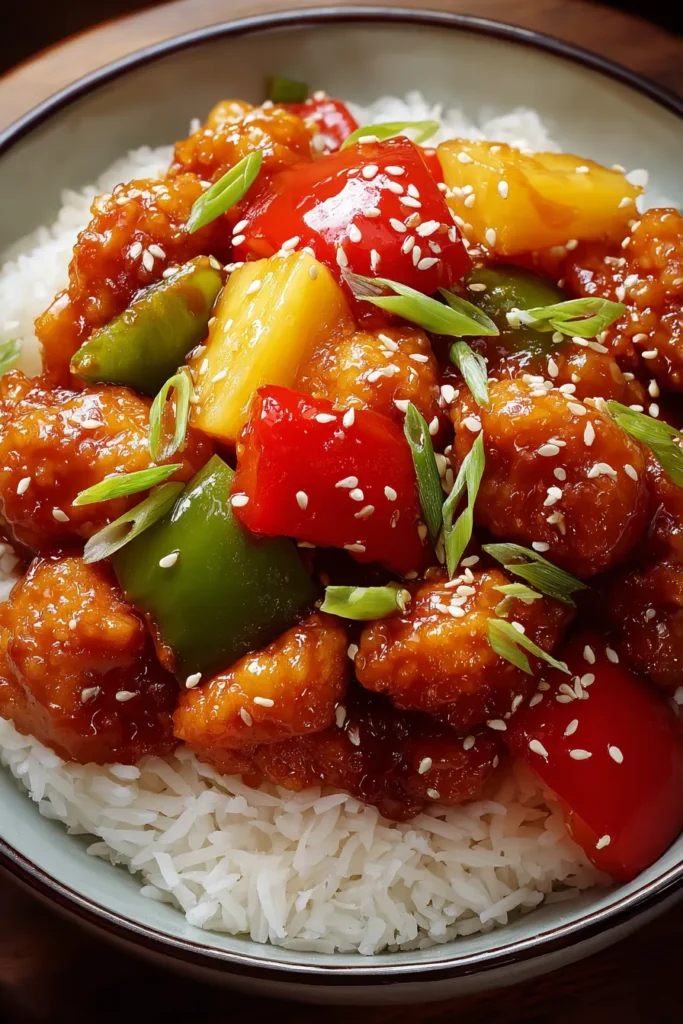

Oven-Baked Sweet and Sour Chicken
Description
Experience the perfect balance of sweetness and tanginess with tender chicken pieces coated in a luscious sweet and sour sauce, complemented by vibrant bell peppers and pineapple chunks. A deliciously satisfying meal for any occasion!
Ingredients
Instructions
-
Preheat your oven to 325°F (163°C). Lightly grease a large baking dish and set aside.
-
Begin by coating the chicken pieces with cornstarch in a medium bowl, ensuring each piece is fully covered.
-
Take another bowl and beat the eggs. Dip each cornstarch-coated chicken piece in the beaten eggs.
-
In a large skillet, heat the vegetable oil over medium-high heat. Once hot, add the chicken pieces and fry them until golden brown on all sides. This should take about 4 minutes per side.
-
Remove the chicken from the skillet and place it into the prepared baking dish.
-
In a small bowl, combine sugar, ketchup, vinegar, soy sauce, garlic powder, water, and salt, whisking until the sugar is dissolved.
-
Pour the sweet and sour sauce over the chicken pieces and make sure they are fully coated.
-
Add the red and green bell peppers and pineapple chunks to the baking dish, distributing them evenly.
-
Place the baking dish in the preheated oven and bake for 1 hour, stirring every 15 minutes to ensure even cooking and sauce glazing.
-
Once cooked, remove from the oven and let it cool for a few minutes.
-
If desired, sprinkle toasted sesame seeds on top and garnish with sliced green onions before serving.
Nutrition Facts
Serving Size 4
- Amount Per Serving
- Calories 100kcal
Note
- For a healthier option, you can reduce or omit the sugar and substitute with honey or a sweet alternative.
- Feel free to add other vegetables like broccoli or snap peas to increase the nutritional value.
- This dish is excellent when paired with steamed jasmine rice or fried rice.
- Marinating the chicken in a bit of soy sauce prior to coating can enhance the flavors.
- Be sure to whisk the sauce thoroughly before pouring over the chicken to avoid any sugar clumps.

