

There is something undeniably magical about the combination of rich chocolate and cool mint during the winter season. These Peppermint Hot Cocoa Cheesecake Bites perfectly capture that cozy vibe in a creamy, no-bake package that is dangerously easy to eat. Whether you are looking for a festive finger food for your next holiday gathering or just need a sweet pick-me-up on a Tuesday night, these little treats deliver big flavor without the stress of baking. I absolutely love how the buttery graham crust balances the smooth cheesecake filling, and I can't wait for you to whip up a batch yourself.
Key Ingredients
To create these delightful bites, you will need a combination of standard baking pantry staples and fresh dairy items. The magic happens when the tangy cream cheese meets the deep flavor of cocoa, all supported by a crunchy, buttery base. Gathering these ingredients is the first step toward holiday dessert success.
- 1 cup graham cracker crumbs: These form the structural base of the bite, providing a crunchy texture and a buttery flavor that contrasts beautifully with the creamy filling.
- 1/4 cup granulated sugar: Used in the crust mixture, this adds just the right amount of sweetness to bind the crumbs together without overpowering the chocolate.
- 1/2 cup unsalted butter, melted: The liquid gold that acts as the binding agent for the crust, ensuring it firms up nicely when chilled in the refrigerator.
- 16 oz cream cheese, softened: The star of the show, providing the rich, tangy, and velvety foundation for the cheesecake filling; ensure it is at room temperature for smooth mixing.
- 1 cup powdered sugar: This sweetener blends seamlessly into the cream cheese without leaving a gritty texture, ensuring a silky smooth mouthfeel.
- 1/2 cup unsweetened cocoa powder: This ingredient transforms the plain cheesecake base into a rich, chocolatey "hot cocoa" flavor profile.
- 1 teaspoon peppermint extract: The essential flavoring that cuts through the richness of the chocolate and gives the dessert its signature holiday cooling sensation.
- 1 cup whipped cream, plus more for topping: Folded into the filling to aerate the mixture, making the cheesecake bites light and fluffy rather than dense.
- 1/2 cup mini chocolate chips: These add a delightful textural contrast, giving you little bursts of solid chocolate within the creamy filling.
- Crushed peppermint candies for garnish: Used as a finishing touch, these add a festive pop of red color and a satisfying crunch to the top of each bite.
- Chocolate or white chocolate melting wafers for drizzling: These provide a professional-looking finish and an extra layer of sweetness to seal the deal.
How To Make Peppermint Hot Cocoa Cheesecake Bites
Making these cheesecake bites is a wonderful experience because it requires absolutely no oven time, keeping your kitchen cool and stress-free. The process focuses on building layers of texture, starting with a firm crust and topping it with a mousse-like chocolate filling. The most critical part of this recipe is patience; allowing the cream cheese to soften properly before mixing and letting the bites set fully in the fridge ensures they hold their shape perfectly. It is a fun, hands-on process that yields impressive results even for beginners.
1. In a mixing bowl, combine the graham cracker crumbs, granulated sugar, and melted butter. Mix until well combined and the mixture has a sand-like texture.
2. Press this mixture firmly into the bottom of a silicone mini muffin tray or a lined mini muffin tin to form the crust. Place it in the refrigerator to set while you prepare the cheesecake filling.
3. In another large bowl, beat the softened cream cheese with an electric mixer until smooth and creamy.
4. Gradually add the powdered sugar and unsweetened cocoa powder to the cream cheese, mixing until fully combined.
5. Stir in the peppermint extract and mix thoroughly.
6. Gently fold in the whipped cream until no white streaks remain, creating a lighter texture for the cheesecake filling.
7. Add mini chocolate chips to the cheesecake mixture and fold in carefully.
8. Spoon the cheesecake filling over the graham cracker crust in the muffin tins, filling each cavity to the top.
9. Smooth the tops with a spatula and return the tray to the refrigerator for at least 4 hours or overnight to allow the cheesecake bites to set properly.
10. Once set, carefully pop the cheesecake bites out of the molds.
11. Melt the chocolate or white chocolate wafers according to package instructions and drizzle over the cheesecake bites.
12. Finish with a dollop of whipped cream on each bite and sprinkle with crushed peppermint candies for added decoration and flavor.
Serving Suggestions
Presentation is everything when it comes to holiday treats, and these Peppermint Hot Cocoa Cheesecake Bites look just as good as they taste. Because they are finger foods, they are incredibly versatile for entertaining. I love arranging them on a nice platter where the red peppermint candy pops against the dark chocolate drizzle. Since they are rich, you don't need huge portions, making them ideal for grazing tables. Here are a few specific ways to serve them to wow your guests.
- The Holiday Platter: Arrange the bites on a white rectangular platter garnished with fresh sprigs of mint and whole candy canes to create a festive centerpiece that highlights the colors of the season.
- Hot Cocoa Bar Companion: Serve these bites alongside a warm beverage station featuring hot chocolate and coffee; the cool temperature of the cheesecake provides a delightful temperature contrast to the hot drinks.
- Dessert Shooters: For a more formal look, you can make these inside small clear shot glasses instead of muffin tins, allowing guests to see the distinct layers of crust and filling before digging in with a spoon.
- Cookie Exchange Addition: Place individual bites in mini cupcake liners inside a sturdy decorative box; they make a fantastic, creamy alternative to the standard baked cookies usually found at a cookie swap.
Tips For Perfect Peppermint Hot Cocoa Cheesecake Bites
I want to make sure your batch turns out absolutely flawless, so I have gathered a few insights to help you navigate this recipe like a pro. The beauty of no-bake desserts is that they are forgiving, but paying attention to the little details can elevate the flavor and texture significantly. These tips are designed to help you customize the experience to your taste and ensure that your preparation goes smoothly, whether you are hosting a big party or just treating the family.
- These cheesecake bites are perfect for holiday gatherings or as a sweet treat for any occasion, so don't feel limited to just Christmas—they are great all winter long.
- Feel free to use flavored chocolate wafers to change up the chocolate drizzle; using a dark mint chocolate melt or even a red-colored vanilla wafer can add a unique visual and flavor twist.
- You can substitute regular peppermint extract with peppermint flavoring for a more intense mint flavor if you really love that strong, cooling menthol kick in your chocolate desserts.
- These bites freeze well; simply thaw in the refrigerator before serving, which is a massive lifesaver when you are trying to prep food ahead of a busy schedule.
How To Store It
Proper storage is essential for these cheesecake bites because they contain dairy ingredients like cream cheese and whipped cream. If left out at room temperature for too long, they can become too soft and lose that perfect bite-sized structure. I always recommend planning your storage space in the fridge or freezer before you even start making them. Keeping them cold not only preserves freshness but also maintains the integrity of the texture.
- Refrigerated Airtight Container: Store the finished bites in a single layer in an airtight container in the refrigerator for up to 5 days to keep the cheesecake filling firm and fresh.
- Freezing for Long Term: For longer storage, place the bites on a baking sheet to freeze individually, then transfer them to a freezer-safe bag or container; they will keep well for up to 2 months.
- Layering with Parchment: If you need to stack the bites in a container to save space, always place a sheet of parchment paper between the layers to prevent the chocolate drizzle and toppings from sticking together.
- Thawing Properly: When you are ready to eat frozen bites, move them to the refrigerator a few hours beforehand to thaw slowly; this prevents condensation from making the graham cracker crust soggy.
Frequently Asked Questions
I know that trying a new recipe can sometimes raise a few questions, so I've gathered the most common inquiries to help you out. Here is everything you need to know to troubleshoot and perfect your cheesecake bites.
- Q: How long do the cheesecake bites need to remain in the refrigerator before serving?
A: The recipe requires the tray to be placed in the refrigerator for at least 4 hours or overnight. This duration allows the cheesecake bites to set properly so they can be removed from the molds without losing their shape.
- Q: Can these Peppermint Hot Cocoa Cheesecake Bites be made ahead of time and frozen?
A: Yes, these bites freeze well, making them a suitable make-ahead option. When you are ready to serve them, simply thaw the bites in the refrigerator.
- Q: What is the correct way to incorporate the whipped cream into the filling?
A: You should gently fold the whipped cream into the cream cheese mixture until no white streaks remain. This specific technique is important for creating a lighter texture for the cheesecake filling.
- Q: What type of pan is best for shaping these bites?
A: You should press the crust mixture into the bottom of a silicone mini muffin tray or a lined mini muffin tin. Using a silicone tray often makes it easier to carefully pop the cheesecake bites out of the molds once they are set.
- Q: How can I adjust the intensity of the peppermint flavor?
A: While the standard recipe calls for 1 teaspoon of peppermint extract, the notes suggest that you can substitute regular peppermint extract with peppermint flavoring if you prefer a more intense mint flavor.
- Q: What consistency should the crust mixture have before pressing it into the pan?
A: When combining the graham cracker crumbs, granulated sugar, and melted butter, you should mix them until the ingredients are well combined and the mixture achieves a sand-like texture.
What Makes This Special
These Peppermint Hot Cocoa Cheesecake Bites are genuinely a lifesaver during the hectic holiday season. They combine the nostalgic flavors of a warm mug of cocoa with the sophisticated texture of a cheesecake, all without turning on the oven. I promise that once you bring these to a party, you will be the most popular person in the room! Go ahead and print this article or save it to your bookmarks so you have it ready for your next grocery run. If you try these out, please leave a comment below or ask any questions you might have; I would love to hear how they turned out for you!
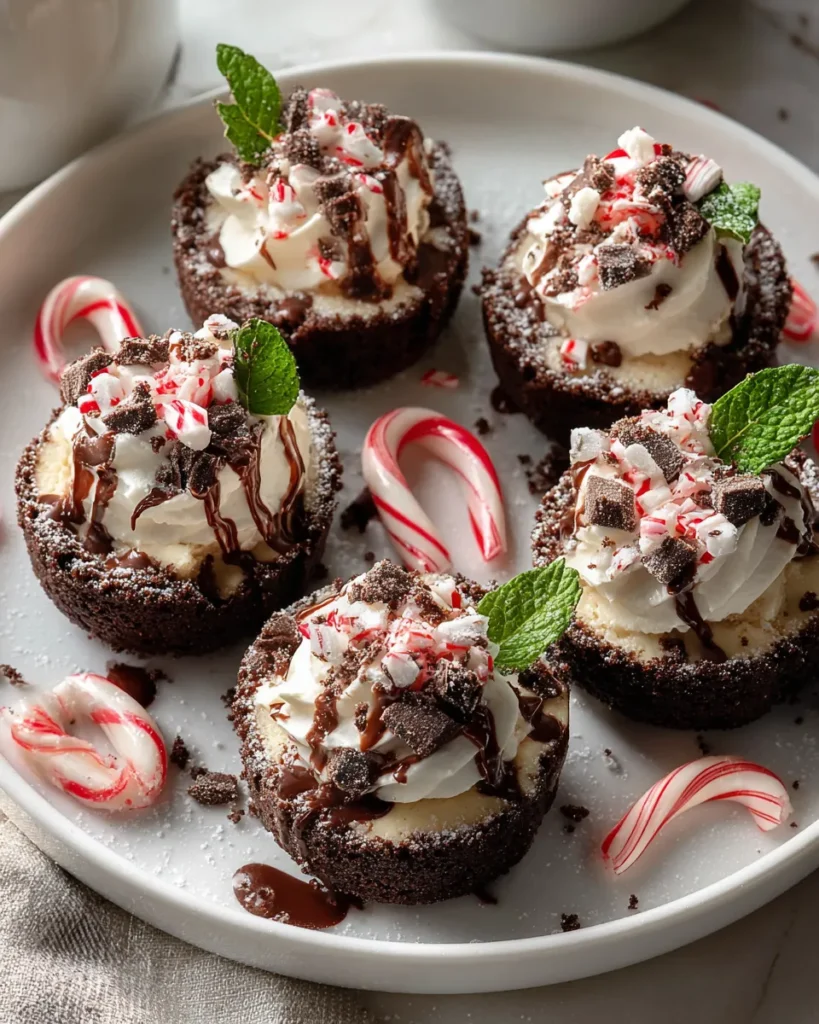

Peppermint Hot Cocoa Cheesecake Bites
Description
Smooth chocolate cheesecake meets a buttery graham crust in these bite-sized sweets, topped with crushed candy canes for a festive crunch.
Ingredients
Instructions
-
In a mixing bowl, combine the graham cracker crumbs, granulated sugar, and melted butter. Mix until well combined and has a sand-like texture.
-
Press this mixture firmly into the bottom of a silicone mini muffin tray or a lined mini muffin tin to form the crust. Place it in the refrigerator to set while you prepare the cheesecake filling.
-
In another large bowl, beat the softened cream cheese with an electric mixer until smooth and creamy.
-
Gradually add the powdered sugar and unsweetened cocoa powder to the cream cheese, mixing until fully combined.
-
Stir in the peppermint extract and mix thoroughly.
-
Gently fold in the whipped cream until no white streaks remain, creating a lighter texture for the cheesecake filling.
-
Add mini chocolate chips to the cheesecake mixture and fold in carefully.
-
Spoon the cheesecake filling over the graham cracker crust in the muffin tins, filling each cavity to the top.
-
Smooth the tops with a spatula and return the tray to the refrigerator for at least 4 hours or overnight to allow the cheesecake bites to set properly.
-
Once set, carefully pop the cheesecake bites out of the molds.
-
Melt the chocolate or white chocolate wafers according to package instructions and drizzle over the cheesecake bites.
-
Finish with a dollop of whipped cream on each bite and sprinkle with crushed peppermint candies for added decoration and flavor.
Nutrition Facts
Serving Size 24
- Amount Per Serving
- Calories 8kcal
Note
- These cheesecake bites are perfect for holiday gatherings or as a sweet treat for any occasion.
- Feel free to use flavored chocolate wafers to change up the chocolate drizzle.
- You can substitute regular peppermint extract with peppermint flavoring for a more intense mint flavor.
- These bites freeze well; simply thaw in the refrigerator before serving.

