

These chewy rice cereal bars swirled with gooey caramel and a hint of sea salt are the snack-time hero you never knew you needed. Crisp Rice Krispies enveloped in molten marshmallow and rich caramel, finished with just the right sprinkle of sea salt, deliver buttery chew, crunchy nuts, and waves of sweet-salty bliss in every bite. Once you try these bars, you’ll be whipping up multiple batches and sharing them with everyone. Let’s jump into this easy dessert that’s perfect for beginners and guaranteed to satisfy your sweet tooth!
Key Ingredients
Before we get cooking, let’s gather the simple ingredients that make these treats shine:
- 6 cups Rice Krispies cereal: Crisp cereal that provides the classic crunchy base for each chewy bar.
- 1/4 cup unsalted butter: Melts into the marshmallows to create a rich, buttery binding agent.
- 1 package (10 oz) mini marshmallows: Becomes that stretchy, gooey glue that holds your treats together.
- 1/2 cup caramel sauce (store-bought or homemade): Swirls of sweet caramel add depth and chewiness.
- 1/2 teaspoon sea salt (plus extra for topping): Balances sweetness with a punch of savory contrast.
- 1 teaspoon vanilla extract: Rounds out the flavor with a warm, aromatic note.
- 1 cup chopped nuts (optional for added crunch): Introduces a nutty texture that plays off the soft marshmallows.
How To Make Salted Caramel Rice Krispie Treats
These treats come together in just a few simple steps—you’ll be amazed how quickly you can go from pantry staples to irresistible bars. Just grab a large saucepan, a spatula, and your greased 9×13 pan, then follow the steps below to achieve perfect sweet-salty bliss.
1. Grease a 9×13-inch pan with butter or cooking spray to prevent sticking and set aside.
2. In a large saucepan over low heat, melt the 1/4 cup of unsalted butter until it’s fully liquefied and shimmering.
3. Add the entire 10-ounce package of mini marshmallows, then stir continuously with a heat-resistant spatula until the marshmallows have melted into a smooth, lump-free mixture.
4. Remove the pan from heat and incorporate the 1/2 cup caramel sauce, 1/2 teaspoon sea salt, and 1 teaspoon vanilla extract, stirring until everything is evenly blended.
5. Gradually pour in the 6 cups of Rice Krispies cereal, then gently fold with your spatula until every crisp is coated in the sticky marshmallow-caramel blend.
6. If using, fold in 1 cup of chopped nuts at this stage to add a toasty crunch throughout.
7. Transfer the mixture into the prepared pan, then use a buttered spatula or lightly greased hands to press firmly and create an even layer.
8. Let the pan sit at room temperature for about 30 minutes, allowing the treats to set and firm up.
9. Once cooled, drizzle extra caramel sauce over the top and finish with a light sprinkle of sea salt for garnish.
10. Cut into squares or rectangles, serve, and enjoy your delicious salted caramel Rice Krispie treats!
Serving Suggestions
These treats are endlessly versatile—whether you’re hosting a party or sneaking a late-night snack, here’s how to make them shine:
- Arrange on a platter: Neatly line up squares on a decorative tray for a show-stopping dessert table display.
- Pair with an ice-cold beverage: A tall glass of milk, iced coffee, or a creamy latte perfectly complements the sweet-salty chew.
- Wrap in parchment paper: For on-the-go treats, cut each bar, wrap in a strip of parchment, and twist the ends like little candies.
- Top with fresh berries or whipped cream: Add a pop of color and brightness before serving to balance the richness.
Tips For Perfect Salted Caramel Rice Krispie Treats
Putting together these bars is almost foolproof, but a few insider tips will take your game to the next level. Keep an eye on your heat, press with care, and don’t be afraid to experiment for personalized flair. Here are some quick pointers:
- These treats can be stored in an airtight container for up to a week.
- For a fun variation, add chocolate chips or M&Ms to the mixture before pressing it into the pan.
- Experiment with flavored marshmallows or caramel for a unique twist!
- If you want a richer flavor, you can brown the butter before adding the marshmallows.
How To Store It
Storing these Rice Krispie treats properly ensures they stay chewy, sweet, and just the right amount of salty. Follow these friendly storage tips to keep each bar tasting as good as the day you made it:
- Airtight container: Place cooled treats in a sealed container and store at room temperature for up to one week.
- Layer separation: Slip parchment or wax paper between layers to prevent sticks and make lifting out bars a breeze.
- Refrigeration: If you live somewhere warm, pop the container in the fridge—just let bars return to room temperature before digging in for the best chew.
- Serving prep: Remove chilled treats 10–15 minutes before serving so they’re soft and gooey again.
Frequently Asked Questions
Got a question? You’re not alone—here are some quick answers to common queries:
- Can I substitute regular marshmallows for the mini marshmallows in this recipe?
A: Yes. If you only have standard-size marshmallows (about 10 ounces equals roughly 40 regular marshmallows), simply use the same weight. They may take a moment longer to melt, so keep stirring gently over low heat until completely smooth.
- How can I make my own caramel sauce instead of using store-bought?
A: To make a quick homemade caramel sauce, combine 1 cup granulated sugar and 2 tablespoons water in a saucepan over medium heat. Stir until the sugar dissolves, then let it simmer without stirring until it turns a deep amber color. Carefully whisk in 6 tablespoons unsalted butter in pieces until combined, then remove from heat and stir in ½ cup heavy cream, 1 teaspoon vanilla extract, and a pinch of sea salt. Let it cool slightly before adding to the marshmallow mixture.
- My treats turned out too hard or too soft. How do I get the right texture?
A: Too hard often means you pressed the mixture too firmly into the pan or cooked the marshmallows too long, reducing moisture. Press gently with a buttered spatula and remove from heat as soon as the marshmallows are melted. Too soft may indicate too much caramel or not enough cereal; stick to the 6-cup Rice Krispies ratio and measure sauces accurately. Cool completely at room temperature for firmer bars.
- What’s the best way to store these salted caramel Rice Krispie treats?
A: Place cooled treats in an airtight container, separating layers with parchment or wax paper to prevent sticking. Store at room temperature for up to one week. If you live in a very warm climate, keep them in the refrigerator—just allow them to come to room temperature before serving for optimal chewiness.
- Can I add extra mix-ins, like chocolate chips or dried fruit?
A: Absolutely. After folding in the Rice Krispies, gently stir in up to ¾ cup of mix-ins such as chocolate chips, M&Ms, chopped dried fruit, or toasted coconut. Adding them before you press the mixture into the pan helps ensure they stay evenly distributed.
- How do I brown the butter for a richer flavor, and should I adjust anything else if I do?
A: To brown the butter, melt the ¼ cup unsalted butter over medium heat in a light-colored pan, swirling often. It will foam, then the milk solids will brown and give a nutty aroma—remove from heat as soon as you see specks of brown. Let it cool slightly, then proceed with melting the marshmallows. No other adjustments are needed, just be cautious as browned butter is hotter than melted butter.
- Why is the sea salt important, and how can I make sure it’s evenly distributed?
A: The salt balances the sweetness of caramel and marshmallows, creating that signature sweet-salty contrast. Mix the ½ teaspoon sea salt thoroughly into the warm caramel-marshmallow mixture before adding the cereal to ensure even distribution. For extra flavor, sprinkle a very light, even pinch of coarse sea salt over the top immediately after drizzling additional caramel so it adheres properly.
What Makes This Special
These Salted Caramel Rice Krispie Treats hit all the right notes—sweet, salty, chewy, and crunchy—in one glorious bar. They’re foolproof for beginners, endlessly adaptable, and guaranteed to spark joy (and a little kitchen chaos). Print this recipe out, tuck it in your binder, and try it out next time you need a quick dessert win. If you whip up a batch, tweak a flavor, or have any questions, drop a comment below—I love hearing how your batches turn out!
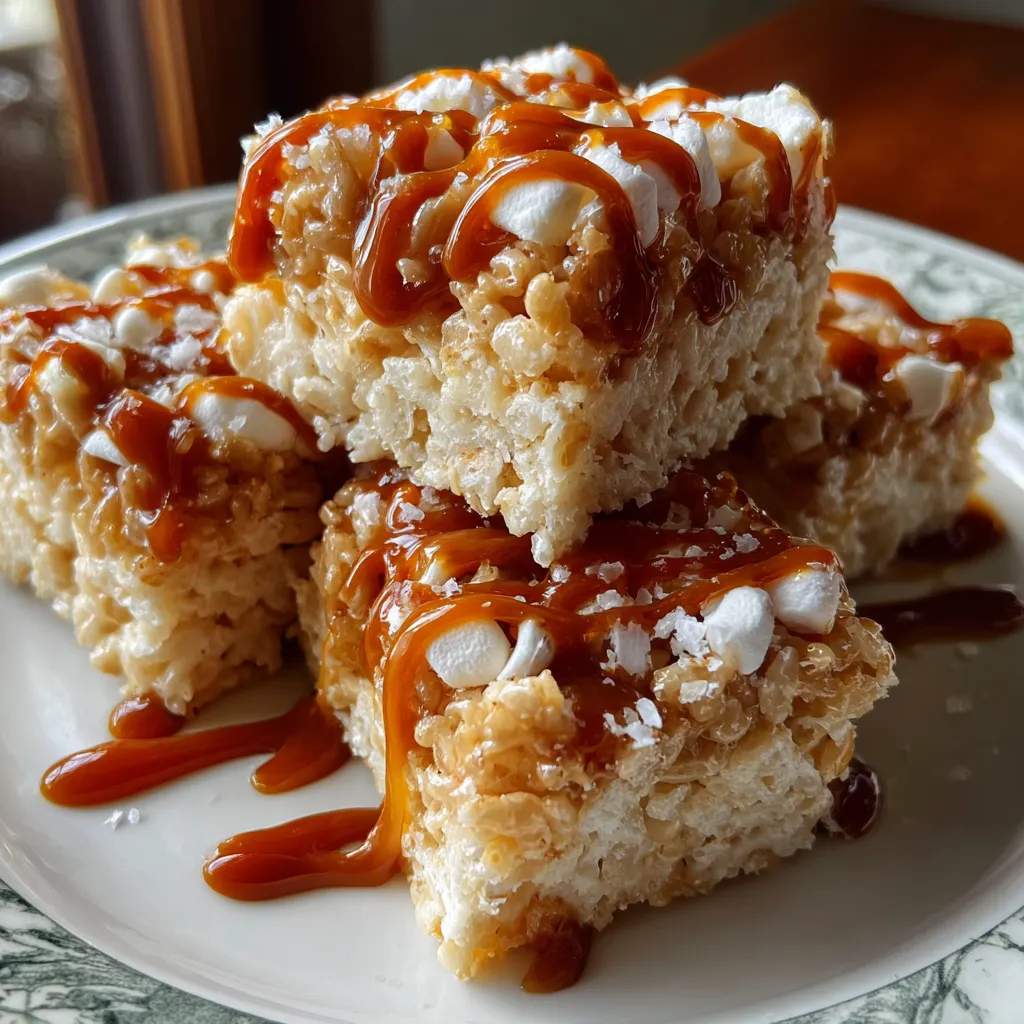

Salted Caramel Rice Krispie Treats
Description
These bars mix crisp Rice Krispies with molten marshmallow and rich caramel, finished with a sprinkle of sea salt. Each bite delivers a buttery chew, a touch of crunch from nuts, and waves of sweet-salty bliss.
Ingredients
Instructions
-
Begin by greasing a 9x13 inch pan with butter or cooking spray to prevent sticking.
-
In a large saucepan, melt the 1/4 cup of unsalted butter over low heat.
-
Once the butter has melted, add the 10 oz package of mini marshmallows to the saucepan. Stir continuously until the marshmallows are completely melted and the mixture is smooth.
-
Remove the saucepan from heat and mix in the caramel sauce, 1/2 teaspoon of sea salt, and 1 teaspoon of vanilla extract. Stir until well combined.
-
Gradually add the 6 cups of Rice Krispies cereal to the marshmallow mixture. Use a spatula to gently fold the cereal into the mixture until all the cereal is evenly coated.
-
If you're using chopped nuts, fold them in at this stage for added texture and flavor.
-
Spread the mixture evenly into the prepared 9x13 inch pan. Use a buttered spatula or your hands (lightly greased) to press the mixture firmly into the pan.
-
Allow the Rice Krispie treats to cool at room temperature for about 30 minutes.
-
Once cooled, drizzle more caramel sauce on top and sprinkle with an extra pinch of sea salt for garnish.
-
Cut into squares or rectangles for serving and enjoy your delicious salted caramel rice Krispie treats!
Nutrition Facts
Serving Size 12
- Amount Per Serving
- Calories 17kcal
Note
- These treats can be stored in an airtight container for up to a week.
- For a fun variation, add chocolate chips or M&Ms to the mixture before pressing it into the pan.
- Experiment with flavored marshmallows or caramel for a unique twist!
- If you want a richer flavor, you can brown the butter before adding the marshmallows.

