

Getting into the holiday spirit is so much sweeter when there is chocolate involved, especially when it looks this adorable. These festive treats take a classic fudgy square and give it a whimsical makeover that looks just like Santa’s famous red cap. It is the perfect way to bring a smile to everyone’s face at your next holiday gathering without spending hours in the kitchen. Whether you are a baking pro or just looking for a fun project to do with the kids, you are going to love how easy and delicious these are to make.
Key Ingredients
Before we start baking, let's gather everything we need. This recipe combines the convenience of a box mix with fresh fruit and a simple homemade touch for the frosting. It is all about balancing that rich chocolate base with the refreshing bite of a strawberry.
- 1 box of brownie mix (plus ingredients required on the package, usually oil, eggs, and water): This serves as the fudgy chocolate foundation for your festive hats and saves you plenty of time during the busy season.
- 1 cup of powdered sugar: The primary sweetener for your homemade frosting that ensures a smooth and stiff texture to hold the decorations in place.
- 2-3 tablespoons milk: This liquid helps thin out the powdered sugar just enough to create a spreadable consistency without making it too runny.
- 1 teaspoon vanilla extract: A splash of this adds a lovely aromatic flavor to the white frosting that pairs perfectly with the chocolate and fruit.
- Red food coloring (optional for more vibrancy): You can add a few drops of this if you want to tint your frosting pink or red, though white works perfectly for a traditional look.
- Strawberries (fresh, medium-sized, with green tops intact): These act as the main structure of the Santa hat, providing a fresh and juicy contrast to the dense brownie.
- Mini marshmallows (or larger ones cut in half for the pom-pom): These fluffy little treats sit right on top to mimic the white pom-pom on Santa's hat.
- Piping bag or a zip-lock bag with the corner cut off for frosting: This tool gives you control when applying the frosting glue, keeping your assembly neat and tidy.
How To Make Santa Hat Christmas Brownies
Creating these adorable treats is surprisingly simple and honestly quite therapeutic. The process is broken down into two main phases: baking the brownie base and then having fun with the assembly. You will want to make sure you give yourself enough time for the brownies to cool completely, as this is crucial for the frosting to stick properly. While the oven does the hard work, you can prep your strawberries and mix up that sweet vanilla icing. It is a straightforward assembly line style of baking that yields impressive results without any complicated pastry techniques.
1. Preheat your oven to the temperature indicated on the brownie mix box. Prepare your baking pan according to package instructions (usually greased or lined with parchment paper).
2. In a large mixing bowl, combine the brownie mix with the required ingredients (oil, eggs, and water). Mix according to the package instructions until well combined, ensuring no lumps remain.
3. Pour the brownie batter into the prepared baking pan, spreading it evenly with a spatula.
4. Bake the brownies in the preheated oven for the time recommended on the box, usually around 20-30 minutes. You can perform a toothpick test for doneness: insert a toothpick into the center, it should come out clean or with a few moist crumbs.
5. Once baked, remove the brownies from the oven and let them cool completely in the pan on a wire rack.
6. While the brownies are cooling, prepare the frosting. In a medium bowl, combine the powdered sugar, milk, vanilla extract, and a few drops of red food coloring (if using). Mix until smooth and desired consistency is achieved; it should be thick but spreadable.
7. Once the brownies are cool, cut them into squares or rectangles, approximately 2×2 inches in size.
8. For each brownie, use a knife or spatula to spread a thin layer of the frosting on top. This will act as the glue for your strawberry and marshmallow.
9. Top each frosted brownie with a strawberry, pointy side up, to form the "hat."
10. Place a mini marshmallow or the cut half of a larger marshmallow at the base of the strawberry, on top of the frosting, to resemble the fluffy pom-pom of a Santa hat.
11. Repeat the process for each brownie until all are decorated.
12. Serve immediately or store in an airtight container in the refrigerator until ready to enjoy.
Serving Suggestions
Presentation is everything when it comes to holiday treats, and these Santa hats practically decorate themselves. However, the way you serve them can elevate the experience from a simple snack to a memorable dessert course. Because they combine fresh fruit with dairy-based frosting, you want to serve them when they are fresh and the strawberries are crisp. They look fantastic on their own, but pairing them with other holiday staples can create a truly festive atmosphere.
- Holiday Dessert Platter: Arrange these brownies on a large white or silver platter surrounded by candy canes and peppermint bark to create a stunning visual contrast that screams Christmas cheer.
- Hot Cocoa Companion: Serve a brownie on a small plate alongside a steaming mug of hot chocolate topped with whipped cream, as the cool strawberry cuts through the richness of the warm drink.
- Kids' Table Centerpiece: Place the brownies on a tiered cake stand for the children's table, making them an accessible and edible decoration that adds height and color to the spread.
- Dusting of Snow: Right before serving, lightly sift extra powdered sugar over the entire batch to create a snowy effect that makes the red strawberries pop even more.
Tips For Perfect Santa Hat Christmas Brownies
We all want our holiday baking to go smoothly, and a few little tricks can make a big difference with this recipe. The beauty of these brownies lies in their versatility and the joy they bring during the assembly process. You do not have to stress about perfection here because the charm comes from the handmade look. Whether you are tweaking the flavors or getting the whole family involved, keeping these notes in mind will ensure your batch turns out delicious and fun every single time.
- This recipe can be easily modified using your favorite homemade brownie recipe instead of a box mix.
- To add variety, consider using different fruits or toppings for a unique twist.
- These brownies are a fun and festive way to enjoy holiday treats with family and friends!
- You can also use chocolate frosting instead of white for a different look.
- Have the kids help with the decorating for a fun holiday activity!
How To Store It
Since we are dealing with fresh fruit and dairy-based frosting, storage is a bit more specific than your average baked good. You want to preserve the freshness of the strawberry so it doesn't get mushy and ruin the texture of the brownie underneath. Proper storage ensures that your hard work doesn't go to waste and that the leftovers (if there are any!) taste just as good the next day. Here is the best way to keep your Santa hats looking and tasting their best.
- Refrigeration: Because of the fresh strawberries and milk in the frosting, you must store these in an airtight container inside the refrigerator to keep them safe and fresh.
- Single Layer Storage: Do not stack these treats on top of one another, as the strawberries are delicate and the marshmallows can slide off; always keep them in a single flat layer.
- Best By Date: These are best enjoyed within 24 hours because the moisture from the cut strawberry can eventually make the brownie soggy, so try to eat them while they are fresh.
- Room Temperature: If stored in the fridge, take the container out about 10 to 15 minutes before serving to let the brownie base soften up slightly for the best texture.
Frequently Asked Questions
I know questions often pop up when you are in the middle of baking, so I have gathered the most common ones to help you out. Here is everything you need to know to troubleshoot and perfect your Santa hats.
- Q: How do I determine when the brownies are fully baked?
A: You can perform a toothpick test by inserting a toothpick into the center of the brownies. They are considered done when the toothpick comes out clean or with just a few moist crumbs attached.
- Q: What ingredients are needed to make the frosting and what consistency should it have?
A: To make the frosting, you need to combine powdered sugar, milk, vanilla extract, and optional red food coloring in a medium bowl. You should mix these ingredients until the mixture is smooth and achieves a consistency that is thick but spreadable.
- Q: How should I construct the Santa hat decoration on the brownie?
A: First, spread a thin layer of frosting on the cooled brownie to act as glue. Then, top the frosted brownie with a strawberry placed pointy side up, and finally, place a mini marshmallow (or half of a larger one) at the base of the strawberry on top of the frosting to resemble the fluffy pom-pom.
- Q: Is it possible to customize the brownie base or the frosting used in this recipe?
A: Yes, you can easily modify the recipe by using your favorite homemade brownie recipe instead of a box mix, and the notes also suggest that you can use chocolate frosting instead of white for a different look.
- Q: How should the finished brownies be stored?
A: If you are not serving the brownies immediately, they should be placed in an airtight container and stored in the refrigerator until you are ready to enjoy them.
What Makes This Special
These brownies are proof that you don't need a culinary degree to make something that looks professional and tastes amazing. The combination of dense, fudgy chocolate with the light, juicy strawberry is honestly a match made in heaven, and the cute factor is just off the charts. It is the kind of recipe that makes you look like a Pinterest superstar with minimal effort. Do yourself a favor and print this article or save it to your bookmarks right now because you are going to want this for every Christmas party moving forward. If you give these a try, I would love to hear how they turned out! Drop a comment below if you have any questions or just want to share your baking victory. Happy holidays and happy baking!
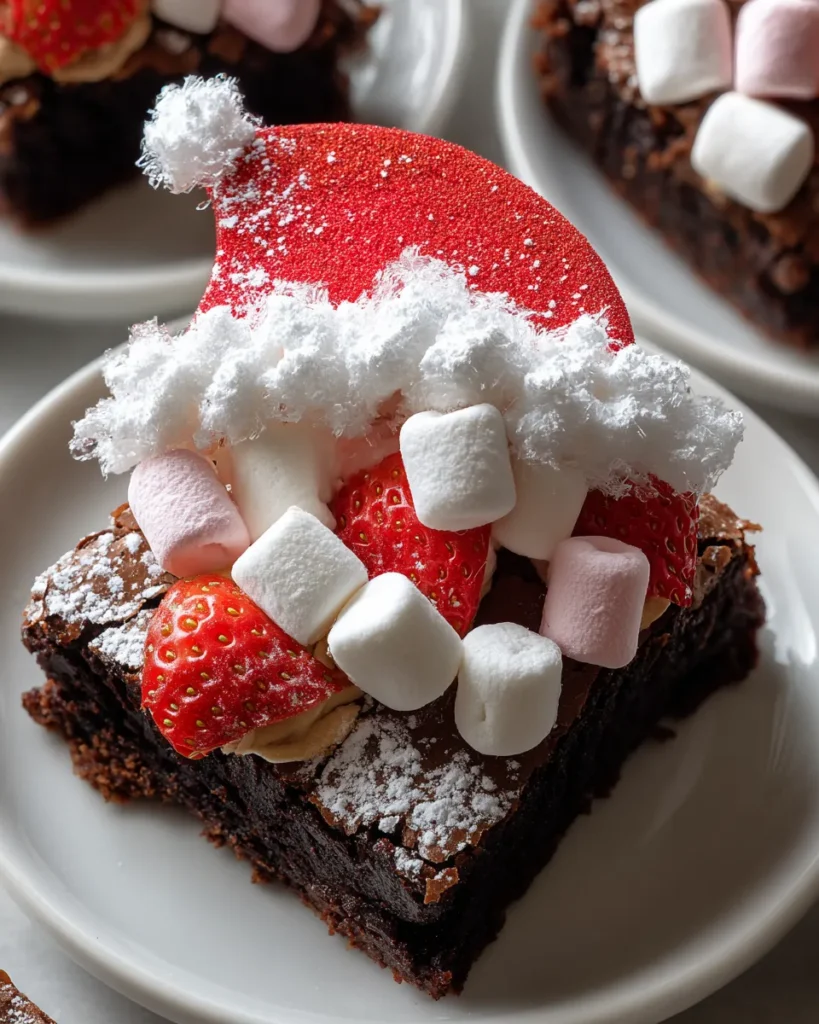

Santa Hat Christmas Brownies
Description
Fudgy chocolate bases meet sweet vanilla icing and juicy strawberries in this whimsical holiday treat. The crisp bite of fresh fruit pairs perfectly with soft, chewy brownies for a pop of color on any platter.
Ingredients
Instructions
-
Preheat your oven to the temperature indicated on the brownie mix box. Prepare your baking pan according to package instructions (usually greased or lined with parchment paper).
-
In a large mixing bowl, combine the brownie mix with the required ingredients (oil, eggs, and water). Mix according to the package instructions until well combined, ensuring no lumps remain.
-
Pour the brownie batter into the prepared baking pan, spreading it evenly with a spatula.
-
Bake the brownies in the preheated oven for the time recommended on the box, usually around 20-30 minutes. You can perform a toothpick test for doneness: insert a toothpick into the center, it should come out clean or with a few moist crumbs.
-
Once baked, remove the brownies from the oven and let them cool completely in the pan on a wire rack.
-
While the brownies are cooling, prepare the frosting. In a medium bowl, combine the powdered sugar, milk, vanilla extract, and a few drops of red food coloring (if using). Mix until smooth and desired consistency is achieved; it should be thick but spreadable.
-
Once the brownies are cool, cut them into squares or rectangles, approximately 2x2 inches in size.
-
For each brownie, use a knife or spatula to spread a thin layer of the frosting on top. This will act as the glue for your strawberry and marshmallow.
-
Top each frosted brownie with a strawberry, pointy side up, to form the "hat."
-
Place a mini marshmallow or the cut half of a larger marshmallow at the base of the strawberry, on top of the frosting, to resemble the fluffy pom-pom of a Santa hat.
-
Repeat the process for each brownie until all are decorated.
-
Serve immediately or store in an airtight container in the refrigerator until ready to enjoy.
Nutrition Facts
Serving Size 16
- Amount Per Serving
- Calories 14kcal
Note
- This recipe can be easily modified using your favorite homemade brownie recipe instead of a box mix.
- To add variety, consider using different fruits or toppings for a unique twist.
- These brownies are a fun and festive way to enjoy holiday treats with family and friends!
- You can also use chocolate frosting instead of white for a different look.
- Have the kids help with the decorating for a fun holiday activity!

