

S’mores Cookie Bars are the ultimate campfire treat brought into your kitchen, blending all the nostalgia of toasting marshmallows with the convenience of a sheet pan. Chewy graham cracker cookie bars are studded with melted chocolate chips and gooey marshmallows, offering golden edges that give way to a soft, chewy center packed with graham cracker crumbs and pockets of melted chocolate. Whether you’re craving a no-fuss dessert for a weeknight gathering or just a sweet pick-me-up, these bars deliver all the fun of s’mores in every bite—no campfire required!
Key Ingredients
Before you dive in, gather these pantry staples that transform into gooey, chewy magic:
- 1 cup unsalted butter softened: Provides rich fat for a tender, melt-in-your-mouth texture.
- 1 cup granulated sugar: Sweetens the dough and helps achieve those golden edges.
- 1 cup packed brown sugar: Adds moisture and a hint of caramel flavor for chewiness.
- 2 large eggs: Bind everything together and give structure to the bars.
- 1 teaspoon vanilla extract: Enhances the overall sweetness and rounds out flavors.
- 3 cups all-purpose flour: The foundation that holds the dough in perfect cookie-bar form.
- 1 teaspoon baking soda: Leavening agent that gives a slight lift without turning them cakey.
- 1 teaspoon salt: Balances the sweetness and accentuates flavors.
- 1 cup graham cracker crumbs: Infuses that unmistakable s’mores crunch directly into the dough.
- 1 cup semisweet chocolate chips: Melts into gooey pockets of chocolate in every bite.
- 1 cup mini marshmallows: Creates the ooey-gooey top that makes these bars feel like campfire s’mores.
How To Make S’mores Cookie Bars
Now that your ingredients are ready, let’s walk through the simple steps to bring these bars to life. From creaming your butter and sugars to folding in those gooey marshmallows, each stage builds flavor and texture. Follow these instructions closely for perfectly baked, chewy S’mores Cookie Bars every time.
1. Preheat the oven to 350°F and line a 9×13-inch baking pan with parchment paper, leaving an overhang for easy removal.
2. In a large bowl, cream together the unsalted butter, granulated sugar, and brown sugar until the mixture is light and fluffy, about 3–4 minutes.
3. Beat in the eggs one at a time, ensuring each is fully incorporated before adding the next, then stir in the vanilla extract until smooth.
4. In a separate bowl, whisk together the all-purpose flour, baking soda, and salt to distribute the leavening and seasoning evenly.
5. Gradually add the dry ingredients to the wet ingredients, mixing on low speed until just combined—don’t overmix or the bars may become tough.
6. Fold in the graham cracker crumbs, semisweet chocolate chips, and mini marshmallows with a spatula, stirring gently to avoid deflating the dough.
7. Press the dough evenly into the prepared baking pan using your fingers or the back of a spatula, ensuring uniform thickness.
8. Bake for 20 to 25 minutes, or until the edges are golden and a toothpick inserted into the center comes out with a few moist crumbs clinging to it.
9. Allow the bars to cool completely in the pan before lifting out with the parchment overhang and cutting into neat squares.
Serving Suggestions
These S’mores Cookie Bars are a crowd-pleaser on their own, but here are some fun ways to elevate your presentation and flavor:
- Serve warm bars with a scoop of vanilla ice cream on the side for an indulgent contrast of hot and cold.
- Drizzle melted dark chocolate or caramel sauce over individual squares for an extra sweet flourish.
- Garnish with fresh strawberries or raspberries to add a bright, juicy note to each gooey bite.
- Pack them in lunchboxes or wrap in parchment for an on-the-go treat that won’t crumble under pressure.
Tips For Perfect S’mores Cookie Bars
A few simple tricks can take your bars from good to unforgettable. Keep these handy next time you bake:
- Make sure the dough is pressed evenly for uniform baking and clean cuts.
- If the marshmallows brown too quickly, loosely cover the pan with foil halfway through baking.
- Store cooled bars in an airtight container at room temperature for up to 3 days.
- For an extra gooey topping, gently press a few additional marshmallows onto the hot bars immediately after baking.
How To Store It
Keeping your S’mores Cookie Bars fresh is easy if you follow these storage tips. A little care goes a long way in preserving their chewy, gooey texture and flavor:
- Room temperature: Place cooled bars in an airtight container and store on the counter for up to 3 days.
- Single-layer packing: Arrange bars in a single layer or separate layers with parchment paper to prevent sticking.
- Short-term freeze: Wrap individual bars in plastic wrap, then foil; freeze for up to 1 month and thaw at room temperature.
- Avoid humidity: Keep them in a cool, dry spot away from direct sunlight or heat sources to maintain texture.
Frequently Asked Questions
Here are answers to some common questions about making these irresistible bars:
- How can I tell when the S’mores cookie bars are perfectly baked?
You’ll know they’re done when the edges turn a light golden brown and a toothpick inserted into the center comes out with just a few moist crumbs clinging to it. If the toothpick is wet with raw dough, give them another minute or two, but watch closely to prevent over-baking.
- What’s the best way to cut the bars into clean, neat squares?
Allow the bars to cool completely in the pan so they set up and the marshmallows firm slightly. Use the parchment overhang to lift the entire slab onto a cutting board, then press a sharp knife straight down in one motion—avoid a sawing motion—to create crisp edges and prevent the layers from sliding.
- How do I prevent the mini marshmallows from browning too quickly?
If you notice the marshmallows beginning to darken before the bar edges are golden, loosely tent the baking pan with a sheet of foil about halfway through the 20- to 25-minute bake time. This will reflect heat away from the top while allowing the cookie base to finish cooking.
- Can I make the marshmallow topping extra gooey after baking?
Yes. As soon as the bars come out of the oven, gently press a few additional mini marshmallows onto the warm surface. They’ll melt slightly from the residual heat, giving you that ultra-gooey finish without over-toasting.
- How should I store leftover S’mores cookie bars, and how long will they stay fresh?
Once cooled, arrange the bars in a single layer or separated by parchment in an airtight container at room temperature. They’ll stay soft and flavorful for up to three days. If you stack them, place parchment between layers to avoid sticking.
- Why do we fold graham cracker crumbs into the dough instead of sprinkling them on top?
Incorporating graham cracker crumbs directly into the dough ensures every bite has that signature s’mores crunch and flavor. If you sprinkled them only on top, you’d lose the even distribution that gives the cookie bars their classic texture and taste.
What Makes This Special
What really sets these S’mores Cookie Bars apart is that perfect balance of crisp, chewy, gooey, and melty—all in one square. The combination of buttery cookie dough, crunchy graham crumbs, pockets of semi-sweet chocolate, and soft, toasted marshmallows is pure nostalgia. Plus, the easy sheet-pan format means you can whip these up for any gathering without fuss. Go ahead, print this recipe and tuck it into your binder for future cravings, then drop a comment below if you gave it a whirl or have any questions before you bake!
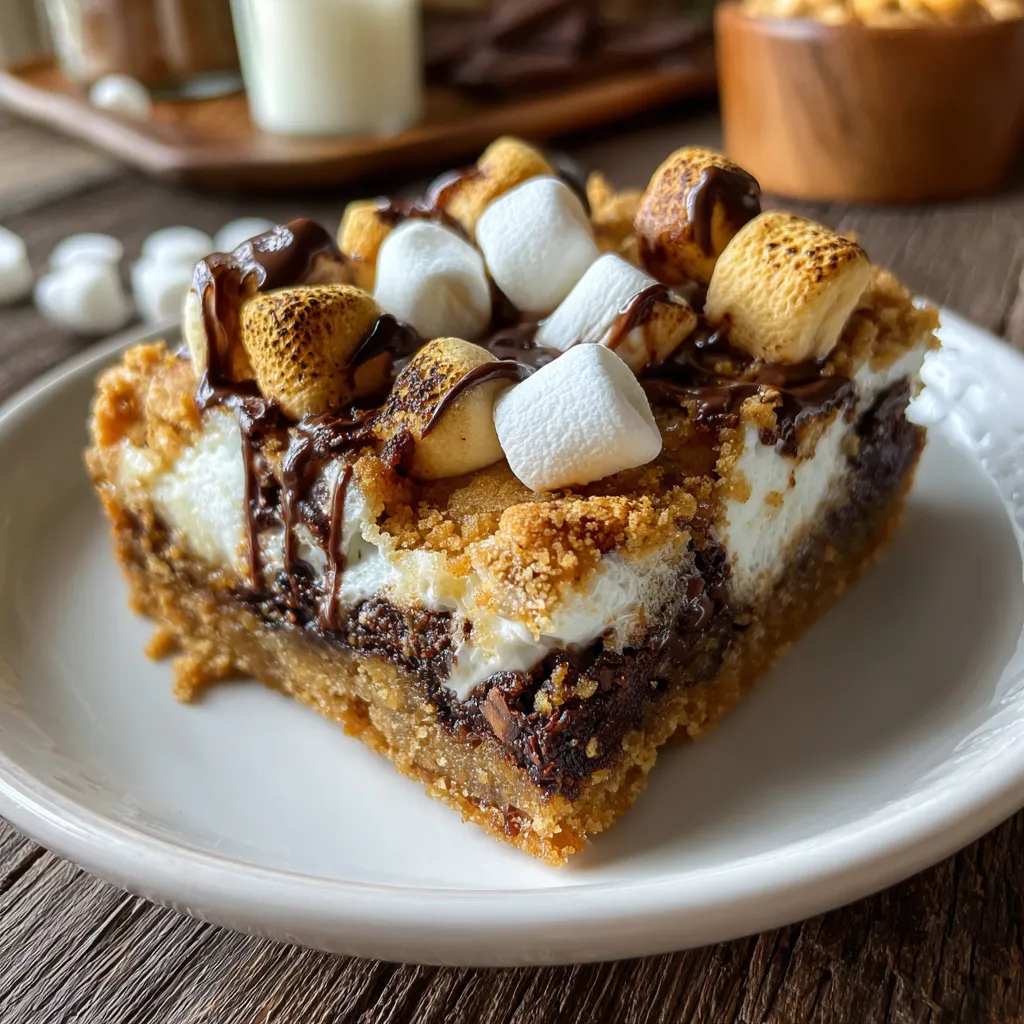

S’mores Cookie Bars
Description
Golden edges give way to a soft, chewy center packed with graham cracker crumbs, pockets of melted chocolate, and gooey marshmallows. Each bar offers a nostalgic, campfire-inspired treat in every bite.
Ingredients
Instructions
-
Preheat the oven to 350°F and line a 9x13-inch baking pan with parchment paper, leaving an overhang for easy removal.
-
In a large bowl, cream together the unsalted butter, granulated sugar, and brown sugar until light and fluffy.
-
Beat in the eggs one at a time, then stir in the vanilla extract until well combined.
-
In a separate bowl, whisk together the all-purpose flour, baking soda, and salt.
-
Gradually add the dry ingredients to the wet ingredients, mixing until just combined.
-
Fold in the graham cracker crumbs, semisweet chocolate chips, and mini marshmallows until evenly distributed.
-
Press the dough evenly into the prepared baking pan.
-
Bake for 20 to 25 minutes, or until the edges are golden and a toothpick inserted into the center comes out with a few moist crumbs.
-
Allow the bars to cool completely in the pan before lifting out with the parchment overhang and cutting into squares.
Nutrition Facts
Serving Size 16
- Amount Per Serving
- Calories 24kcal
Note
- Make sure the dough is pressed evenly for uniform baking and clean cuts.
- If the marshmallows brown too quickly, loosely cover the pan with foil halfway through baking.
- Store cooled bars in an airtight container at room temperature for up to 3 days.
- For an extra gooey topping, gently press a few additional marshmallows onto the hot bars immediately after baking.

