

When you’re craving something outrageously indulgent but don’t want to spend hours in the kitchen, Peanut Butter Cup Dump Cake is your new best friend. This dessert recipe brings together the sweet nostalgia of peanut butter cups with the deep, rich notes of chocolate cake, all in one crazy-simple package. With minimal prep, you literally “dump” the mix, sprinkle on peanut butter chips and halved mini peanut butter cups, and top it with melted butter for that signature almost-caramelized crust. Before you know it, your oven is baking a cake that’s glossy, gooey, and lip-smacking in every bite. Whether you’re a peanut butter aficionado or simply someone who loves an easy baking win, this beginner-friendly treat delivers on flavor, texture, and pure satisfaction.
In just 10 minutes of prep time, 30 minutes in the oven, and a quick 10-minute rest, you’ll knock out 12 servings of pure joy—about 350 calories each, if you’re counting. It’s the kind of dessert course that’s perfect for casual family nights, potlucks with friends, or whenever a chocolate-peanut butter craving strikes. I still remember the first time I whipped this together: my kids hovered around the kitchen like moths to a flame, begging to taste every spoonful of batter (don’t worry, they eventually got their slice). And oh, the way it pairs with a scoop of cold vanilla ice cream or a dollop of airy whipped cream—it’s almost too good to be true. Ready to dive in? You’re in for one ridiculously easy, insanely delicious ride!
KEY INGREDIENTS IN PEANUT BUTTER CUP DUMP CAKE
Let’s break down what makes this dump cake so irresistible. Each ingredient has its starring moment, from building the base of the chocolate cake to creating pockets of melty peanut butter bliss. Understanding these components will help you appreciate every gooey bite and maybe even inspire some fun swaps of your own!
- Chocolate cake mix
A boxed chocolate cake mix forms the fluffy yet rich foundation of this dessert. It streamlines the process by bringing in pre-measured flour, cocoa, leaveners, and sugar—so you get a reliable crumb with just a few added wet ingredients.
- Peanut butter chips
Mini nuggets of sweet, creamy candy that soften and spread throughout the cake as it bakes. They create delightful pockets of nutty sweetness, balancing the deep cocoa flavor and adding an extra dimension to each slice.
- Mini peanut butter cups
Halved peanut butter cups pack in a double hit of chocolate and peanut butter. As they melt, they form little islands of luscious filling, making every forkful a surprise treat. Feel free to mix in other candies if you’re feeling adventurous!
- Unsalted butter
Drizzled in melted form across the top, butter ensures the entire surface develops a golden, almost toffee-like crust. Using unsalted allows you to control the sodium level and keep the focus on pure, buttery flavor.
- Eggs
Eggs lend structure, moisture, and richness to the dump cake. When beaten into the cake mix and milk, they help create a tender crumb that’s neither too dry nor too dense.
- Milk
Milk brings the batter together and keeps it smooth and pourable. It hydrates the cake mix, ensures even baking, and contributes to that irresistible, soft texture.
- Optional toppings
Vanilla ice cream or whipped cream serve as the perfect cool, airy contrast to the warm, gooey cake. They enhance the overall dessert experience without stealing the spotlight from the peanut butter chocolate magic.
HOW TO MAKE PEANUT BUTTER CUP DUMP CAKE
Ready to bring this sensational dump cake to life? Below you’ll find a step-by-step guide covering each stage, from preheating the oven to serving a warm, decadent slice. Follow these instructions carefully, and you’ll nail that spot-on texture every time.
1. Preheat your oven to 350°F (175°C).
Ensure the oven rack is centered so the cake bakes evenly. Give the oven at least 10 minutes to reach the right temperature before sliding in the pan.
2. Lightly grease a 9×13-inch baking pan with non-stick spray or butter.
Coat every corner and edge to prevent sticking. I like to use a pastry brush and unsalted butter for an extra touch of richness.
3. In a large mixing bowl, combine the cake mix, eggs, and milk.
Stir until just combined to avoid overmixing. Overworking the batter can lead to a tough crumb, so mix gently until no dry streaks remain.
4. Pour the batter evenly into the prepared baking pan.
Smooth the top with a spatula so the cake rises uniformly. An even layer ensures consistent pockets of gooey goodness.
5. Sprinkle the peanut butter chips and halved mini peanut butter cups evenly over the batter.
Distribute them well so each serving gets its share of melty peanut butter nuggets and chocolate-peanut islands.
6. Drizzle the melted butter evenly over the top, ensuring it is spread across the entire surface.
This step creates the dump cake’s signature crisp, buttery crust. Use a spoon or small ladle to distribute the butter without pooling.
7. Bake in the preheated oven for 25–30 minutes, or until a toothpick inserted into the center comes out clean.
Keep an eye on the edges—they should be deep golden brown, while the center remains soft and slightly moist.
8. Remove from oven and let it cool for at least 10 minutes before serving.
Allowing the cake to rest helps it set up, making it easier to cut clean slices and ensuring the filling doesn’t run everywhere.
9. Serve warm with a scoop of vanilla ice cream or a dollop of whipped cream for an extra decadent treat.
The contrast between cold cream and hot, melting chocolate-peanut butter is absolute bliss.
SERVING SUGGESTIONS FOR PEANUT BUTTER CUP DUMP CAKE
This gooey masterpiece is delightful all on its own, but there are countless ways to elevate each serving. Whether you’re hosting a casual movie night, celebrating a birthday, or simply craving a midnight snack, the right finishing touches can take your dump cake from great to unforgettable. Here are four ideas to spark your creativity:
- Classic ice cream pairing
Top each warm slice with a generous scoop of creamy vanilla ice cream. The temperature contrast highlights the rich chocolate-peanut notes, while the smooth texture of the ice cream balances the cake’s buttery crust.
- Drizzle with salted caramel
For a sweet-salty twist, warm up some salted caramel sauce and swirl it over the top. The caramel’s golden sweetness and hint of sea salt make every bite even more indulgent and layered in flavor.
- Add fresh berries
Bring in a pop of brightness by garnishing with fresh raspberries or strawberries. Their slight acidity cuts through the richness, and the vibrant color adds a stunning presentation-worthy touch.
- Sprinkle chopped peanuts
Elevate the crunch factor by scattering roasted, chopped peanuts on top. This adds texture variation and amps up the peanut flavor, making it especially appealing for true peanut butter lovers.
HOW TO STORE PEANUT BUTTER CUP DUMP CAKE
Leftover dump cake isn’t just acceptable—it’s practically a reward for having made something so tasty! To keep those gooey layers fresh and flavorful, proper storage is key. Whether you’re stashing away individual slices or saving a whole pan, these simple methods will ensure your dessert stays delightful for days.
- Room temperature, covered
Let the cake cool completely, then cover the pan tightly with plastic wrap or aluminum foil. Store at room temperature for up to 48 hours, keeping the crust tender and the filling soft.
- Refrigerator, sealed
For longer life (up to 3 days), press plastic wrap directly onto the cake surface or transfer slices into an airtight container. Chilled cake firms up slightly, so let it come back to room temperature or warm individual portions in the microwave for 10–15 seconds.
- Freezer, double-wrapped
If you want to save cake for a couple of weeks, wrap cooled slices first in plastic wrap, then in foil, or use heavy-duty freezer bags. Thaw overnight in the refrigerator before reheating gently in the oven or microwave.
- Individual portions
Slice the cooled cake into individual servings and store each in mini containers. This grab-and-go approach means you can warm just one piece at a time, preventing the urge to reheat the entire pan!
CONCLUSION
What started as a box of cake mix has transformed into a luscious, peanut butter-studded masterpiece that proves you don’t need fancy techniques to yield a show-stopping dessert. From the ease of “dumping” ingredients into a pan to that moment when melted peanut butter chips peek through a crisp, buttery crust, this Peanut Butter Cup Dump Cake is the epitome of easy baking done right. In about 10 minutes of prep and a half-hour in the oven, you’ll enjoy 12 generous servings of pure, chocolate-peanut heaven—each clocking in at around 350 calories. The recipe’s blend of nostalgia and simplicity makes it perfect for both seasoned home cooks and beginners alike, ensuring that every bite is packed with gooey chocolate cake, creamy peanut butter chips, and melty mini peanut butter cups.
Feel free to print this article and save it for later—you can easily tuck it into your binder or pin it to your kitchen board for those times when a sudden dessert emergency arises! Below, you’ll also find an FAQ section to answer any last-minute questions you might have about ingredient swaps, baking tips, or storage hacks. If you give this peanut butter cup dump cake a try, I’d love to hear how it turns out: leave a comment, share your tweaks, or ask any questions if you need help. Happy baking, and may your kitchen always be filled with rich, gooey goodness!
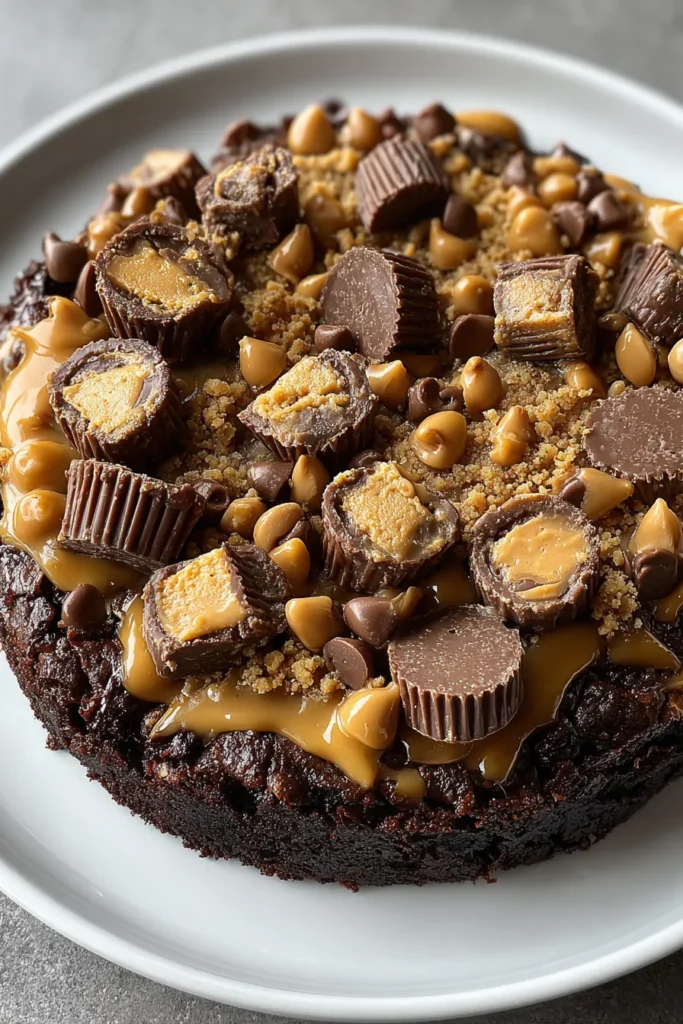

Peanut Butter Cup Dump Cake
Description
Dive into layers of decadent chocolate cake studded with melty peanut butter chips and mini peanut butter cups, all topped with a buttery finish. A true delight for peanut butter lovers!
Ingredients
Instructions
-
Preheat your oven to 350°F (175°C).
-
Lightly grease a 9x13-inch baking pan with non-stick spray or butter.
-
In a large mixing bowl, combine the cake mix, eggs, and milk. Stir until just combined to avoid overmixing.
-
Pour the batter evenly into the prepared baking pan.
-
Sprinkle the peanut butter chips and halved mini peanut butter cups evenly over the batter.
-
Drizzle the melted butter evenly over the top, ensuring it is spread across the entire surface.
-
Bake in the preheated oven for 25-30 minutes, or until a toothpick inserted into the center comes out clean.
-
Remove from oven and let it cool for at least 10 minutes before serving.
-
Serve warm with a scoop of vanilla ice cream or a dollop of whipped cream for an extra decadent treat.
Nutrition Facts
Serving Size 12
- Amount Per Serving
- Calories 29kcal
Note
- Feel free to substitute any similar candy if you prefer a different flavor.
- You can add chopped peanuts for extra crunch.
- This dessert is best when served warm for optimal ooey-gooeyness.
- Store leftovers in an airtight container for up to 3 days.
- Reheat leftovers in the microwave for a quick sweet snack.

